Sunday, August 21, 2011

Michigan Fiber Festival 2011


So I went out to the MI fiber fest today and had an amazing time! We had really nice weather for it, not to hot and breezy.

I scored some mill end yarns. the bright pink one is a hand dyed and was only $8 and the cone was only $6 ( it's cotton).


And here are some photos I took from the barns and booths


I love this photo!

They had a costume parade which was really cute!


Saturday, August 13, 2011

How to make a hat... any hat... any craft

Hat's are easy to make and quite fast to work up. You don't need a pattern to make a nice hat. These tips will work to help you make a hat out of what ever craft you choose be it knitting, crochet, nalbinding or what ever... it all works the same.

Now this method does tend to a bit of frogging some times to get it right but if you start at the bottom and work your way up this is minimal. With knitted hats you may like to see what your gauge is via a swatch but it's not necessary. For my knitted hats worked in standard worsted yarn on about size 7 needles I cast on about 70 - 80 stitches.

To make a hat you just make a strip long enough to fit generously around the head. It is common for this strip to snug up as you work into it on the next round which is why you don't want to make it just snug enough to fit or it may become to tight.

Work in the round how ever you like (joining each round, working in a spiral) untill the hat is long enough for your taste. you can make it a roll brim or a beanie style, it's up to you. when the hat has cleared your ears and is to the point you think it should start to round off for the top you can reduce it.

For a long time i reduced all my hats on 4 evenly spaced corners (I did this for knitting and crochet) and just kept reducing until the opening was not much more than an inch and i would run my yarn through the stitches and cinch it closed.

You can also reduce every 10 stitches for a more rounded top. If knitting reduce every other row.

you can use any stitch pattern your want to make your hats. Plain, ribbing, cables, single crochet, double or any combination you desire... it's entirely up to you. Make it out of what ever makes you comfortable.

to reduce you generally either knit 2 together, you put your hook into 2 stitches at the same time or put your hook into one draw up a loop and into the next and draw up a loop than draw a loop through all the loops on your hook, or put your needle into 2 stitches at the same time. How ever you do it, you are turning 2 stitches into 1. If using this for nalbinding I would suggest making more drastic decreases as the rows are so tall yet the stitches are close together so it will take more reducing, I'll work 4 stitches together by putting my needle into the next 4 stitches before completing the stitch.

Tuesday, August 9, 2011

Nalbinding hat

So I've learned me a new craft... nalbinding! I don't really have time right now to post in detail about what it is exactly but it's a very old craft which predates knitting and crochet. I believe it was used in the Viking era and probably even before. It uses wool yarn and a needle to create interlocked loops of yarn. You break the yarn into workable lengths (I'm using 2 fathoms) and than spit splice them together as you run low.

the craft is so old that there is not a clear translation of how to spell it. Nalbinding is one way of a few to spell it. I am using a big fat yarn needle.

This will be a hat.

The videos I used to learn this are right handed videos and he worked with his needle in his right hand. I am working with my needle in my left hand.


Sunday, August 7, 2011

A great easy scarf pattern!


So I was rummaging through my stash last night and found this skein of green/purple camo yarn I forgot I had. Wanted to make something out of it but I knew it had to be able to be made with 1 skein as i know I would not be able to match this after so long. So I made this drop stitch scarf.

this is a easy, fast and fun knit. A great pattern if you have that 1 skein of variegated yarn you just don't know what to do with. I knit mine on size 10 needles.

I crochet up a swatch in this yarn using my brick stitch scarf pattern and it really was pretty but I just couldn't crochet this in just one skein so I used this pattern instead.

the drop stitch scarf pattern is not mine but it's a really nice pattern!

Ravelry pattern page

PDF pattern file

Saturday, August 6, 2011

Different types of color work in knitting

So I thought it would be nice to do a post about the different types of color work used in knitting.

Most common I think is stranded color work. Fair Isle is a form of stranded color work but not all stranded color work is Fair Isle.

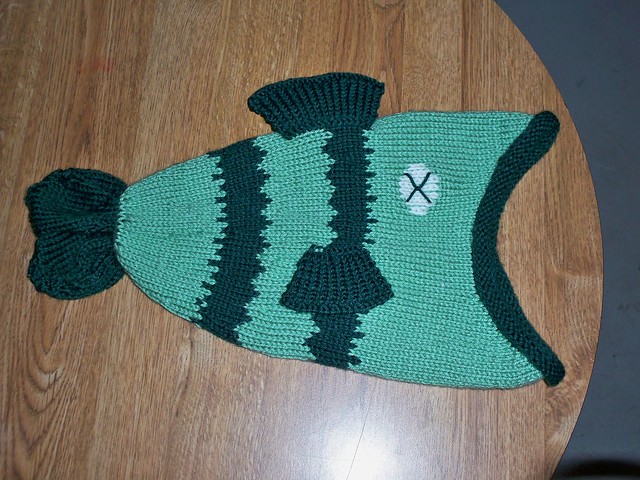
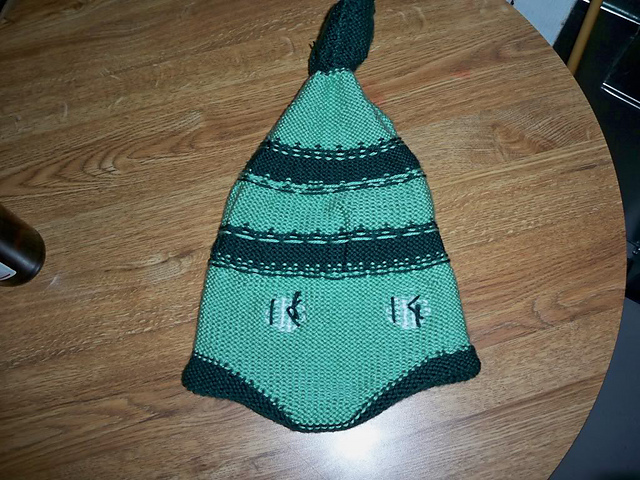
Stranded color work is the simple process of working multiple colors in 1 row and carrying the one not used along the back. If the strand is to be carried for more than a few stitches it should be tacked up as you knit along the back to reduce the chance of long floats being snagged. I used stranded color work when I worked my Dead fish hat.


The eyes on the hat are worked in a duplicate stitch. This is a way to add color to a finished project. Instead of knitting the color as you work it you thread a yarn needle and trace the stitches with the new color to add a layer of color on top.

Fair Isle is a more intricate form of color work which has a rich history in origins and design. Only 2 colors are used in any given row but one color is switched out after only a couple rows. Fair isle is traditionally worked in the round and than the knitting is cut to create openings for sweaters and front openings. It must be steeked as a prep to cutting the yarn to prevent it from unraveling.

This is an example of traditional Fair Isle


Intarsia is a form of color worked used to add large blocks of color to a solid background. This technique does not require carrying your yarn on the back of the project. The different colors are held on bobbins and hang from the project when not being used. To transition between the 2 you must wrap your colors around each other to make the knitting flawless.

Here is a good example of intarsia


the technique used to create intarsia is not limited to adding blocks of color to a project but can be used to add borders of diffrent colors while you knit.

Slip stitch is another technique which you do not carry any colors and only work one color per row. For slip stitch designs you slip the opposing color which pulls it over the background color. This is an afghan I am making that uses slip stitch. It is worked in 6 rows of color worked in stockinette separated by 4 rows of garter (which is the gray). I slip 2 stitches while I knit the color portions and than I connect it with the gray when I knit my next band of gray which pulls the gray over the colored background.

Also I have added an edging on this in gray which is 4 stitches wide on either side. to do this I use the intarsia technique and use a bobbin to hold my gray yarn for the opposite side so this blanket has 3 strands of yarn coming off of it but only one is worked at any given time (I carry the unused strands up the edges between the color and the gray). the back just has colored bands and you cannot see the front pattern on the back.

When this photo was taken I was about 1/2 way through a band of color and you can see how the 2 gray stitches are slipped and starts to pull up. This is a stitch pattern found in the book A Treasury of Knitting Patterns

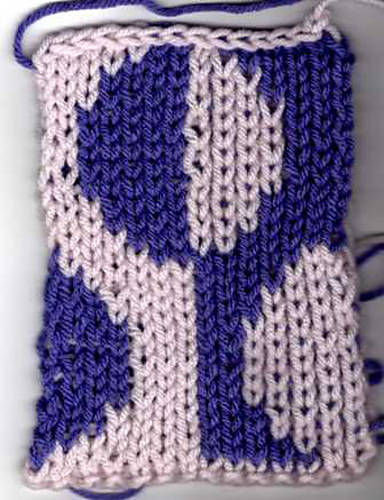
Double knitting is a technique that has you knitting 2 sides at 1 time. both sides are the right side. Often double knit designs provide a negative image on either side of the opposing side. Double knitting also can be used to create 2 completely different designs on either side of the fabric. Here is a sample I did of a double knit swatch. this was my 1st double knit so the stitches are a bit wonky. This is a pattern I pulled out of the reversible knitting book

If this was done in the more standard version of double knitting the reverse side of the spots would be a negative image of what you see here.

This more advanced form of double knitting requires you to use circular needles and you have to slide your work back and make 2 passes for each side before turning your work.

this is side A
and this is side B

Friday, July 29, 2011

Book: A treasury of knitting patterns

Book: A Treasury of Knitting Patterns by: Barbara G. Walker

A truly indispensable book for any knitter! And a fixture on many a knitters book shelf already. It does not give much in the way of instructions and ho-to's but this book contains over 500 stitch patterns to get your creative juices flowing! All patterns are in written form

The section in the book on color work is almost entirely about slip stitch color work which I think is really nice for blankets because you don't have yarn trailing across the back of your work.

All the photos in the book are in black and white. Each stitch pattern has it's own photo and many of them show variations of each stitch pattern as well.

I enjoy simply sitting down and browsing though this book over and over. I can't wait till I get the rest of her collection for my knitting library.

If you are looking for a bare bones dictionary without all the how-to's and pages of diagrams this is it!

This was originally published in 1968.

This book is available at Amazon

Book: Reversible Kniting

Book: Reversible Knitting - 50 Brand-new, Groundbreaking stitch patterns.


I purchased this book while browsing the shelf at our local book store and couldn't pass it up! This is an amazing book. the stitch patterns are not simply reversible but often provide completely different looks on both sides of the fabric. I have made the one run socks (I call them my strapy socks) and worked one of the DK patterns.

The book is broken up into 3 main sections.

Reversible stitch patterns:

Faux crochet - (9 stitches) these are actually quite impressive in their simulation of crochet and at some points it basically is crochet with a knitting needle.

Rows within rows
- (6 stitches) these require you to knit off into completely different directions and return to the body of the project.

Openwork - (7 stitches) stitches with open spaces or a rather lacy feel to them

Divide & Combine - (6 stitches) these are patterns that require you to divide your stitches and knit separately before rejoining into the main body.

Picked up - (6 stitches) these require you to either pick up stitches for joining or to knit off the fabric that has already been knitted.

Double knit - (6 stitch patterns) These are not your standard DK designs. These patterns offer completely different designs on opposite sides of the fabric like stripes on one side and dots on the other for one example. Very easy to follow charts

Reversible designs:

20 different designs

folded scarf
branching ribs (upper left back cover)

two-tone vest
investments (a vest)
double knit vest
geometric dress (a slip stitch pattern)
folded mini dress (this has a folded ripple like design on the skirt portion)
Double wrap stockings (a thigh high stocking with a net and strip design)
Winding path (a sweater that can be worn upside down and inside out)
faux warp (clever sweater with reversible cables)
Syncopation (a brioche headband)
laced wrap
incognita (a brimmed hat pattern with attached scarf)
reverse me ( a cardigan that can be worn upside down or inside out with reversible cables) pictured on the front cover
lice jacket (a traditional style DK jacket with a reverse image on either side)
Brioche bag
Flip your lid - pictured on back cover
tie socks (these tie around your legs)
one run socks - picture on back cover
linking hip sash (a decorative tie belt)

Special techniques:

This section has detailed photos for the techniques used in this book. Covers various cast on's (including 2 color), Kitchener plus (how to Kitchener ribbing and seed stitch) and other assorted techniques.

For the most part these use advanced knitting techniques and several require multiple sets of needles for the same project.

I would like to note though that if you are left handed and knit left handed this book may take a bit of brain power to flip around as it refers to left and right needles almost exclusively rather than using the term "working needle"

This book can be purchased on amazon


Sunday, July 24, 2011

Is your square crochet slanting?

One of the most common problems for people when they start crocheting is loosing stitches on the edges. This is really easy to do (honestly no matter what your skill level is) because the turning chain kind of gets lost and does not look like a stitch when you return to that spot. Some patterns are particularry hard to identify where the turning stitch is.

I made this swatch to help someone else on this issue. The swatch is made from SC clusters which can be found in this sweater pattern Twila. for this one you chain 1 at the end and 2 at the start of the next row (so chain 3) this chain get's lost though once you start to work into the stitches.

To make sure you won't be loosing stitches, no matter what the pattern, you will need 2 markers. I often prefer paperclips (or piece of contrasting waste yarn works fine as well). Place your marker in your top chain you just made before you start to work your row. When you get to the end of the row you will place your hook into the stitch which you placed your marker in the beginning of the previous row and than remove the marker, chain up and place the marker back into the last chain of your turning chain.

Repeat these steps and you will be sure to not loose stitches on your edges due to not seeing the turning chain.

This works for any stitch pattern, even if you are doing plain single crochet of double crochet.

Saturday, July 23, 2011

crochet shawl - pattern wip


Just thought I would post this. I'm working on a shawl pattern that will be quite simple. I think Iw will have the corners wrap around rather than be a traditional triangle. More V shaped.

I'm crocheting it with an I hook and using Ultra Alpaca yarn

I make no promises but if all goes well I should be able to write this one up after a while.

Knitting vs. Crochet

This is not your crochet bashing knitting or knitting bashing crochet but my views on both crafts as compared side to side.

Knitting vs. crochet

I love them both. I have been crocheting for nearly 13 years now and knitting a few as well. I am self taught for each. I conciser my self equally good at both crafts. I also conciser my self to be quite good and write patterns for both crafts.

crochet plays on the beauty of the individual stitch to were knitting plays on the flow of the fabric over all as the columns of stitch flow in, out and around each other to create patterns.

Crochet is sturdier than knitting as in you are not going to snag a run in crochet. This makes knitting a more delicate fabric (I’m not speaking of the design just the care). Knitting needs to be handled more gently than crochet at times.

Crochet is easier to shape on the fly. you can see what your fabric is doing instantly. Knitting takes a few rows to “see” what is going on.

Crochet is easier to design IMO because you can see what is going on. Knitting deals w/more math with your increases, decreases and keeping your stitch count the same. You gotta figure if you are designing in knitting and you add a YO you need to figure out where you are going to take that stitch out.

both crafts have worthy application for similar items. you can make some really nice crochet sweaters and of course knit as well. Some say knitting is for clothing but really it’s all a matter of personal preference.

both can be felted and anything you make with one can be made in the other

as we all know, crochet is faster in general but uses more yarn so using the same yarn and needle/hook size your crochet fabric will be heavier than your knit. Crochet is not faster when you get down to the tiny needles and some lace projects like filet but in general it is faster. Similar projects to filet that are knit use YO's instead of individual chain stitches and that can take longer.

I don’t much prefer one over the other I enjoy them equally for everything I make.

Though I do havea couple exceptions… I do prefer crochet lace for when I do 3D and stiffened items like my angle and snowflake tree toppers. I also prefer crochet for my kitchen wares and hair accessories.

Oh, about the colorway though, crochet color work creates a reversible fabric as the running strands are concealed under the stitches, to where standard knitting color work (aka. fair isle) does not. All the floats are on the back as knitting has a distinct front and back. Double knitting, how ever, does create a reversible fabric but generally a mirrored image or different image on opposing sides. Crochet color work creates the same image on both sides.

And that is my assessment of knitting vs. crochet

Tuesday, July 5, 2011

Pantie liner


OK, so here's something a bit different. I know this isn't for everyone but If I am seeking something like this I can't be that unique that nobody else would also like it.

I'm all about natural stuff and I have been using a menstrual cup for over 5 years now. the thing is I still use pantie liners and have been toying for a while about a way to make my own. I did have some flannel ones but they would scrunch up in uncomfortable ways. I recently tried one in seed stitch and it was just to thin and flimsy.

this is the design I settled on. it's a 1x1 rib so thicker and more stable. I like mine a bit wide. This is rather the formula I used to create one so adjust as you desire. for a general guideline I took one of my liners of my fave brand and used that as a visual adjusting size as I saw fit.

This is not designed to replace a pad as it's not thick enough for such use. But it is a nice substitute for a every day pantie liner.


needle: us 5
yarn: Hobby Lobby's "I Love This Cotton!" This is a VERY soft 100% cotton and feels nice against the skin. I t is a sport type weight.

I like to slip one stitch on my edges, It helps to keep things looking neat.

I suggest making 1 and using it and washing it to see where you may want to customize this more to your liking. Also I suggest making it just a tad wider than what you think is good. they do compress a bit when you wear them.

for the increases just either make one knit or make one purl. I prefer to do this at the end of the row but I like to set it up with a YO at the beginning of the row which makes it easier to twist the stitch when you do your m1. Being a 1x1 rib if you want to set up with a YO you will have to do either a yo front or yo bak depending on weather you have a knit stitch or a purl stitch following the yo.

For mine I cast on 15 stitches.

(always knit the 1st stitch).
row 1: k1, p1 to last stitch, slip last stitch with yarn in front
row 2: k1, yo, work the k1, p1 rib to last stitch and slip last stitch wyif
row 3: k1, yo, work rib to yo, use the yo to either make one knit or make one purl by twisting the yo as you stitch into it, slip last stitch wyif.

repeat row 3 till it is of the desired width. (I increased till I had 21 stitches.)

work a few rows in the k1, p1 rib till top is desired length and you feel it's time to start to reduce. (I worked 7 rows before reducing)

To reduce: k1, work ribbing to last 3 stitches. either k2tog or p2 tog on next 2 stitches, slip last stitch wyif

Repeat reducing row until narrow enough to fit. (I reduced to 10 stitches)

Work k1, p1 rib till the center is of desired length (I worked this for about 10 rows)

Work increasing row 3 for a few rows till bottom is of desired width (I increased to 13 stitches)

work 1x1 rib for a couple rows (I worked for 3 rows).

Reduce again following same formula in row 3 till you have about 6 stitches. bind off.

Of course customize this shape for best fit and comfort.

In short: cast on about 15 stitches, increase till top is desired width, knit till top is desired length, reduce till narrow enough to fit, knit till desired length. increase a little for the bottom and decrease and bind off.

Friday, June 24, 2011

Gail in the Round

It's not to often I make more than 1 of a pattern, let alone 3. But I have just finished my 3rd Gail pattern. But this one is not a shwl but a blanket/throw instead. I knit it in the round so essentally it's the pattern repeated 2x. To start it I cast on 8 stitches. Being that it was going to be a blanket I wanted the corners to be more stable than what the double YO provides so 4 of the cast on stitches were inserted to be between the YO's on what would be the center points of the shawl, the other 4 stitches cast on were to start the pattern. I worked the pattern chart every other row and did plain knit every other row. When it came to doing the edging I did plain stockinette and increased on either side of teh final leaf points by doing a after though YO (aka knitting into the running strand w/o twisting it) and worked those spaces as plain stockinette. the afterthought YO creates an open space but not as large of one as a regular YO woul give.

I did keep to the pattern for the corners and made those into points so that the blanket would be square on the corners. I finished up by doing 2 garter ridges and binding off.

If you are thinking you may want to knit a light weight throw conciser a shawl pattern in the round but knit in worsted yarn. This will be going to my Mom in Arizona so I didn't want a heavy blanket but still wanted to knit her something.

These photos are really poor quality, but you can get the idea of what I did. I used Bernat value yarn for this and about 4 skeins I believe.

Being that this is worked in worsted weight yarn it only took 3 pattern repeats to complete before adding the final repeat which contained the edging.


Friday, June 17, 2011

Peaches & Creme HUGE SALE!!!!

P&C is having a HUGE sale right now. 50%-70% off balls and full cones of yarn.

Just had to pass this info on incise anyone is interested. Peaches & Creme is the yarn I love to use for my hair accessories and all my kitchenware.

The sale is going for a total of 10 days and ends 6-25-11

Peaches & Creme website

Thursday, June 9, 2011

Lacy shells headband


Yarn: Hobby Lobby's "I Love This Cotton!" (Band info: medium, 4 ply, 100% cotton)
Hook size: G (4mm, UK 8) & H (5mm, UK 6)

Stitches used (US):
ss - slip stitch
ch - chain
sc - single crochet
dc - double crochet

Special stitches:
Beginning shell (beg shell) : ch3, 2dc, ch2, 3dc
shell: 3dc, ch2, 3dc
double shell (dbl shell) : ch3, 2dc, ch2, 3dc, ch2 3dc

This head band works up really fast and uses less than one skein of yarn. It is worked in 2 parts and seamed together.

Tie: With H hook chain 26. Switch to G hook and SC in 2nd chain from hook and each chain space to beginning chain, ch3, ss in same st as last sc made, ch1 turn

Row1: ss in ch3 sp, beg shell in same sp, ch1, turn

row 2: ss in next 2 dc and ch2 sp, beg shell in same sp, ch1, turn

row 3: repeat row 2

row 4: ss in next 2 dc and ch2 sp, dbl shell in same sp, ch1 turn

row 5: ss in next 2 dc and ch2 sp, beg shell in same sp, shell in next ch2 sp, ch1, turn

row 6: ss in next 2 dc and ch2 sp, beg shell in same sp, ch2, shell in next ch2 sp, ch1, turn

row 7: ss in next 2 dc and ch2 sp, beg shell in same sp, ch2, dc in last dc of shell, ch2, dc in 1st dc of next shell, ch2, shell in next ch2 sp, ch1 turn

row 8: ss in next 2 dc and ch2 sp, beg shell in same sp, ch2, dc in last dc of shell, (ch2, dc in next dc) 3 times, ch2, shell in next ch2 sp, ch1, turn

row 9: ss in next 2 dc and ch2 sp, beg shell in same sp, ch2,skip next ch2 sp, (dc in next dc, ch2) 4 times, shell in next ch2 sp, break yarn and fasten off and set aside.

Make 2nd piece the same except do not fasten off at the end or row 9

Joining: On 2nd half after row 9 - ch1, turn, ss in next 2 dc. Cut yarn leaving a long enough tail to be able to sew halves together and pull tail through last stitch.

Thread tail onto yarn needle and holding halves together whip stitch across stitch for stitch starting at ch 2 spaces of 1st shell and ending at the last ch2 space of last shell. weave in ends and finish off. When whip stitching the chain spaces go into the stitches rather than around the chains.

This pattern is available as a PDF file

Monday, May 9, 2011

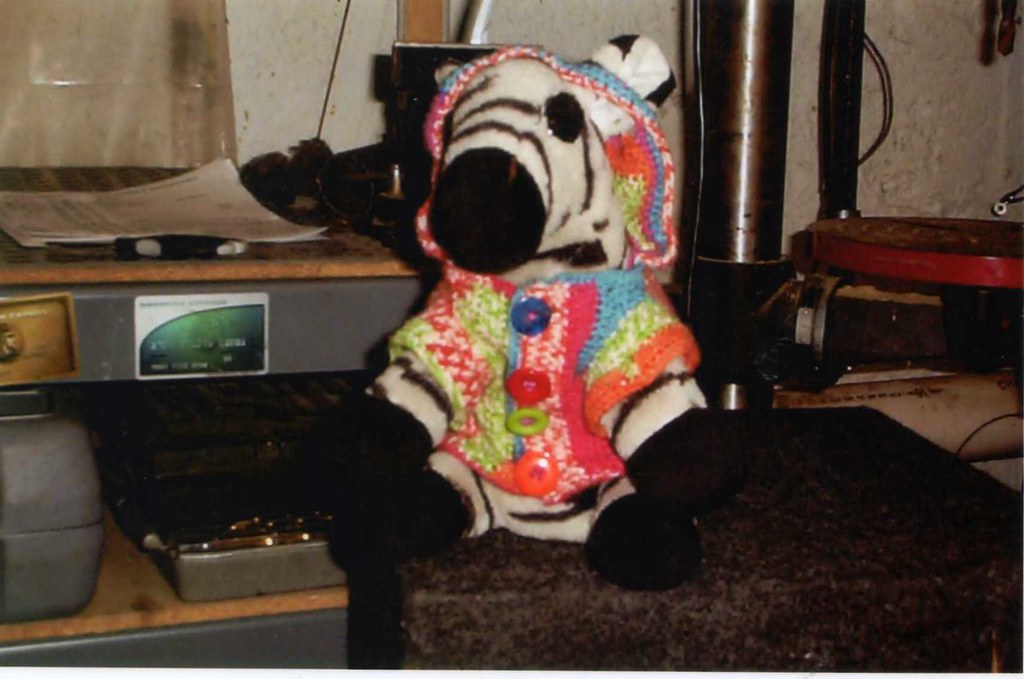
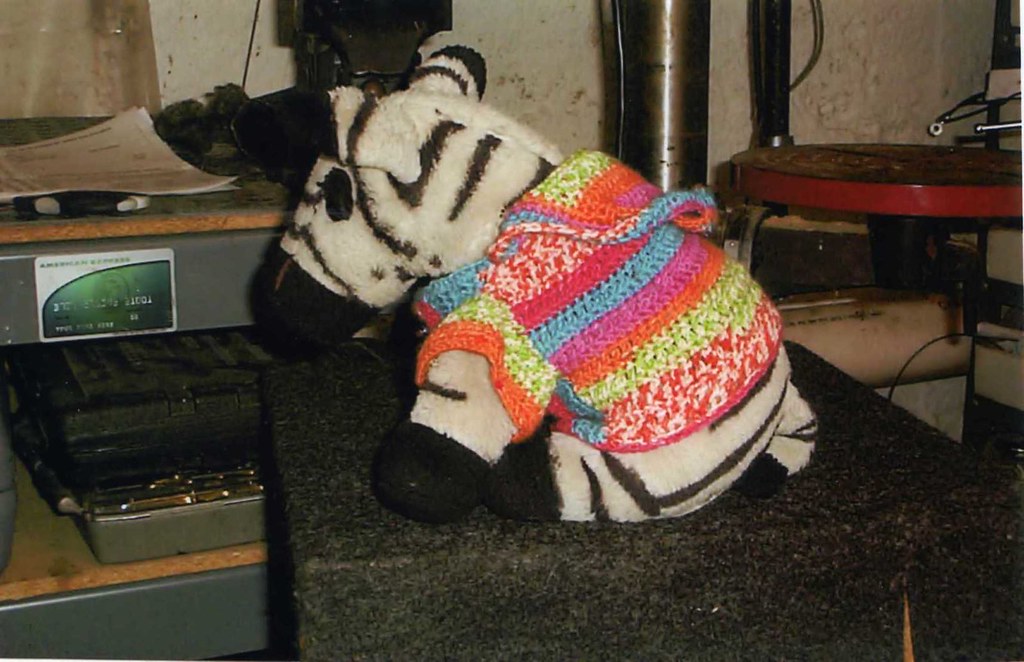
Zebra gets a hoodie!

Robert has been asking me to make his zebra a new sweater. I finally got around to it. He raided my stash looking for my colorful yarn and found this self striping sock yarn.

I crochet it with my #1 steel hook and the whole thing is done entirely in alternating rows of DC and SC. The back is worked back and forth all the way up to the top of the head shaped to fit behind the ears. the front of the hoodie is worked back and forth leaving holes for the ears to poke through. the front of the sweater is crochet directly onto the back leaving about 4 rows unworked which became arm holes. the arms were done last.

Wednesday, May 4, 2011

How I make my grannie squares

This is the method I have come up with to create a granny square that I find most appealing as far as the seam that shows up and other things.

ch4, join with a slip stitch to 1st chain.

round 1: Insert hook into ring yo and and draw up a loop, yo and draw through 2 loops on hook, chain 2, 2dc in ring, ch2, (3dc, ch2) in ring 3 times. join with slip stitch to top of 1st chain 2.

round 2: insert hook into last ch2 space made, yo and draw up a loop, yo and draw through 2 loops on hook, ch2. (3dc, ch2, 3dc) in next corner ch 2 space repeat * to * 3 times total. In last ch2 corner space work: 3dc, ch2, 2dc join with slip stitch to top of 1st chain 2 or round (this makes your chain up the last DC in the round)

round 3: insert hook into space where you just joined, yo, draw up a loop, yo, draw through 2 loops on hook, ch2, 2dc in same space. 3dc, ch2, 3dc in next ch2 corner space and each corner space there after. 3dc in spaces between 3dc clusters on previous row. after working last corner space slip stitch to top chain from beginning of round.

round 4: insert hook into space just created, yo, draw up loop, yo, draw through 2 loops on hook, ch2. Work groups of 3dc between each space on previous row. ON corners work 3dc, ch2, 3dc in each ch2 corner space. In last space work 2dc and slip stitch to the top of your ch2 from start of round.

See, every other round you are chaining up and that counts as the 1st dc of your 3dc group. than on the other rounds your chain up counts as your last DC of last DC 3 group of round. This I feel hides the “seam” best. your seam also stays centered along one side. I devised this after many yars of trial and error and not liking the way my grannies looked.

I only use chain spaces on the corners.

I think that inserting the hook and creating a stitch right on the 1st one also helps hide the appearance of the traditional ch 3 at the start of the rounds.

There are other ways to beef up your starting chain if interested in that as well.

I worked a grannie and wrote down each step as I went to make this post

Here is the grannie I made for this post. the seam runs up towards the top.


Sunday, May 1, 2011

The Big Book of Crochet Sweaters


This is a book I have had in my collection for a while now. I have not made any but it is a very nice book. It contains 10 sweater designs. They are sized as small, medium and large but the stitch patterns are quite repetative so making them larger than that shouldn't be much of a problem. The book contains a clear stitch guide, inches to mm conversion chart and US to metric hook conversion chart. Also clear color photos for each pattern included in the book.

The book does not rate the patterns by difficulty but some are pretty basic and others contain more detailed stitch patterns or color changes.

I have included images of all the sweaters in this book and you can click on any of these pages for a larger blown up view to better see the sweaters.

I have not made any of them as of yet because though sweaters are pretty i just have not been inclined to make one my self.


Thursday, April 21, 2011

Yarn ring

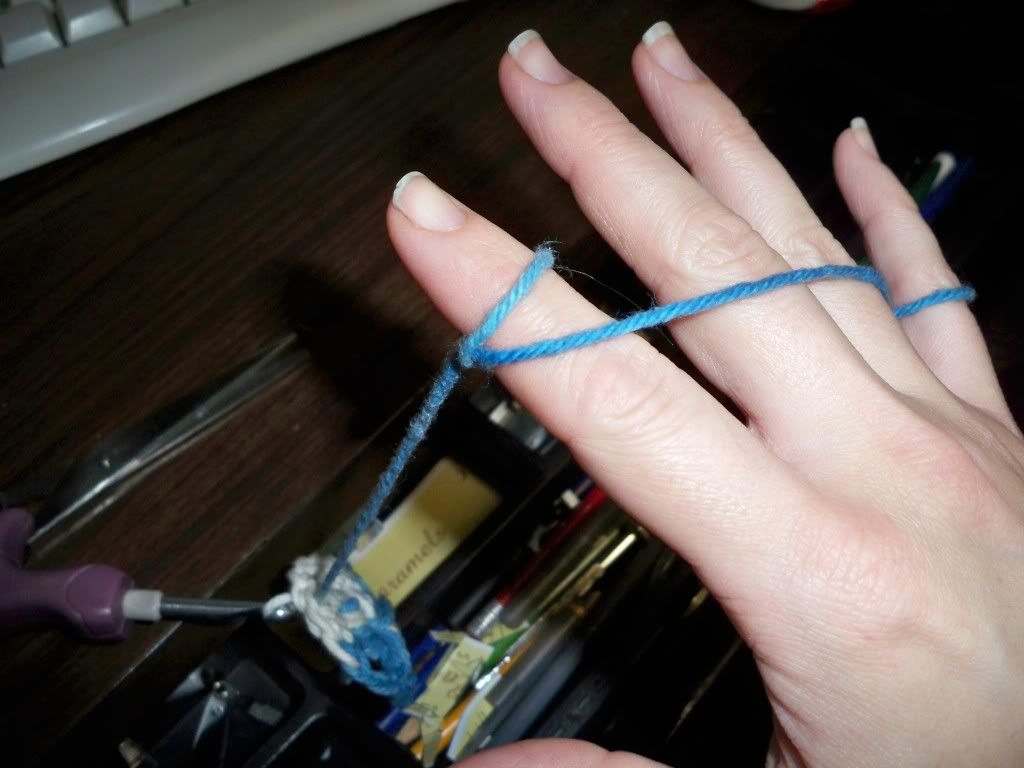
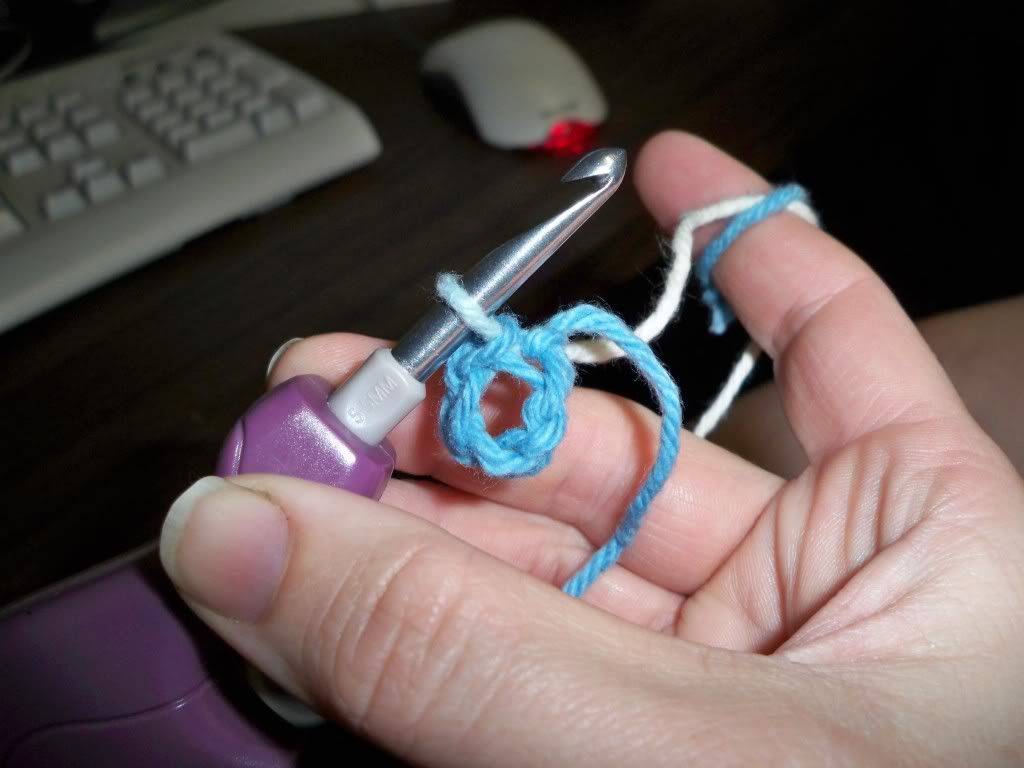
This is something I came up with when I changed the way I held my yarn when I learned to knit. Before I learned to knit I held my yarn between my 1st 2 fingers (kind of like a cigarette). When I learned to knit I learned continental and changed my yarn hold so that it wraps around my pinkie and up and over the back of my hand and index finger and this is a much better hold for me.

For the longest time I had problems holding my yarn in the same spot on my finger. To solve this I created yarn rings. I would get scraps of yarn and tie them into loops around the yarn I was working with. I would make the loop large enough to stay between my 1st and 2nd knuckle.

I then put the ring on my finger and my yarn still runs across the back of my hand and over my index finger but the yarn ring keeps it from slipping off. This is also hand when working with more than one color as you can make a separate yarn ring for each strand it it will keep them from crossing.

Here are a couple photos of the yarn ring in use. They don't need to be tight, it's just a guide. I don't need it like I used to because i have become accustomed to holding my yarn secure but it's a handy tip to pass on for anyone who is having problems keeping their yarn in the same spot on their finger.

Sunday, April 3, 2011

Queen Anne's Lace - FINISHED!
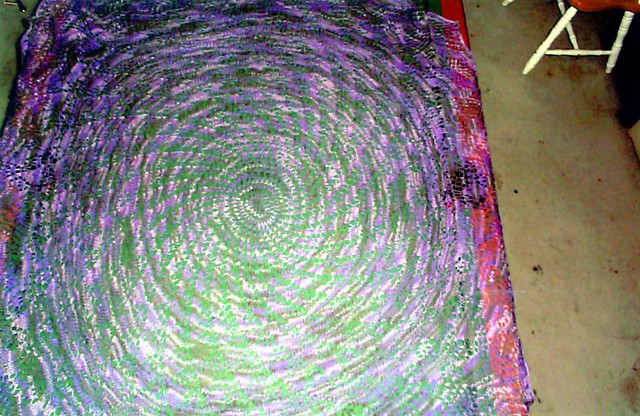
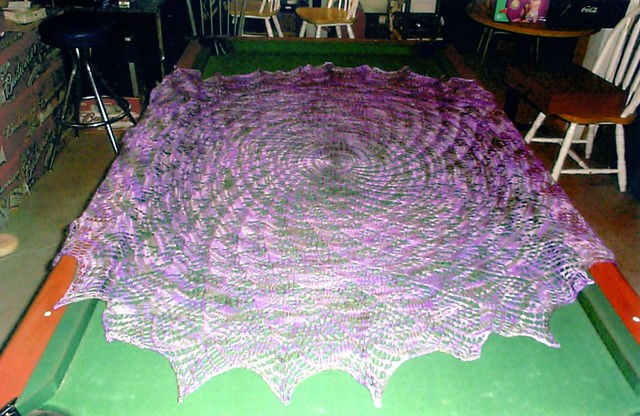
Finally finished my QAL! I cast on last June so it's been a long time coming. It's really big but I like it and will be keeping this one for my self. IT was an easy pattern (IMO) as it's done in the round so everything is knit and it's composed of 32 sections so the rows you work are extremely short even twards the end, you just repeat them over and over all the way around.

If anyone does decide to give this one a go. Early on in the pattern there are rows that are all knit. He leaves these rows unmarked and just skips them but it's not in regular intervals so can trip you up if you are not paying attention to what row # you are on. It is both charted and written. I followed the written pattern

Here are the pattern page links.

Ravelry pattern page

Pattern off rav

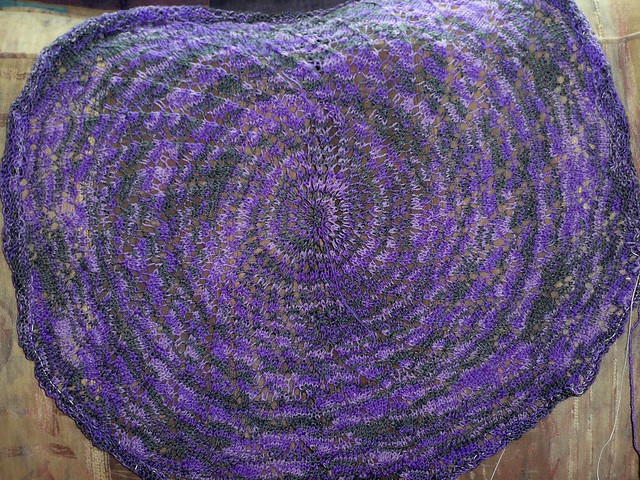
I didn't get a good before blocking phto as I was so excited to see it done. Here is one mid way through the project though. This is a really good depiction of the color. This is the same yarn I used for my wrist warmers and my last Gail.