Friday, June 24, 2011

Gail in the Round

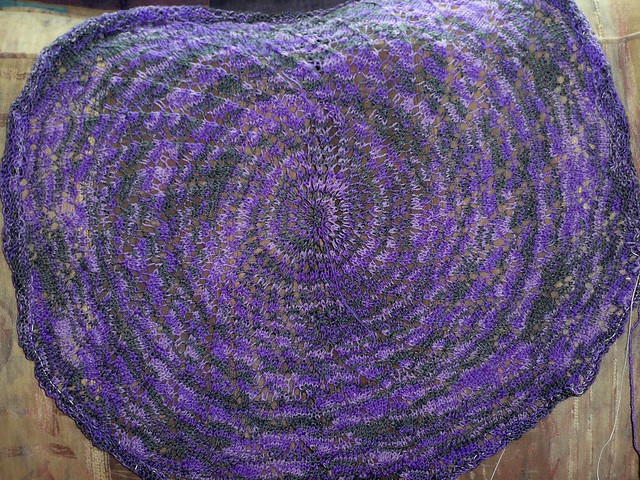
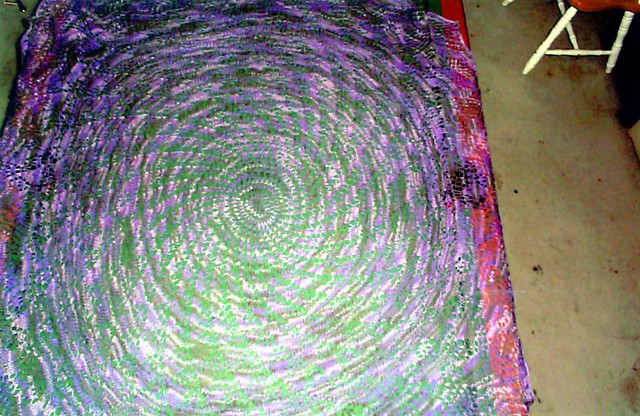
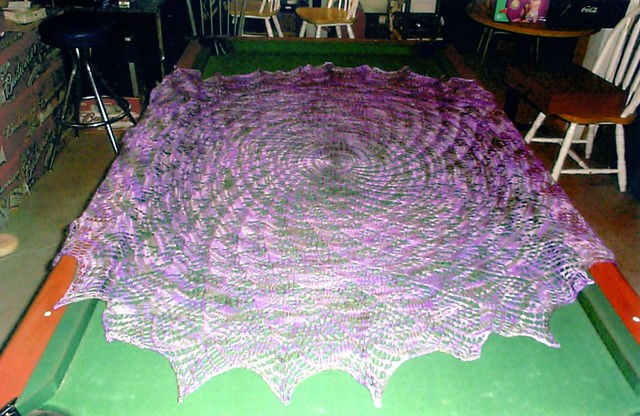
It's not to often I make more than 1 of a pattern, let alone 3. But I have just finished my 3rd Gail pattern. But this one is not a shwl but a blanket/throw instead. I knit it in the round so essentally it's the pattern repeated 2x. To start it I cast on 8 stitches. Being that it was going to be a blanket I wanted the corners to be more stable than what the double YO provides so 4 of the cast on stitches were inserted to be between the YO's on what would be the center points of the shawl, the other 4 stitches cast on were to start the pattern. I worked the pattern chart every other row and did plain knit every other row. When it came to doing the edging I did plain stockinette and increased on either side of teh final leaf points by doing a after though YO (aka knitting into the running strand w/o twisting it) and worked those spaces as plain stockinette. the afterthought YO creates an open space but not as large of one as a regular YO woul give.

I did keep to the pattern for the corners and made those into points so that the blanket would be square on the corners. I finished up by doing 2 garter ridges and binding off.

If you are thinking you may want to knit a light weight throw conciser a shawl pattern in the round but knit in worsted yarn. This will be going to my Mom in Arizona so I didn't want a heavy blanket but still wanted to knit her something.

These photos are really poor quality, but you can get the idea of what I did. I used Bernat value yarn for this and about 4 skeins I believe.

Being that this is worked in worsted weight yarn it only took 3 pattern repeats to complete before adding the final repeat which contained the edging.


Friday, June 17, 2011

Peaches & Creme HUGE SALE!!!!

P&C is having a HUGE sale right now. 50%-70% off balls and full cones of yarn.

Just had to pass this info on incise anyone is interested. Peaches & Creme is the yarn I love to use for my hair accessories and all my kitchenware.

The sale is going for a total of 10 days and ends 6-25-11

Peaches & Creme website

Thursday, June 9, 2011

Lacy shells headband


Yarn: Hobby Lobby's "I Love This Cotton!" (Band info: medium, 4 ply, 100% cotton)
Hook size: G (4mm, UK 8) & H (5mm, UK 6)

Stitches used (US):
ss - slip stitch
ch - chain
sc - single crochet
dc - double crochet

Special stitches:
Beginning shell (beg shell) : ch3, 2dc, ch2, 3dc
shell: 3dc, ch2, 3dc
double shell (dbl shell) : ch3, 2dc, ch2, 3dc, ch2 3dc

This head band works up really fast and uses less than one skein of yarn. It is worked in 2 parts and seamed together.

Tie: With H hook chain 26. Switch to G hook and SC in 2nd chain from hook and each chain space to beginning chain, ch3, ss in same st as last sc made, ch1 turn

Row1: ss in ch3 sp, beg shell in same sp, ch1, turn

row 2: ss in next 2 dc and ch2 sp, beg shell in same sp, ch1, turn

row 3: repeat row 2

row 4: ss in next 2 dc and ch2 sp, dbl shell in same sp, ch1 turn

row 5: ss in next 2 dc and ch2 sp, beg shell in same sp, shell in next ch2 sp, ch1, turn

row 6: ss in next 2 dc and ch2 sp, beg shell in same sp, ch2, shell in next ch2 sp, ch1, turn

row 7: ss in next 2 dc and ch2 sp, beg shell in same sp, ch2, dc in last dc of shell, ch2, dc in 1st dc of next shell, ch2, shell in next ch2 sp, ch1 turn

row 8: ss in next 2 dc and ch2 sp, beg shell in same sp, ch2, dc in last dc of shell, (ch2, dc in next dc) 3 times, ch2, shell in next ch2 sp, ch1, turn

row 9: ss in next 2 dc and ch2 sp, beg shell in same sp, ch2,skip next ch2 sp, (dc in next dc, ch2) 4 times, shell in next ch2 sp, break yarn and fasten off and set aside.

Make 2nd piece the same except do not fasten off at the end or row 9

Joining: On 2nd half after row 9 - ch1, turn, ss in next 2 dc. Cut yarn leaving a long enough tail to be able to sew halves together and pull tail through last stitch.

Thread tail onto yarn needle and holding halves together whip stitch across stitch for stitch starting at ch 2 spaces of 1st shell and ending at the last ch2 space of last shell. weave in ends and finish off. When whip stitching the chain spaces go into the stitches rather than around the chains.

This pattern is available as a PDF file

Monday, May 9, 2011

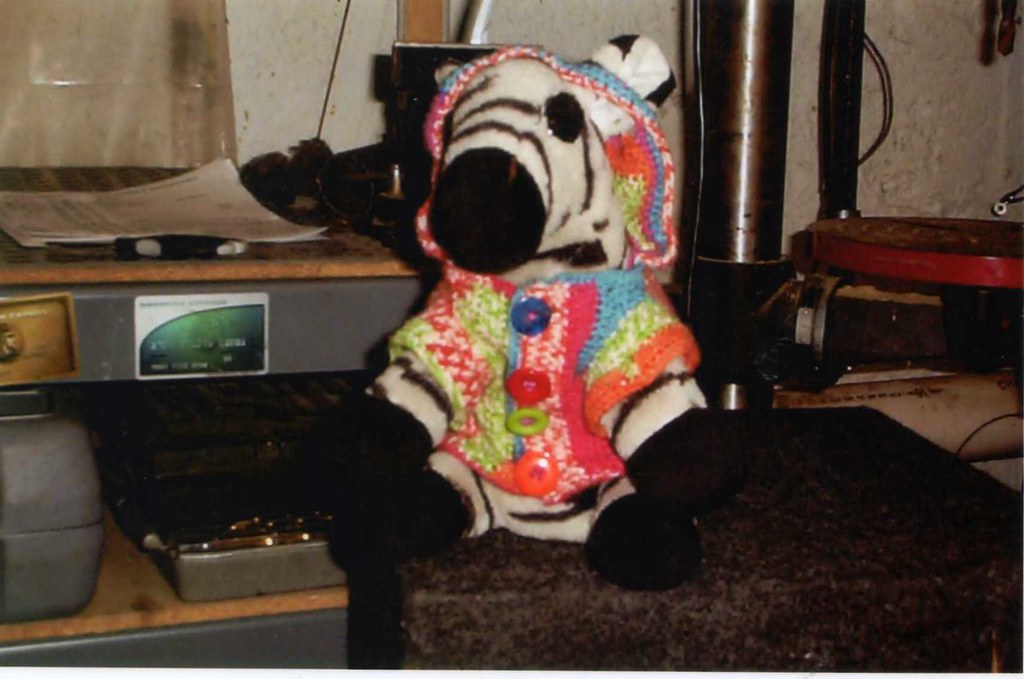
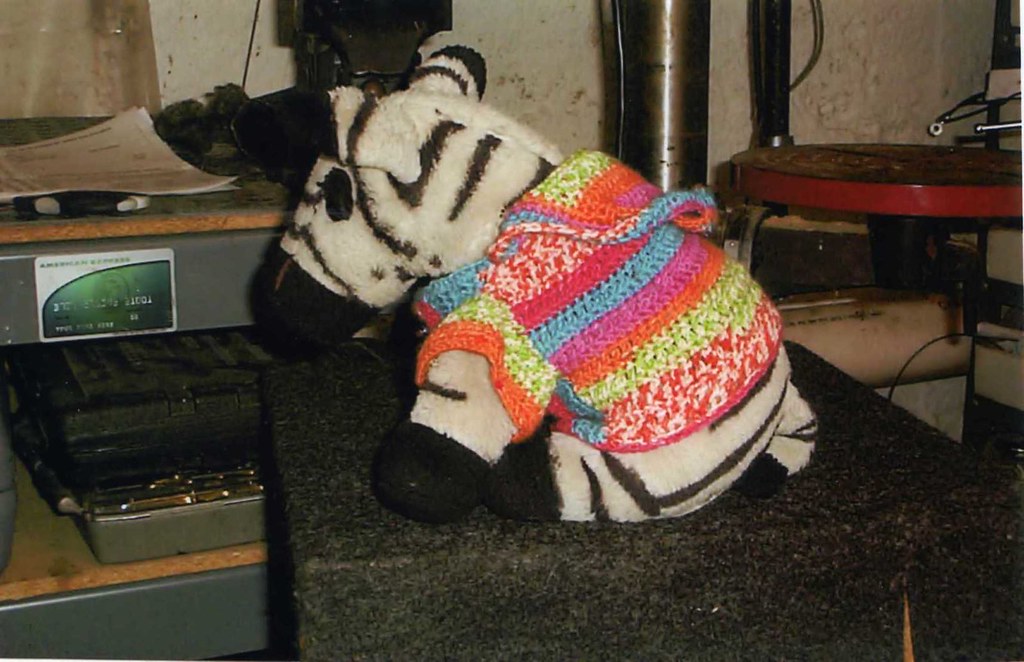
Zebra gets a hoodie!


Robert has been asking me to make his zebra a new sweater. I finally got around to it. He raided my stash looking for my colorful yarn and found this self striping sock yarn.

I crochet it with my #1 steel hook and the whole thing is done entirely in alternating rows of DC and SC. The back is worked back and forth all the way up to the top of the head shaped to fit behind the ears. the front of the hoodie is worked back and forth leaving holes for the ears to poke through. the front of the sweater is crochet directly onto the back leaving about 4 rows unworked which became arm holes. the arms were done last.

Wednesday, May 4, 2011

How I make my grannie squares

This is the method I have come up with to create a granny square that I find most appealing as far as the seam that shows up and other things.

ch4, join with a slip stitch to 1st chain.

round 1: Insert hook into ring yo and and draw up a loop, yo and draw through 2 loops on hook, chain 2, 2dc in ring, ch2, (3dc, ch2) in ring 3 times. join with slip stitch to top of 1st chain 2.

round 2: insert hook into last ch2 space made, yo and draw up a loop, yo and draw through 2 loops on hook, ch2. (3dc, ch2, 3dc) in next corner ch 2 space repeat * to * 3 times total. In last ch2 corner space work: 3dc, ch2, 2dc join with slip stitch to top of 1st chain 2 or round (this makes your chain up the last DC in the round)

round 3: insert hook into space where you just joined, yo, draw up a loop, yo, draw through 2 loops on hook, ch2, 2dc in same space. 3dc, ch2, 3dc in next ch2 corner space and each corner space there after. 3dc in spaces between 3dc clusters on previous row. after working last corner space slip stitch to top chain from beginning of round.

round 4: insert hook into space just created, yo, draw up loop, yo, draw through 2 loops on hook, ch2. Work groups of 3dc between each space on previous row. ON corners work 3dc, ch2, 3dc in each ch2 corner space. In last space work 2dc and slip stitch to the top of your ch2 from start of round.

See, every other round you are chaining up and that counts as the 1st dc of your 3dc group. than on the other rounds your chain up counts as your last DC of last DC 3 group of round. This I feel hides the “seam” best. your seam also stays centered along one side. I devised this after many yars of trial and error and not liking the way my grannies looked.

I only use chain spaces on the corners.

I think that inserting the hook and creating a stitch right on the 1st one also helps hide the appearance of the traditional ch 3 at the start of the rounds.

There are other ways to beef up your starting chain if interested in that as well.

I worked a grannie and wrote down each step as I went to make this post

Here is the grannie I made for this post. the seam runs up towards the top.


Sunday, May 1, 2011

The Big Book of Crochet Sweaters


This is a book I have had in my collection for a while now. I have not made any but it is a very nice book. It contains 10 sweater designs. They are sized as small, medium and large but the stitch patterns are quite repetative so making them larger than that shouldn't be much of a problem. The book contains a clear stitch guide, inches to mm conversion chart and US to metric hook conversion chart. Also clear color photos for each pattern included in the book.

The book does not rate the patterns by difficulty but some are pretty basic and others contain more detailed stitch patterns or color changes.

I have included images of all the sweaters in this book and you can click on any of these pages for a larger blown up view to better see the sweaters.

I have not made any of them as of yet because though sweaters are pretty i just have not been inclined to make one my self.


Thursday, April 21, 2011

Yarn ring

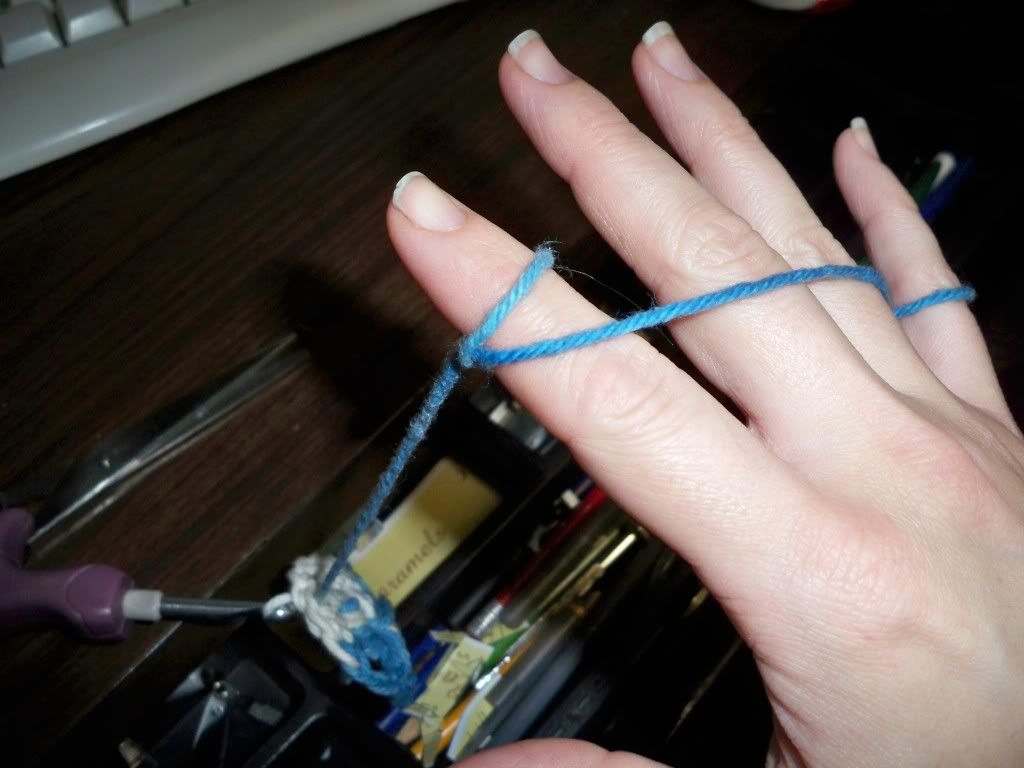
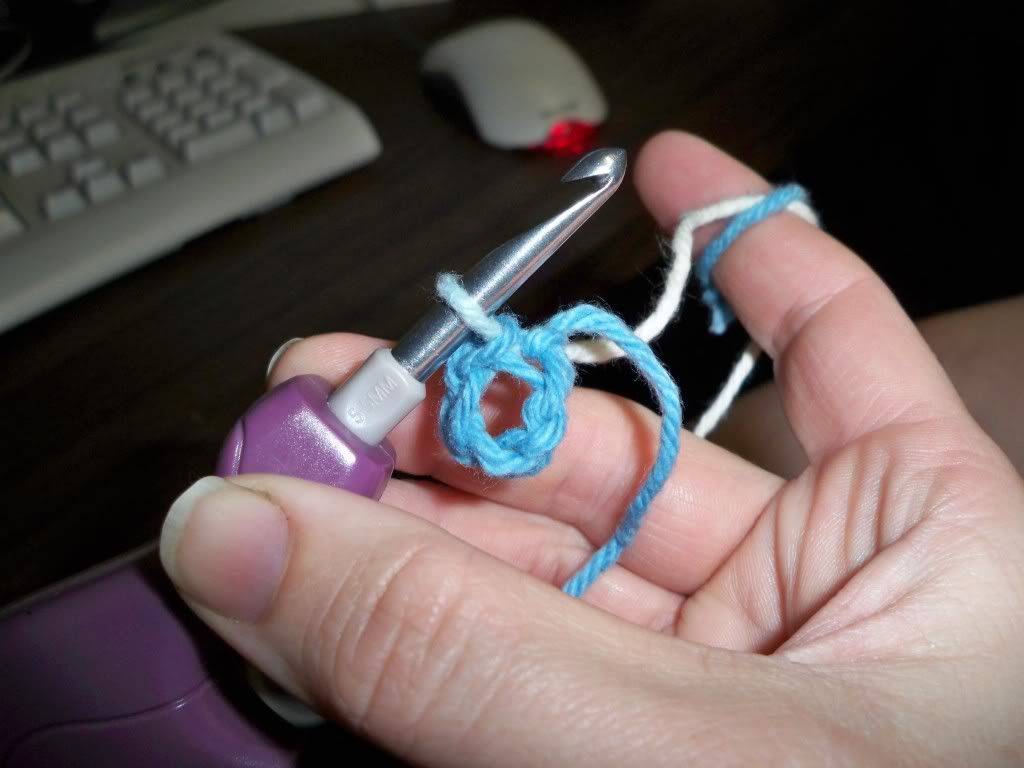
This is something I came up with when I changed the way I held my yarn when I learned to knit. Before I learned to knit I held my yarn between my 1st 2 fingers (kind of like a cigarette). When I learned to knit I learned continental and changed my yarn hold so that it wraps around my pinkie and up and over the back of my hand and index finger and this is a much better hold for me.

For the longest time I had problems holding my yarn in the same spot on my finger. To solve this I created yarn rings. I would get scraps of yarn and tie them into loops around the yarn I was working with. I would make the loop large enough to stay between my 1st and 2nd knuckle.

I then put the ring on my finger and my yarn still runs across the back of my hand and over my index finger but the yarn ring keeps it from slipping off. This is also hand when working with more than one color as you can make a separate yarn ring for each strand it it will keep them from crossing.

Here are a couple photos of the yarn ring in use. They don't need to be tight, it's just a guide. I don't need it like I used to because i have become accustomed to holding my yarn secure but it's a handy tip to pass on for anyone who is having problems keeping their yarn in the same spot on their finger.

Sunday, April 3, 2011

Queen Anne's Lace - FINISHED!

Finally finished my QAL! I cast on last June so it's been a long time coming. It's really big but I like it and will be keeping this one for my self. IT was an easy pattern (IMO) as it's done in the round so everything is knit and it's composed of 32 sections so the rows you work are extremely short even twards the end, you just repeat them over and over all the way around.

If anyone does decide to give this one a go. Early on in the pattern there are rows that are all knit. He leaves these rows unmarked and just skips them but it's not in regular intervals so can trip you up if you are not paying attention to what row # you are on. It is both charted and written. I followed the written pattern

Here are the pattern page links.

Ravelry pattern page

Pattern off rav

I didn't get a good before blocking phto as I was so excited to see it done. Here is one mid way through the project though. This is a really good depiction of the color. This is the same yarn I used for my wrist warmers and my last Gail.

Saturday, March 12, 2011

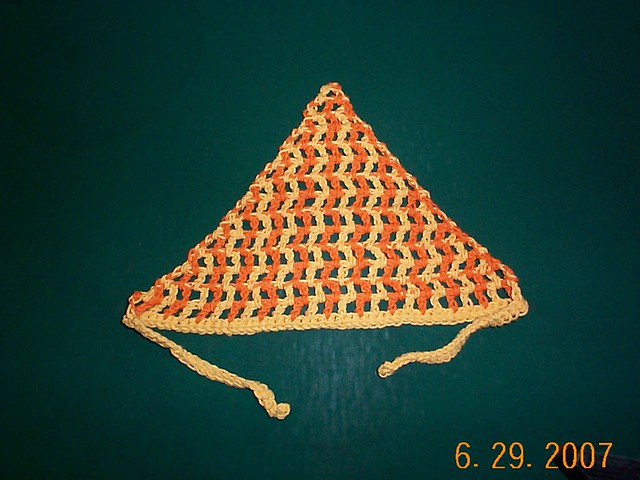
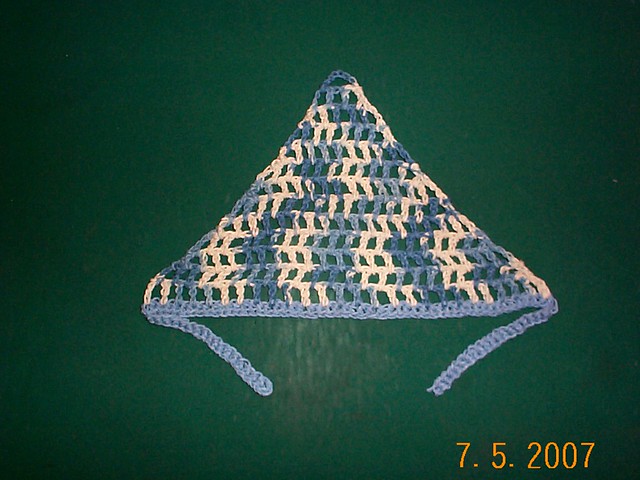
Crochet kerchief

Crochet kerchief

i have this posted on this blog but it was a while back and the pattern was not written as well.

These work up fast and are easy to make. The open stitches hold your hair back without making your head hot. I wear these nearly every day. The ties are long so if you want you can pull your hair into a pony tail and tie it again around to hold the rest of the hair out of the way.

Hook size: H & I
Yarn: Peaches'n cream
(one ball is not quite enough for 2 full kerchiefs)
stitches:
chain (ch)
double crochet (DC)
single crochet (sc)
slip stitch (SS)

When starting these kerchiefs be sure when SC into the chain row to work into the back ridge leaving the braided edge open and stitch free. This not only makes a neater edge but also makes it easier to work into both sides of your chain.


You can start this 2 ways.

Foundation row: Using a foundation row single crochet and do a foundation row of 73 stitches using the H hoook. switch to the I hook and chain 20, switch back to the H hook and ch1 and SC in each chain. join to the 1st stitch.

Chain start:
Using the I hook chain 73. switch to the H hook and ch1, sc in each ch to the end. Switch back to the I hook, chain 20. switch to the H hook, ch1, sc in 2nd chain from hook and in each open chain. Slip stitch to the 1st chain you made.

If you are making your band a different color than the triangle you can either just do a foundation row of 93 with the H hook and fasten off(do not use the I hook for this method. Or chain 93 stitches with the I hook and SC in each chain with the H and fasten off.

For the rest of the kerchief you will only be using the H hook.

Row 1: ch3, skip next stitch, DC in next stitch (ch1, skip next stitch, DC in next stitch) repeat until you have 26DC and 25 ch1 spaces (do not include the 1st ch3.

Row 2: Turn, ss into 1st chain 1 space, chain 3, DC in next ch1 space (ch1, dc in next ch1 space) repeat to the 2nd to last ch1 space. Skip next ch1 space and DC into last DC.

Repeat row 2 and reduce until kerchief has reached it's final point and you cannot work row 2 anymore. break yarn and weave in ends.

In this 2 color one i worked the band and did the ch3 joined in color B and alternated between colors for each DC made. I changed colors after the DC was completed. so I with color A, DC. than drop color A and with color B I ch 1, DC 1. drop color B. with color A chain 1. continue this to the end. and at the end of the row hold both colors together and chain 3. and than work alternating colors back.

This pattern is available as a PDF file


Friday, March 4, 2011

Crochet dishmat

Crochet dish mat


This is part of my kitchen crochets. These dish mats are perfect for setting on the counter to set your dishes on for air drying. Place them on the counter alone or next to your drying rack. They also make great hot pads for casserole dishes.

This uses a small V stitch which allows air to circulate under dishes yet is stable enough to set glasses on.

Hook: H
yarn: Worsted kitchen cotton (I like Sugar & Creme or Peaches'n creme)

gauge: Gauge is not really important but I get 4" = 7 dc2tog groups and 6 rows

You can make these any size you like but I prefer mine to be about as wide or slightly wider than a hand towel. Make them as long as you need, I like to have mine be the same length as the depth of my counter top.

Chain in multiples of 3. For mine like to have about 78 chains long. you can eyeball this pattern to your personal preference.

Basically all this is is dc2tog (but in the ch 1 spaces) with 2 stitches in each ch1 space, ch1 between each dc2tog. repeated over and over. I break it down in the pattern.

Row 1: dc in 3rd chain from hook, *ch1 yo, insert hook into same ch stitch just worked, yo and draw up loop, yo draw through 2 loops on hook, skip next ch, yo, insert hook through next ch stitch, yo draw up loop, yo draw through 2 loops on hook, yo draw through last 3 loops on hook* repeat from * to * all the way to the end DC in same ch as the last stitch worked.

Row 2: Turn, ch2, dc in next ch1 sp, ch1 * yo, insert hook into same space just worked, yo and draw up loop, yo and draw through 2 loops on hook, yo insert hook into next ch1 space, yo, draw up loop, yo, draw through 2 loops on hook, yo, draw through last 3 loops on hook.* repeat from * to * to the last ch1 space. yo, insert hook into same space just worked, yo, draw up loop, yo and pull through 2 loops on hook, yo, insert hook into ch2 space of turning chain, yo, draw up loop, yo draw through 2 loops on hook, yo and draw through last 3 loops on hook.

Work row 2 until mat is long enough. Cut yarn and weave in ends.

for the trim I work them in a reverse SC.

I recommend attaching the yarn to the right corner of the end if you are left handed and the left hand corner of the end if you are right handed and ch1. work reverse sc (aka crab stitch) around the edge stitch for stitch along the top and bottom. when working along the sides work one stitch into each space and into each row. Work last reverse sc in same space where you joined the yarn. cut yarn and weave in ends.

If you do not want to work the reverse sc you can simply crochet around the edge and over the loop and join as normal.

Reverse SC/crab stitch is my favorite way to put edgings on my kitchenware's. Creates a decorative yet simple and sturdy edging.

To work a reverse SC you insert your hook into stitch behind the one you just worked into, yo and draw up a loop, yo and draw through 2 loops on hook, repeat around. Reverse sc has you working backwards to the direction you normally crochet so for lefty's you will be working right to left and for righties you will be working left to right.

Here are some great video tutorials for reverse single crochet.
Left hand
Right hand

Here is a close up of the one I just made. Sorry I don't have my camera so am using my scanner. Click on the photo for a close up detail of the stitches.


Crochet pot handle cover

Crochet pot handle cover

These pot handle covers are really quick to crochet, take very little yarn and are worked in a continuous round without joining. Gauge is not important but when made and laid to be flat the wine one measures 2 inches across and mine is 5 inches long from top to bottom edge.

Hook size: G
Yarn: Peaches & creme or Sugar n' Cream
stitches: chain, single crochet, reverse single crochet (aka crab stitch)

Start by chaining 2 stitches 4 SC in 2nd chain from hook, 2sc in 1st sc made, 2sc in next sc and repeat until you have 16 sc around. 1sc in next sc until holder is desired length.

final round (this can be at any point). sc in next sc, ch8 (sc in next sc) 8 times. cut yarn and weave in ends. This is the loop you will use to hang it up. you don't have to have a loop if you don't want one.

for the trim I work them in a reverse SC.

Attach yarn at some point opposite the loop and ch1. work reverse sc (aka crab stitch) around the edge stitch for stitch up to the loop do a reverse sc into the last stitch. Starting on the opposite side of the loop as where you did your last reverse sc work 14 regular SC around the loop covering it, chain 1 and continue your reverse sc stitch starting in the next sc on the other side of the loop and work around to where you joined at your start. cut yarn and weave in ends. I like to work my very last reverse sc into the same stitch I joined my yarn into. You have to cross over the loop this way to be able to transition from reverse SC to regular SC. you can see in the 1st image how it crosses.

If you do not want to work the reverse sc you can simply crochet around the edge and over the loop and join as normal.

Reverse SC/crab stitch is my favorite way to put edgings on my kitchenware's. Creates a decorative yet simple and sturdy edging.

To work a reverse SC you insert your hook into stitch behind the one you just worked into, yo and draw up a loop, yo and draw through 2 loops on hook, repeat around. Reverse sc has you working backwards to the direction you normally crochet so for lefty's you will be working right to left and for righties you will be working left to right.


Here are some great video tutorials for reverse single crochet.

Left hand
Right hand


Thursday, January 20, 2011

now using PDF file format

I just went and got a host to load my word document pattern stuff to PDF files which are easy to save to your computer. I don't have but 2 at the moment but as I make stuff here and there that is somewhat worthy of a pattern page I'll link them as a PDF file in the post.

Also on the left between where the followers are listed and my flicker photo widget I have added a page link which will also list the links in just a alphabetical list for quick reference.

Saturday, January 15, 2011

Simple and squishy rib scarf


I knit this on size 10 needles but you can use what ever size you desire for your yarn. I got this stitch pattern from someone on one of my knitting message boards and it has become my favorite "go-to" scarf pattern. Suitable for men or women!

Cast on in multiples of 6

row 1: k3, p3
row 2: k1, p1

repeat these 2 rows till the scarf is of desired length.

If you want a cleaner edge you can cast on a extra 2 stitches to your grand total and just slip them on each side.

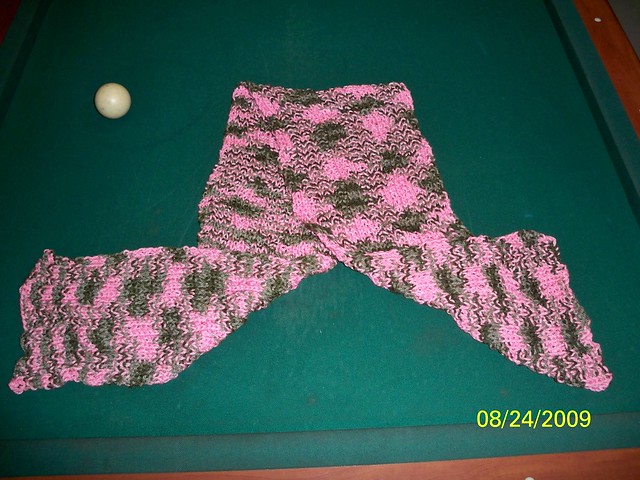
Here are some close up photos of what this stitch pattern looks like. The Pink scarf was done in Bernat Camo yarn and the black and white one was done in Red Heart Super Saver Zebra color. The pink scarf is 36 stitches wide.


Wednesday, January 5, 2011

Light and lacy spring hat


I could not find my camera but I put the hat in my scanner and it came out rather well.

This is a nice and open, light and lacy pattern. I used Caron country in the colorway Ocean Spray. This hat is a beanie style but rather loose. Caron Country tends to be on the splitty side so if you would rather substitute a yarn with a tighter twist go ahead. I would probably stick to a medium weight.

I made this to fit me and I have somewhat of a larger head so I would describe this as a large size in how it fits around. It is easy to adjust the size simply by adding or taking away pattern repeats (12 stitches on the cast on row). If you like a roll brim hat, knit a longer portion of 2x2 rib.

Try your hat on as you are making it to get the right fit for you.

For me, one pattern repeat is about 3.5" and 4 rows is just under 1"

this is knit in the round.

Needles: Size US 6 (4mm)
Yarn: Naturally Caron Country (much less than 1 skein)

Using a stretchy cast on of your choice (I use the cable cast on), cast on in multiples of 12.

*For my hat I did 8 pattern repeats so I cast on 96 stitches though 7 repeats (84 stitches) would have been fine as well.

Join for knitting in the round making sure not to twist your cast on row.

Do a 2x2 rib for 1 inch.


Hat body

*K9, p3 for all even numbered rows

Row 1: k2 tog, k2, yo, k1, yo, k2, ssk, p3 repeat
Row 3: k2 tog, k1, yo, k3, yo, k1, ssk, p3 repeat

Repeat these rows until the body is of desired length ending on row 4. for my hat I did 7 repeats. My hat just comes down over the tops of my ears.

Crown
Row 1: ssk, k1, yo, s1, k2tog, psso, yo, k1, k2tog, p3 repeat
Row 2: k7, p3 repeat
Row 3: k1, ssk, k1, k2tog, k1, p3
Row 4: k5, p3
Row 5: ssk, k1, k2tog, p3
Row 6: k3, p3
Row 7: s1, k2tog, psso, p3
row 8: purl all stitches
row 9: p1, p2tog, p1
row 10: purl all stitches
row 11: p1, p2tog

run yarn through all live stitches to remove from the needles and cinch the opening closed, secure and weave in ends.

This is available as a PDF file


I hope this helps. I have made this into chart form. You can click on this image to enlarge it or download the chart in the link below


I have charted this and made it a PDF file


If you have any questions about this (or any of my post) feel free to ask in a comment. I do reply. you may want to check through the current comments to see if it has been answered already ☺

Friday, December 17, 2010

Book: Twinkie Chan's Crochet Goodies for Fashon Foodies

Twinkie Chan's Crochet Goodies for fashion Foodies - 20 yummy treats to wear.


I saw this book and just had to get it! I ordered it from Amazon for $10.19 (USD) The designs are so cute! There are 20 patterns in this (mostly scarfs). It has great directions for all levels on the techniques used including the basic stitches.

You could easily mix up the designs like if you wanted to add toast to your bacon and eggs scarf it would be easy to do.

It's broken up into 3 sections.

Sweet Things
  • Cupcake scarf
  • Candy button scarf
  • Cookie scarf
  • Gingerbread man scarf
  • Lemon coconut cake tissue cozy
  • Rocket popsicle scarf
  • Soft-serve ice cream scarf
  • Chocolate cupcake hat with blue frosting
Fruits & Veggies
  • Green salad scarf
  • Pink grapefruit scarf
  • Baby radish lariat scarf
  • Pear scarf
  • Giant carrot scarf
  • Strawberry fingerless mittens
Savory Stuff
  • Bacon and eggs scarf
  • Buttered toast scarf
  • Sushi scarf
  • Pepperoni pizza scarf
  • Popcorn scarf
  • Spaghetti 'n' meatballs scarf
You can click on the cover images to enlarge.

Monday, December 13, 2010

Brick stitch scarf - crochet

also called crazy stitch or crazy shell. I reverse engineered this from a rug that was crochet for my grandmother as a wedding gift in the late 1930's. This is done a bit different than other similar stitches I have seen which I believe is why all edges on this are nice and "brick" like and even all the way around.

The scarf pictured is rather old and well used. i used a washable wool blend yarn and it is very warm.


Using the recommended hook for the yarn you choose to use (or the hook of your preference), chain in multiples of 5 + 2

row 1: DC in 3rd chain from hook and in next chain, skip next 2 chains and slip stitch into 3rd chain. This is one "brick" of 3 DC and 1 ch3 space (the 1st ch3 counts as a DC) * ch3, DC in next 2 chains, skip next 2 chains and slip stitch into the 3rd chain.* Repeat * to * all the way across ending in a slip stitch to the 1st chain stitch you made in the starting chain.

row 2: Turn and slip stitch over last 2 DC of previous row and in 1st chain of the ch 3 space. *ch3, 3 dc in same ch3 space, slip stitch to the 1st chain of next ch 3 space.* Repeat * to * to end. ending with 3 DC into last chain 3 space.

repeat row 2 for all other rows till scarf is desired length.


If you want to do it in 2 colors: I recommend crocheting length wise. If you do it width wise you will have a lot of ends to try to weave in up both sides. That is how I did the scarf in this photo and you can see all the ends starting to poke out. Doing it length wise won't change the appearance very much from what you see here.

At the start of each row you can leave a long tail and when finished with each row fasten off and you can leave the ends to incorporate them into a fringe if you like.

for each row turn and join w/a DC to the last ch3 space of previous row, 3 dc in same ch3 space and continue as + to + of row 2

Saturday, December 11, 2010

sorry for the laps in posts

I just got done painting Christmas cookies. I invited the family kids over and we had fun. I made 2 batches of cookies and a load of icing which we colored into many different colors.

My camera is currently MIA and i have so much I want to post and update for this blog. Hopefully I'll find my camera soon!

Wednesday, September 22, 2010

Family update

Last week I was called to Robert's (my middle child) school. He had an asthma attack but we didn't know he had asthma so nobody was prepared. I rode to the hospital with him in an ambulance where they kept him for several hours and still could not get his blood oxygen level to raise w/o him being on oxygen so they admitted him into the hospital and I stayed with him all Wed. night.

He is now doing great. They say it was intermittent asthma and was allergy induced. He's fine inside the house but has a rough go at it when he goes outside though he has been fine lately. I want to get him tested to see what it is he is allergic to. Michigan is a bad place to live if you have allergies. I have seasonal fall allergies and never had them till I moved to Arizona then came back to Michigan.

And then the other day Michael clogged our toilet (it's an old toilet and clogs easily). But he flushed and flushed and flushed till he jammed the valve into an open run. I was taking a nap before work and Anja came in saying it was raining in the basement... sure enough the whole bathroom, hall, entrance to the boys room and our bedroom was beginning to flood (or was well flooded already). The water was raining down through the floor into the basement! What a mess! Luckily it stayed on the side of the basement that didn't have the pool table but I had to shop vac the upstairs than shop vac the basement and everything is a sloppy mess!

WE have all hard wood floors which will need to be replaced and refinished as needed. But I don't intend to even think about that until the kidlets are older and out of the "oops I destroyed the house" stage. What would be worse than flooding our house is putting in new floors and THAN having it flooded.

So Now I'm cleaning the basement and everything that got wet. Well I have been putting it off for way to long so i guess this is my motivation.

Why does it seem we put things off and then it's 10x the hassle to clean when something happens?

Saturday, September 4, 2010

We do(n't) have a new cat

So we have had this stray kitty on our porch. I was feeding it to keep it near as I posted a found add on Craigs List and also a "seeking a good home" add.

Well, DH felt sorry for it as it was storming and let it in. It is really friendly with the kids and lets them pet him and pick him up. I went and got a litter pan and small bag of food but it looks as though we have a kitty now! He doesn't have fleas and is litter trained. I will take him to the vet down the road to see if he has a microchip in him and if not, he's good as ours.

Robert has decided on his own that the cat's name is Cookie.


Book: The Doubleday Large Print Nedlecraft Book


This is a great book with simple projects and is written for those with vision impairment. It contains many simple projects using common yarn weights, needle sizes and lighter colors. The projects in it are small and flat some times with some easy seaming to shape them.

Printed in large type so it's easier on the eyes this is a great book for anyone who's eyesight as started to slip, anyone seeking easy patterns to learn from with clear instructions and tips for making your own stuff.

Chapters cover:
Crocheting
Knitting
Quilting
and
Decorative stitching

You can get this book used at Amazon


This is the ball I made for what I believe will be our new kitty. The pattern is in this book and it's crochet flat and then sewn into shape. My youngest also enjoys playing with the ball as it's so soft, light and squishy he can throw it in the house. A quick little project I had done in a hour or 2.