Showing posts with label pattern. Show all posts

Saturday, December 5, 2015

Moebius bubble cowl/scarf

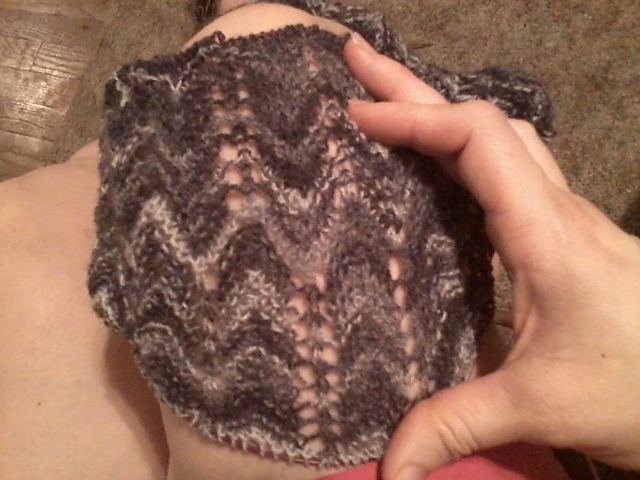
Moebius Bubble Cowl


This pattern is available on Ravlery!

Yarn: premier yarns "wool-free lace"
Needles: size 2

This yarn, though labeled "lace" is more like a sock (fingerling) yarn. This pattern is easily modified for any yarn. The thicker the yarn you use, I recommend doing your sections with less stitches. Use the needle size recommended for your yarn. The finished cowl is quite warm and the stitch pattern allows plenty of stretch if you desire to use it as a hood.

I also like to use stitch markers at each knit/purl transition point.

Here is a sample of this same stitch in a thicker, hand spun yarn worked on size 6 needles and it is a 6x6 rib. this yarn is pretty much worsted.


If you intend to make this a cowl, you can either cast on provisionally and graft or do a 3 needle bind off, or cast on regularly and seam. Of course grafting will result in a seamless cowl and have a post here that deals with working the Kitchener Stitch (grafting) in pattern. It's a useful skill to have and not nearly as complicated as it may seem once you understand it.
 

I have this pattern charted. it's a simple pattern to adapt and also makes a great scarf if you don't want to make a moebius. As written, it's basically a 10 stitch by 10 row checker of tight and dropped stitches with twisted stitches to help keep it all tidy on the edges of the transition points. A 10x10 rib that creates a reversible bubble effect.

A close up of the stitch pattern at the point where I grafted the ends together.

You can read more about creating moebius knits here: Demystifying the moebius!

I did not block this. If you block it, you will loose the texture of the bubbles.


Demystifying the moebius!

I have a couple new moebiuses to post but thought I would post a little trouble shooting and tips post first.

For starters, when I cast on for a center out moebius I use my longest cables. I believe the are 60". I use this for all my center out moebius knits. It's the most comfortable length for me. I also like to put a small tip on the end that i will be knitting off. this makes it easier to get the stitches off the cable.

When it comes to cowls, the moebius is my preferred shape as it lies flat and you don't have any bunching at the twist.

This is regarding the center out moebius knit in the round. You can adapt any stitch pattern that looks good on both sides to a moebius knit! It doesn't even have to be the same on both sides, just has to look good.

I always use Cat's moebius co. YouTube link It's a brilliant and super fast co. But its also incredibly sloppy and somewhat difficult to count as you don't have any actual stitches on the needles until you knit 1/2 way around on round 1. Before that it's just yarn wrapped around the needles and cord.

When casting on you count the stitches being wrapped around the needle only. Each set of wraps creates a wrap on top and on the bottom cord, but only count the top!

If you are converting a regular circular cowl to a moebius, co the same amount the pattern recommends (counting top only).

When converting a nesting pattern like chevrons or drop stitch (as in the cowl I'll be posting) or a staggered pattern. You want to cast on in what ever your pattern stitch repeat is + 1/2 that. If your stitch repeat is 8, for example, you want to cast on in multiples of 8+4. The 1/2 count will let the pattern nest above and below the co line. Your grand total, on a 8 stitch repeat will be a multiple of 16+8 counting all stitches (top and bottom). Here is the cast on of the Moebius waves of Color cowl with 1/2 the stitch repeat added so that it nests (I did a few modifications to the original as well which I detailed on my Ravelry project page).


Now I have yet to cast on a center out moebius and have an accurate stitch count. It could be because its such a fast co that my hands work faster than my brain.

So after I cast on and when I'm working the 1st round, I place markers for counting. Of course ALWAYS use something to mark the start of the round! I place small markers every 20 or so stitches. If you need to adjust your stitch count, make sure to balance it on both sides of the co line! This is extremely important on nesting designs!

If you find you need to add stitches, do it in sets. If you need to add 2 stitches do a M1 and in that same spot on the other side use a locking marker and place it between the stitches on the other side so you know you need to m1 in that spot when you get there. A strand of scrap yarn tied around the spot works to.

If you have to many stitches, decrease in sets as well. K2tog and place a locking marker through 2 stitches on the other side so you know to knit them together when you get there.

You need to increase/decrease in this way for fixing stitch counts to maintain the same amount of stitches above as below to keep things lined up properly when you start your pattern.

Working a moebius flat and seaming into shape

Another cowl I made uses a 20 stitch repeat of 10x10 ribbing. When doing something like this you want a reversible pattern and offset design. When working the cowl, I work it flat like a scarf and seam it on the short ends into a moebius. In ribbing you want your rows to end opposite of how they start. Start with knits, end with purls. When you add the 1/2 twist the sides will line up.

You will also want to make sure any row repeats line up properly. The bubble cowl I made started with a bubble on the 1st column repeat. So I needed to end with a bubble being in the 1st column again so that when the twist was made it lined up properly on the other side. If you have a ribbing pattern and knits are on the left, you want to end with purls on the right so it lines up when grafted.

Also, this type of cowl requires grafting in pattern which isn't nearly as complicated as it sounds. I have a post describing how to Kitchener in pattern which will enable you to Kitchener any combinations of knits and purls. It will also help you to understand what you are doing and to tell where you are at if you have to set it down.

This is the seam of my recent pattern Bubble Moebius cowl.
The seam is the last grey row to the right of the skinny grey strip on the left. On the right you see it flat as a WIP. If you look you will notice that the bubble on the left is knit and the bubble on the right is purl. this needs to be offset like this to be able to make the 1/2 twist required to complete the moebius shape.


Sunday, May 19, 2013

back bar single crochet

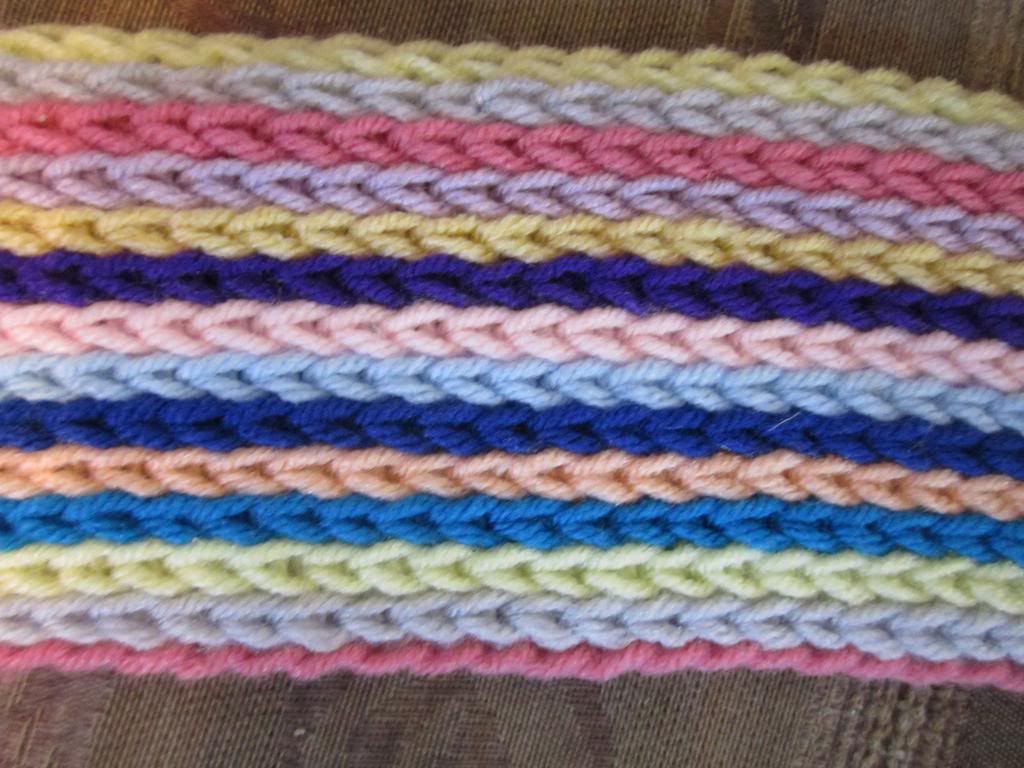
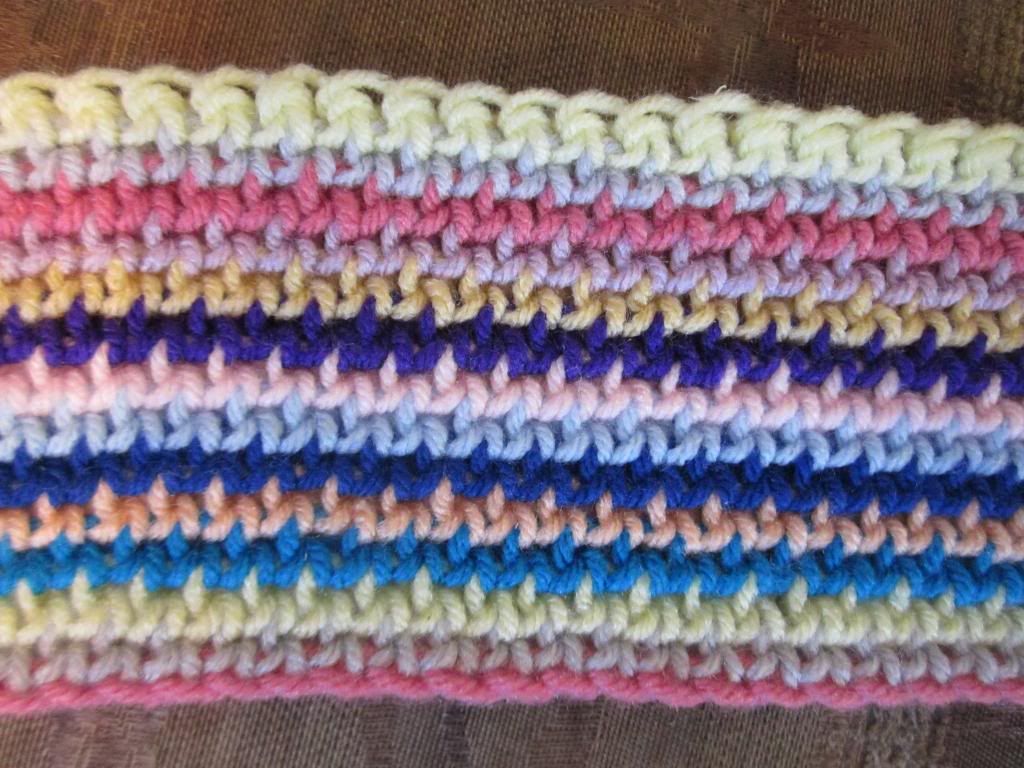
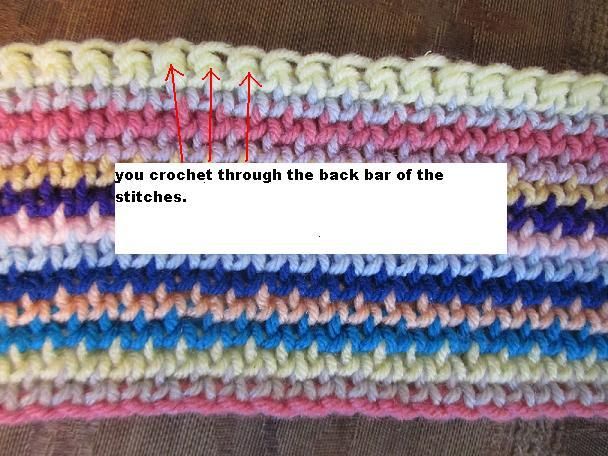
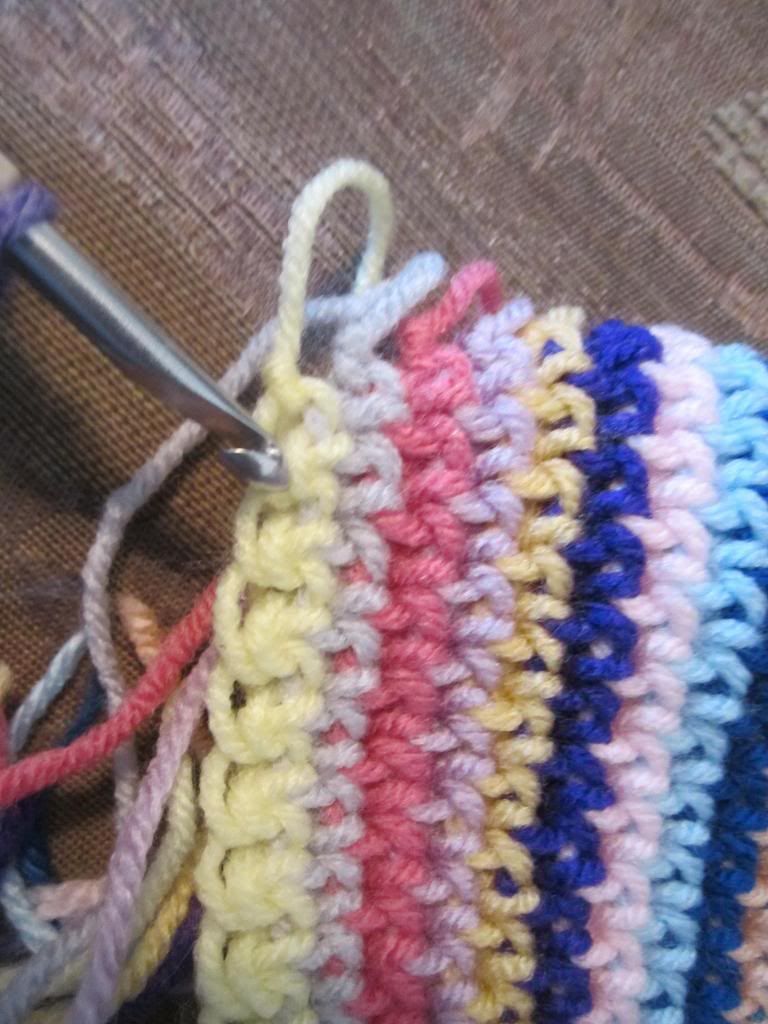
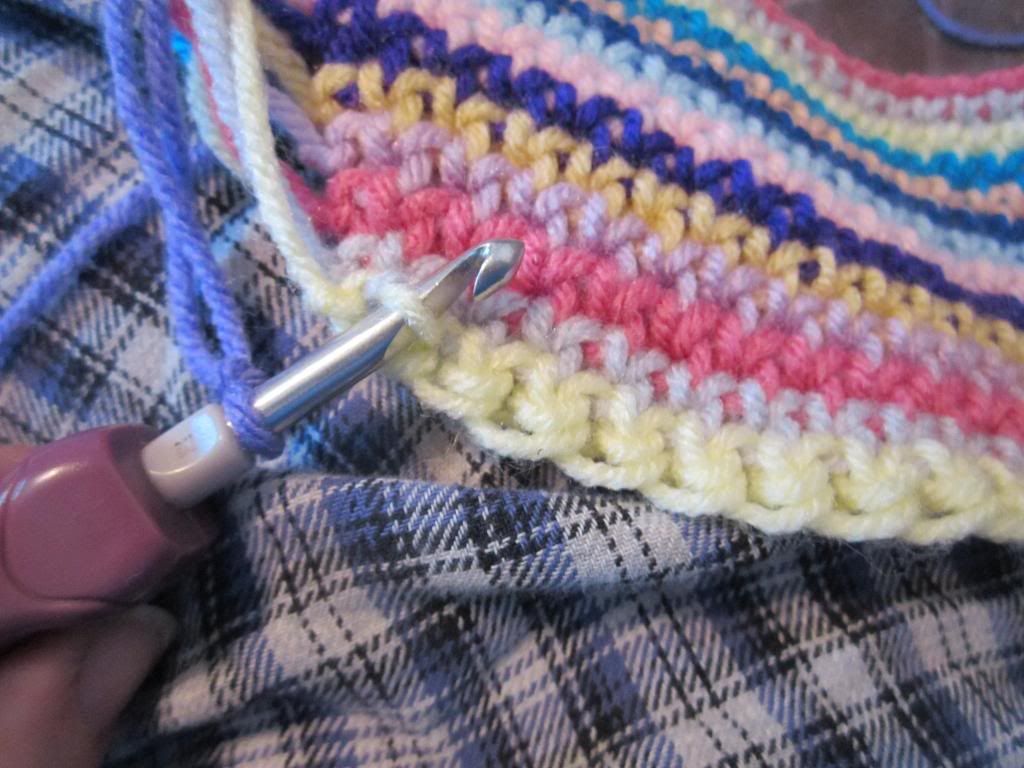
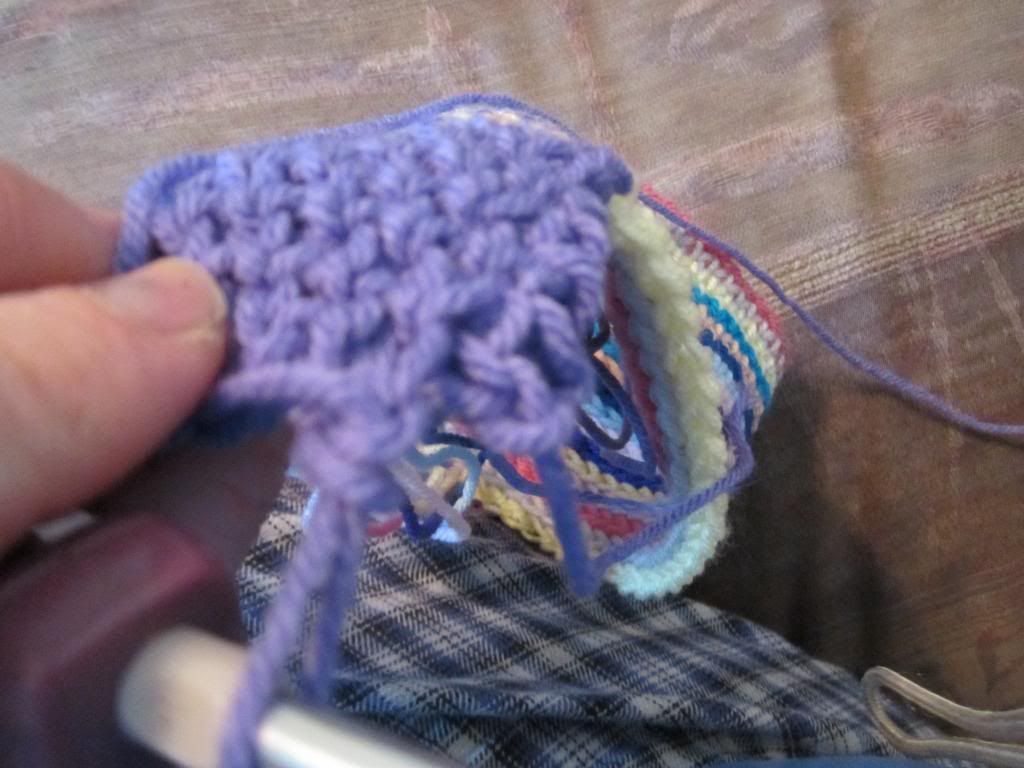
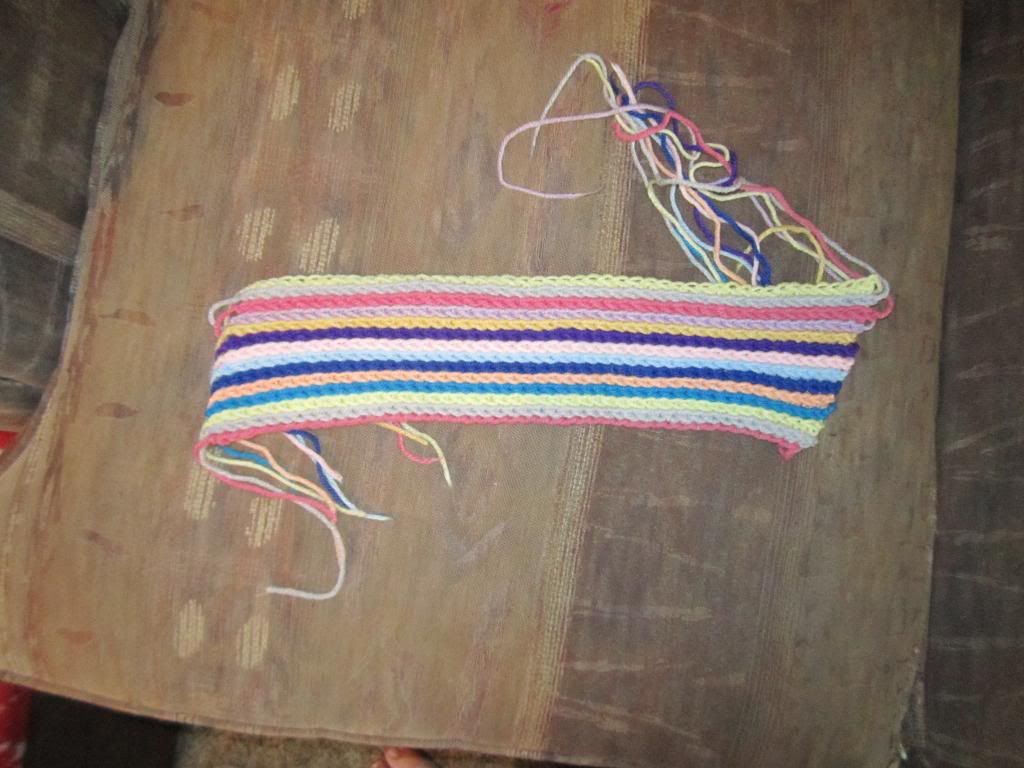
This is a technique that I cam up with when someone posted a "how is this done?" photo. This is crochet through the back bar of the stitch and it is always worked with the right side of the fabric facing you.

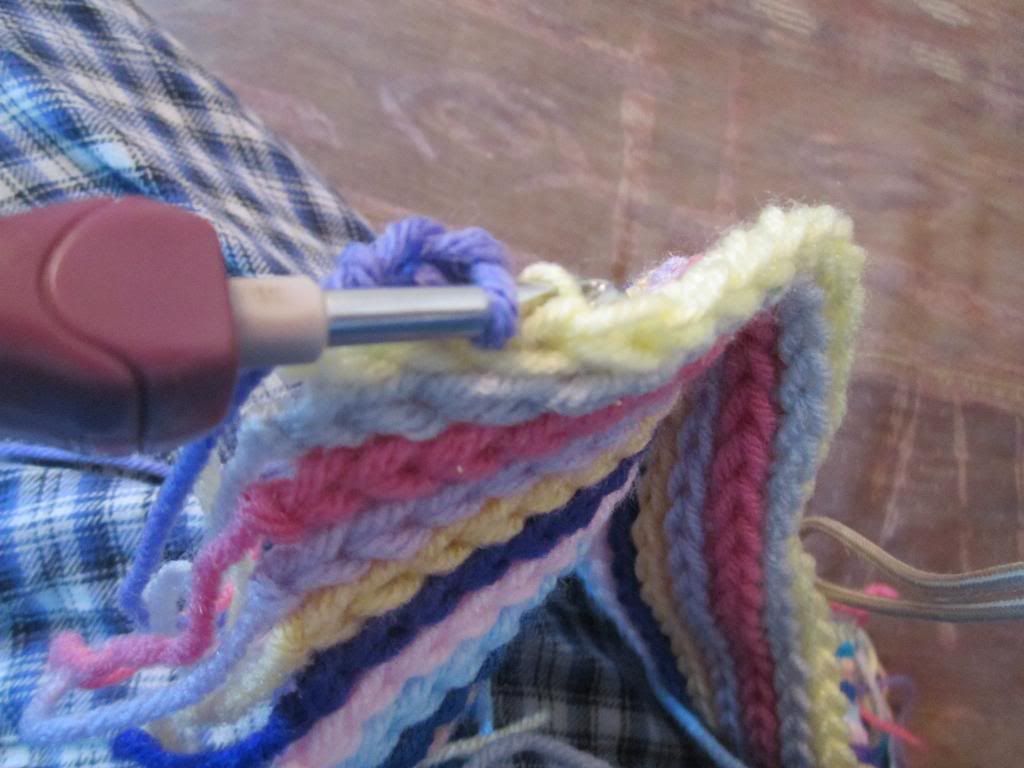
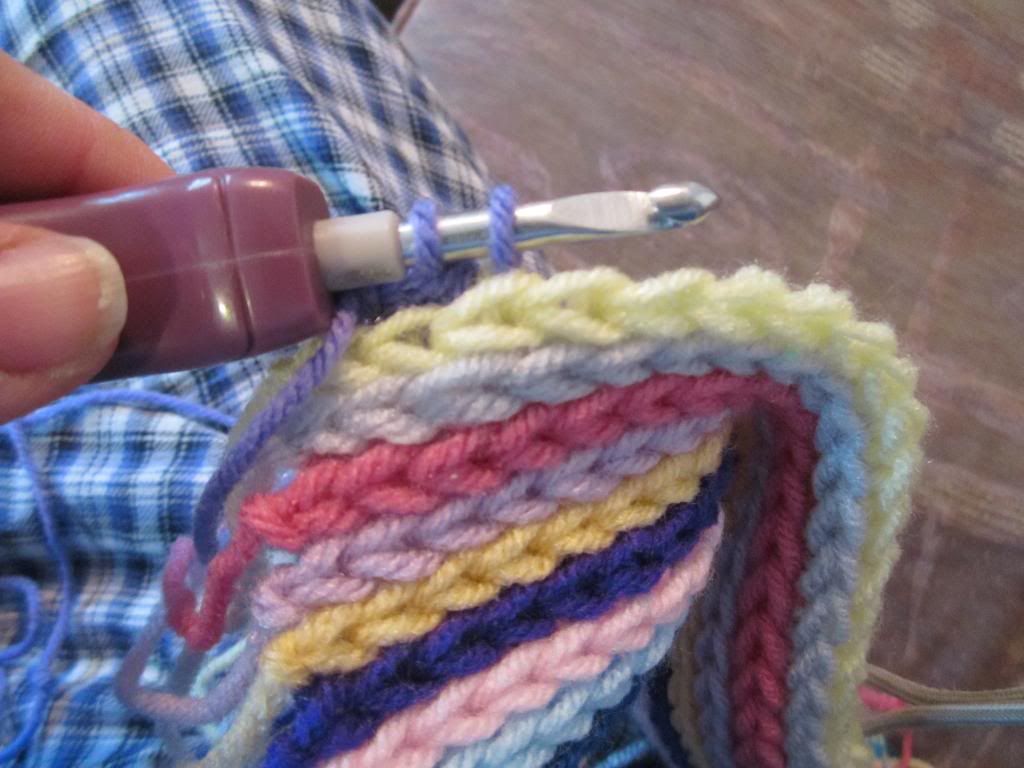
When working this flat, you work 1 row and break your yarn and return to the beginning to start the next row new. By working through the back bar of the stitch you are pushing forward the top edge which leaves the right side of the fabric showing the braided edge of each row. This also results in a denser fabric. 

I recommend using a larger hook and a non splitty yarn to be sure you can get your hook into the back bar of the stitch. For the initial chain I worked it with a hook 2 sizes larger than the one I did the work with to help eliminating a tight edge.

This also will bias hugely as it's worked all from the right side. There are ways to counter this effect and I will mention them later. Due to the tails on each side, this is also a great fabric to add fringe to, especially if you are working each row in a different color.

This makes a nice fabric for a place mat, or a unique texture for a scarf. You can work it in the round to create a unique striped edging for a blanket.

this is the fabric from the back. You can click on the images to enlarge them.


To start, chain a desired amount for the length you wish to make. Use a hook 2 sizes larger than your working hook to make sure your starting chain does not get to tight while working into the stitches.

* I always prefer to work my 1st row of any project through the back bumps of the chain. This creates a nice edge.

After you have made your chain, turn and switch to the smaller hook and now  work 1 row of SC. I like to end with a chain one than break my yarn. (this is the right side of the fabric)

After this point you will always have the right side facing and you will be crocheting into the back bars of the stitches.


Return to the start and join with a single crochet into the back bar of your 1st stitch. 


To join with a single crochet place your slip knot on your hook and insert your hook into the bar, yo and draw up a loop, 


yo and draw through loop and slip knot on hook.


Continue working accross the row working 1 sc into the back bar of each stitch on the previous row. 


When you reach the end the last stitch can be hard to see. This one is a bit harder to see because i left my ends loose.


Here I have 1 stitch left to make


Continue to work 1 sc in each back bar to the last stitch and chain 1 and break yarn

Working every row as stated above will result in a fabric that slants on both sides. This is just the nature of this stitch.


If you wish to minimize this effect or shape the bottom differently, you can work 2 sc into the 1st bar of the row and on the last 2 stitches sc them together (insert hook into next stitch, yo draw up a loop, insert hook into last stitch yo and draw up a loop, yo and draw through 3 loops on hook). doing this on every row will result in the fabric slanting the opposite way. Alternating every 5 rows or so between regular and the shifted rows will result in a edge that has points.


To make the edges more straight. work one row regular, stitch for stitch to the end. and work the next row with the sc2 in 1st bar and sc2tog in last 2 bars. this will help keep the edges in a straighter line.

On the 1st 3 rows of the pruple here, I have worked them as the shifted rows starting with 2sc in 1st bar. you can see the slant is gong the oposite way as the edg in the fabric below the purple.

the rest of the purple is worked alternating rows which has caused a straighter edge.

this is how the solid section will look from the back


and form the front


Saturday, October 6, 2012

Key tag cozy


Key tag cozy

This is something I have been thinking about for a while and finally made because everything needs a cozy!

 The inspiration for this is that I have a lot of tags and being that they are open on a ring the bar codes rub off and some are chipped. For this I knit it flat in a version of double knitting that allows you to knit an open tube in the round and flat at the same time. 2 rows = 1 round

Materials needed:
size 2 needles - you will need at least 3 needles. For mine I used double point needles (but I treated them like straights)

Small amount of sock yarn

 In short this is a stockinette tube with a small rib on the open end. You can work it on DPN's or with magic loop. This is just a fun way to try a different double knitting technique.

Instructions:
Cast on 20 stitches (in even amounts if you need more or less). I used the long tail cast on and snugged my stitches up together to keep the end from flaring out because these stitches will be shared between  2 sides.


body of cozy:
*slip all stitches purlwise with yarn in front

s1,  p1,  repeat to end of row, turn

repeat this row untill the tube is about 2 inches long. If you are skipping the ribbing, make this section a few rounds longer. 

Ribbing (optional) :
s1, p1, s1, k1,repeat to the end of row, turn

Repeat this row untill you have about 5 rounds of ribbing.

bind off:
this is where the other needle comes in handy. When you have finished your last row you still have all the stitches shared on one needle.
 Now take 2 needles and slip the stitches onto them diving the stitches between front and back to open the tube. Slip the 1st stitch onto the back needle, 2nd stitch onto the front... *remember, I'm left handed so I'm slipping my stitches onto the needles in my left hand.

 Repeat this untill the stitches are divided and your tube is open
Now bind off in pattern using a stretchy bind off. knitting the knits and purling the purls. p1, k1, slid both back and k2tog, *p1, slide both stitches back and p2tog, k1, slide both stitches back and k2tog*. repeat between * and * untill all stitches are bound off.

Tie in your ends.

putting this on your key ring

Leave your finished tube purl side outout
In the center about 3-4 rows down from your cast on edge, slid this onto your ring slopping through both sides at the same spot. Try not to split the stitches.


Now just turn it knit side out  
 

Wednesday, August 15, 2012

Headphone earbud holder


Earbud headphone holder

I like to use earbud headphones  with my iPod at work but have to take them out often. I usually run my cord up my shirt and when I take out the earbuds I let them hang out the neck of my shirt. Problem with this is the left and right get all twisted together and gravity grabs hold and they start to slid down to the point that the ear buds are bouncing around somewhere on my belly. Not only is this irritating, but I've ruined several sets by snagging them on things.

So I saw a photo somewhere of some silicone holders for earbud headphones and of course thought "I bet I could make that" and this is the result. I whipped these up before work last night and they worked great! I work in a factory.

So here you go!

Yarn: sock yarn scraps, this takes verry little yarn
needles: size 2 double point needles. you don't really need a whole set if you don't want to knit the ends in the round, I don't have a full set so I knit my ends flat and seamed them. you do need 2 dpn's though.

cast on 12 stitches (join in the round if you want, other wise leave a tail to seam shut
knit 5 rows in 1x1 ribbing
bind off 9 stitches leaving 3 on the needle.

use these 3 stitches to make an i cord about 14 inches long (or desired length)

cast on 9 stitches (join in the round if you prefer, other wise knit flat)
knit 5 rows in 1x1 ribbing
bind off. 

use tails to seam ends closed if you have not knit in the round.

The ribbing stretches enough to allow you to put the earbuds through but are not big enough to have them fall back out. when I set my earbuds to hang in this holder I just move the cord so the bud is resting on the end piece.

If you find your buds are sliding in the holder (I didn't have this problem) you can just loop the bud back through another time creating a loop around the end hole and this will secure it in place.

To knit an i cord you must have 2 double point needles. you knit your stitches, do not turn, slide them back to the other side of the needle and knit them again. keep doing this untill cord reaches desired length.


Sunday, April 29, 2012

Lacy shells edging

This is the edging I put on my Lapse of Reason moebius wrap. The wrap pattern is available for free on Ravelry .

I used an I hook, which is compatible to the size of the knitting needle I used. 

Stitches/terms used used
ch - chain
ss - slip stitch
sc - single crochet
dc - double crochet
sp - space
sk - skip
st - stitch

This edging is worked over a distance of 9 stitches on the edge of what ever you are attaching it to.

Personally I do not worry about exact stitch count of the fo that I attach it to, I just follow the pattern and when I'm about 1/2 way to the end I figure out if I have enough stitches to complete the pattern. If I have a few to many stitches than the pattern calls for I'll just skip a total of 4 here and there when working the edging to make it come out correct. Or if I don't have enough I'll just skip 2 instead of 3 stitches on the edge a couple times spread out so it evens up.

I worked this wrap using Caron Simply Soft and I bound off the knitting in single crochet by inserting the hook into the 1st stitch to be bound off , yo and draw up a loop, *insert hook into next stitch to be bound off, yo and draw up a loop, yo and draw through 2 loops on hook* Repeat around untill all stitches are bound off. This is the same bind off as the knit stretchy bo but it's just easier for me to do in crochet.

For the edging I attached my 2nd color at any stitch.

Round 1: ch3, sk next 3 st on edge of wrap, sc in next st, ch3, sc in next st, ch3, sk next 3 stitches on edge of wrap... repeat around join with a ss to beginning of round.

Round 2: *ch3, ss to 1st ch, sk next ch3 sp, (dc, ch3, ss to 1st ch) 5 times in next ch3 sp, sk next ch3 sp, ss to next sc* repeat from * to* around. join to beginning of round. break yarn and weave in ends.


Saturday, March 10, 2012

felted crochet slippers


I can't take any credit for these awesome felted slippers but realized it was just taking to long to knit them and figured "why take extra time to make something that is going to be felted down anyway?" so I frogged and did them in single crochet.

Now that being said, I have never felted before so I only made 1 slipper. Seeming how I was not following the pattern (crocheting instead of knitting) and I was "winging it" for size and had nothing to reference it to (never felted before) so I couldn't even guess if it would fit. I figured it would be safer to make just 1 slipper, felt it and see if any adjustments needed to be made. But it turned out to be a perfect fit. These are defiantly mens sized though, I have a rather wide foot and I actually wear an 11 in mens. I ran them through the wash on hot/cold 2x to felt them down.

I wanted to try these because my uncles are coming in and I thought it would be fun to make them felted slippers but send them home w/the slippers not felted so they can shrink them to fit. All my family is really crafty so I think it would be neat for them to do. And I had one uncle a long time ago ask if I knew how to make slippers that didn't wear though because he loved home made slippers but wore holes in the bottoms to easily.

When I was knitting them per the pattern instructions, I was making the mens size. So when I started to crochet them, I compared my square sizes and I made sure my square was the same size as it was when I was knitting them.

Yarn: fisherman's wool
Hook: I (5.5mm)

My mens size squares are 18 stitches wide (single crochet) and 20 rows each

I'm thinking that for womens size I will likely make them 15-16 stitches wide and 17-18 rows per square.

I followed the same construction directions as in the original knitted pattern crocheting it in one long strip and than crocheting the 2 "flaps" onto the strip. Also I found the construction a tad confusing so I made little tags and tacked them to the edges that needed to be sewn together to help keep things straight. At 1st I didn't do this and I sewed the A seams together and realized that it would going to be confusing to try to match up edges so I made the tags. When I seamed them I did so rather loosely. The seam yarn is at the same tension as the rest of the yarn, I figured this was a good idea and it turns out I can't even feel the seams ♥

To better understand the construction and square placement, I printed out the diagram after filling each square with a different color and cut it out and taped it together per the pattern instructions.

Oh, I didn't like how shaggy the outside of the slippers looked after felting so I took our electric hair clippers to them and shaved all the fuzzy off the out side.

Now I just have to make the other one... and many more♥


I finished the slippers! Here are some various shots of them in diffrent stages.

I did find that I liked the fit much better if I sewed the cuffs together in the front for about 5 stitches. it just feels snugger. I'll probably go back to the 1st slipper and stitch it closed in the front just a bit.

this is what it looks like before I seamed it

Here's a good size comparison, the 1st slipper is laying on top the new one before I felted it. You can see how much it shrank!

And this is before I took the clippers to it. This is how it looks straight form the wash. Incredibly shaggy! I only shaved down the outside of the slipper and the underside of the cuff flaps. I left the inside and the folded down portion of the flaps shaggy.


3-25-2012

Another slipper update.

I have made another pair of these slippers. I gave them to my step mom and would concider them a childs/large childs size as she has rather small feet and can actually wear boys shoes.

But with these slippers I modified the heels. As the pattern is, it is composed of full squares. but when you seam them together like that the heel ends up with a pointed flap sticking out the back. I simply cropped the corners off the squares that will be seamed together for the heel.

On these slippers each square is 14 stitches x 16 rows.

What I did was on the 2nd square of the strip which would be the heel, I crochet 8 rows at 14 stitches wide. than I reduced 1 stitch per row untill I reached my row height of 16 rows. I attached the next color and worked one row, stitch for stitch. And than I increased 1 stitch each row until I had worked back up to my stitch count of 14 stitches and finished the square to a height of 16 rows.

This does not result in any new seaming directions. I seam them from the toe up as the diagram states. I seam up to one cuff and than start at the broken heel and seam that and work around to the other cuff. This just makes a more rounded heel and eliminates the heel flap.

Here are some photos of how the modified heel is worked.


This is just about finished. I like to have the dark end be the cuffs so that is where I put my modified heel.
And here is a close up of it seamed together. I just think this looks neater.

I do not have a finished, felted photo of these as they were gifted for the wearer to felt.