
A place where I can share patterns and help others on their way to loving fiber crafts while being left handed.
Tuesday, September 29, 2009
the bookmark is done
Here's the photo of the bookmark. I did press it but after I took this photo. it did look a ton better after pressed. But I sure did learn a lot while making this. It was a great experience to join in different directions.

Monday, September 28, 2009
My Birthday Present

My Dad gave me the painting/print he bought the day before our wedding in Jamaica. We were married in Montego Bay March 5, 2002. It's a fiar sized painting. My Birthday was Yesterday, Sept, 27. And I spent the day with both my Grandma's. My AZ grandma is celebrating her 80th and my Grandma Z is going to be celebrating her 90th next month.
Sunday, September 27, 2009
Tatting a draggon

So the bookmark is done (will post later). twisted some of the chains but Oh well, it was a learning experience!
Anyway I've decided to tatt a draggon. It's a bit ambitious for a 2nd project but I am not worried about mistakes... that's how you learn. i figured out how to tie in the ends as I go (at least for the begining of the strands).
Well I figured out the SSSR and did the body just fine. I could stand to have my rings closer together but Oh well, I'm plenty happy with the results as far as it being a 2nd project. I gotta go and figure out the wings though. I think I screwed them up somewhere. But the body went smoother than I expected. These are fun little dragons to make and I'm sure this won't be my last!
Here is the PDF pattern for the dragons Flying Minor Norwegian Dragons
Friday, September 25, 2009
A day at the gardens
I took my 3yo on a field trip with this class to Fredrick Meijer Gardens & Sculpture park. I so love that place... it's amazing! If anyone ever comes up to West MI (or passes through) I would highly recommend stopping there! It's such a wonderful place! We spent most of the time in the childrens gardens and they have this water pool that is in a accurate map of the great lakes that the kids can play with. They have regular exhibits and displays and are always acquiring new sculptures. I used to spend so much time there when I was pregnate. I think with taxes I will get a membership so I can go any time I want with the family. My husband is the mechanical engineer and I am the artistic one so the children will be well rounded and exposed to many things. My son is the blond in the blue/grey Micky shirt with the 28 in the corner (and sleeping in my lap right now ;) )


Friday, September 18, 2009
progress on tatted bookmark
My next crochet project

So, I was thinking all last night (I work 3rd... 11pm - 7am) about the yarn I recieved and what I want to do with it. and the picture thing was just running wild in my minds eye and I started to sketch out my ideas on some lable paper from the printer. I see the background being a suble variegated blue and the grass being sublet variegated green done is a spike stitch. and the tree being appliqued on. the tree top which would be done in that wonderful yellow yarn would be ina overlapping bands of the clover lace stitch my aunt used that i found in her tatting stash I think the little clover pats would look very much like leaves. I also see the edging having leaves all around it. either in squares or appliqued on.
Thursday, September 17, 2009
Ohhh that yummy yarn!
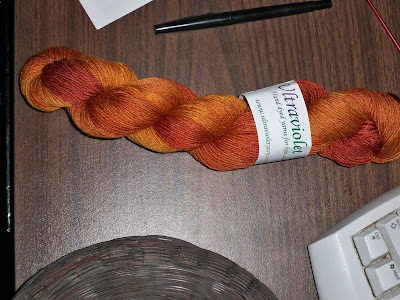 I won this wonderful yarn and my mind is whirling as to what to do with it. I was initially thinking of making a doily pattern that was a sunflower into a throw using this for the flower. but the colors are so deep and rich and my mind is into artsy mode and I'm considering using it for a crochet wall hanging of my own design one of my "make it as it goes" designs, I have this way of seeing things in my head and then trying to make them happen in thread/yarn. This would be perfect for the changing colors of leaves on a tree... or even a sunset.... hmmm the possibilities!
You can find the blog of the talented lady who made this yarn at La belle Helene She defiantly as an eye for color!
My "new" tatting supplies
 So this is my "new" tatting stash I received this AM. The very yellowed piece of paper is a hand written pattern and the little square w/the ribbons appears to be a needle book as it's fleece lined. 4 shuttles, one has a removable bobbin and all but one have a pick/hook on it. Also are the samples that were in the basket. I love looking at work from time past. There are also some pattern pages. Also is a "how to" booklet with the patterns that these motifs were made form.


Wednesday, September 16, 2009
my 1st project and tatting experience

So I have decided to make my Grandma (Mom's Mom) a bookmark. It's a simple design. I found some really pretty thread. one was a dark purple varigated from Dk. purple to lt. purple and the other is lt. purple to white. the light purple in each match. So the rings are in the dark variegated and the chains are int he light variegated. I think it should be pretty. I know it won't be perfect but you gotta start somewhere. The thread is size 60.
I took this with me to my dentist apt. this AM. I figured it would be good practice and figured if I did run into someone who knew what I was doing they certainly wouldn't mind my beginner mistakes. And one of the dental assistants was asking me about it. I told her I had just started to teach my self and she said that she had some tatting supplies that were either her grandmothers or mothers and she didn't have anyone to pass them to and she does not intend to tatt and asked me if I wanted them. She said there were some plastic and metal shuttles and thread and that it's all tangled. I told her I would definitely appreciate them and if she gave them to me she could be assured that they would be going to someone who would appreciate them.
So tomorrow on my way home from work she will have them and I'll stop by and pick them up and also post on what my findings are.
I think now is definitely the time for me to start tatting with all these supplies coming in I would be a fool not to!
Tuesday, September 15, 2009
My favoriate book to learn by - any fiber craft!

If anyone out there want's to learn nearly any fiber craft/needle craft and you can find this book... BUY IT!!!! This is a wonderful book covering many crafts with detailed diagrams, directions, abbreviation codes, photos, stitch patterns and a history of each craft. Verry fascinating to simply read. It does have some patterns in it but it gives more in the line of stitch patterns so you can make your own things. Click on the photos for a close up and I also scanned the back and you can see all that it coveres. It was copy wright in 1979
You can often find copies at Amazon
It appears the same book was re-issued (yet still out of print) under a different name. available also at amazon the step by step needlecraft encyclopedia
I have not seen this book but based on the author, contents and chapter layout it appears to be the same book.

Monday, September 14, 2009
my 1st tatting attempt
Saturday, September 12, 2009
My inherited tatting supplies

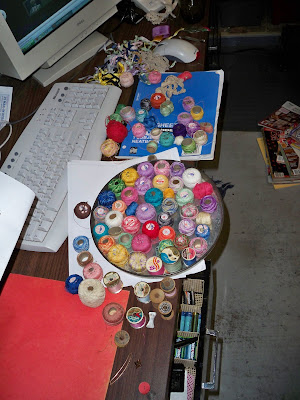
I have had this tin for quite a few years and tatting has been in the back of my mind but i finally went through the tin and sorted it all out. This belonged to my Great Great Aunt Gracy who passed away probably about 25 years ago. I am the one who recieved all this because, though many family members crochet, I am the only one who has taken an intrest in thread so I would be the only one who would eventually get use out of these things. These are all vintage of course. Varing brands from Coats & Clark to Lilly. All are either identified as "Boil safe" or "Boilproof". And nearly all, except a small few, are size 70 thread.
IN the back of this photo were all the ribbon that was also in the tin. I just realized that in this photo you can see my battery holder I made out of plastic canvas. I cut it the width and height of the draw and made the sections wide enough to hold various sized batteries. We use rechargeable and this is a great way to keep them organized.
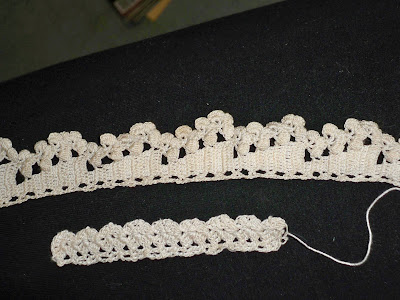
 This is a motief that was in the tin
 This is the shuttle which is stamped "Gen Silver" and the motief and a strand of tatted lace that is 5' long! The photo is taken on my leg and shows how small the work is.
 These were some crochet edgings that were also in the tin.
Progress on the curtain
It doesn't appear to have grown much but I did finish the 2nd full heart. I had to rip 4 rows because I skipped a bar and didn't find it till I was reproducing the heart pattern and in filet (especially the open mesh background), a missed bar is a blunt error and not easy to hide.
The panel is now about 8" long and, as you see, I have nearly used up the entire ball of thread.
I use a loop of yarn to help keep my thread (and yarn if I'm working with it) in position over my index finger. I tend to have a problem with it sliding off and prefer it to stay put between my knuckles.

Sunday, September 6, 2009
About the snood

So the snood is finished! It was rather easy but I did have to rip it because the pattern confused me a bit. Pattern: Perky Snood
for starters to do a long trebble crochet you YO 3 times before inserting your hook into your work then you YO and draw through 2 loops on the hook 4 times.
This pattern is basically a octagon you can adjust the length by adding or subtracting repeats of row 9.
the increases and decreases are on both sides of each row. When it says "long tr in 1st tr" it means to do a long tr in the stitch that you just chained up from and this adds a mesh square at the start. The increase at the end is fairly clear. Here are some different angles of my finished snood.
for the trim I did it as DC, ch1, DC, ch1.... all the way around placing a DC in the same stitches as the long trebble crochet stitches are and 2 in each block. on the decrease triangle blocks I did one DC in each block space. I then made a foundation row SC (or chain less foundation) and laced it through the DC and used it for a tie. I made the chain less foundation long enough to be able to tie it into a bow. It can either be tied at the top or hidden underneath. Oh, and this design took nearly the whole ball of red thread and that includes making the tie.
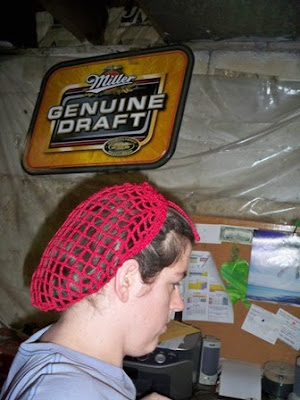
 This is a photo of just the body finished w/o any edging or the tie.
Saturday, September 5, 2009
my snood
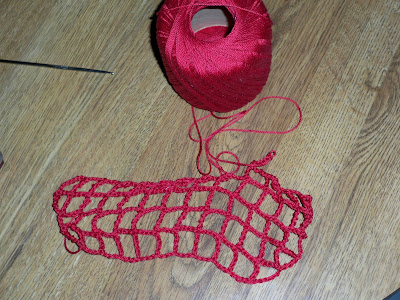 So I'm now making a snood. It's basically a hair net but it is a very old type dating back to the mid evil period. With all the candy making I do which is coming up this time of year and also Anja's band has a apple pie fundraiser where we (parents and students) get together and make hundreds of pies (400 last year) I wanted a crafty way to keep my hair back so a snood it is!
The pattern can be found here Perky Snood . The pattern calls for a long trebble crochet and what you do for that is yo 3 times before inserting your hook into your work and draw through 2 loops each time (total of 4 times per stitch).
Friday, September 4, 2009
The snowflake is done!

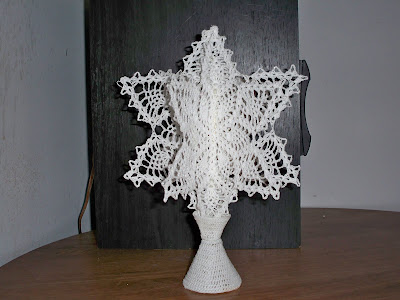
The snowflake is assembled and finished! I must say it is very pretty! in the stand it is 11" from base to tip. I'll have to update when the auction is over to post what it sold for. When I stiffened it I didn't dilute the glue hardly at all because this is going to someone else I wanted it to be as stiff as possible and it is very hard!

Thursday, September 3, 2009
updated my poetry blog
I found my disk that i had thought I lost that i had all my poetry stored on so I uploaded it all individually to my poetry blog if anyone is intrested
Poetry Thoughts and Ideas
Poetry Thoughts and Ideas
Wednesday, September 2, 2009
Drying the snowflake
 These are the photos of my snowflake drying. i had to use a hair dryer to speed it up so I could use the pins for the last flake. The base is drying on some cup tops they used to have at my DH work. They are cone shaped and are for kids cups (he works at a bowling alley) but the top was a bit to skinny (strw hole sized) so I put a dime on top and stretched them over that. for stiffiner I used Elmer's ALL PURPOUS glue very slightly diluted with water.
stiffening thread crochet
Subscribe to:
Posts (Atom)


