Showing posts with label crochet tips. Show all posts

Wednesday, February 2, 2022

Flipping any YouTube video

Something I just learned. If you go to the URL of a YouTube video from the website (not the app) and replace YouTube or m.youtube with mirrorthevideo it will flip any video so you can view it mirrored. Great for turning any right, or standard,  knitting or crochet video into a mirror or lefty video


Monday, February 22, 2021

Darning needle holder

 My brain works in weird ways. I opened a packet of Sugru (moldable putty glue) and didn't use it for what I intended so I was trying to figure out what I could use it for before it set up. 

 So I got a cap from a dried up marker and cut it down (it was to long) and used it to glue the cap to my lamp by the chair I sit and knit in. 

 And that's how I made a darning needle holder so they don't fall off my stand when not in immediate use and are at the ready.


Sunday, April 14, 2019

How to win when you loose at yarn chicken

How I adapted this pattern to make the yarn stretch.

I chose to use a hook 2 sizes larger so running out is my fault. I did buy more dark purple, but didnt want to have to wait for more of the light yarn. Being that it was the last band followed by a lace edge I chose to skinny up the design

Below is the lace band overwritten with my adaption. The screen shot is from the program "knit companion", which is a fabulous app! The section I modified was everything in the white.

1. a the 1st row of sc is just a foundation to build the next row of DC on. I conserved yarn by changing this row to a sc, ch1, sc row instead of all sc. Being sure the sc would be where the next row was worked into so that the chains would show and creeatevthat boundary foundation similar to the band above.

2. I made sure to work the DC for the next row into the sc stitches. This still leaves the ch stitches below visible  so that it keeps the feel of the origional panel

3.the next row of sc is to work the cluster stitches onto. I eliminated it. 

4. The 3tc cluster stitches are a HUGE yarn suck. I reduced them to a 1tc v stitch. This maintains the V, but cuts the yarn by close to half. I made sure to crochet into the chain1 spaces of the DC row as the sc row is missing.

5. Because I eliminated the row of sc before the V row, I eliminated the row of sc after to keep it symmetrical. This row gives you the foundation for the next row of dc.

6. Because there are no sc stitches over the chain spaces in the V row I worked the DC stitches directly into the actual chain stitches. Working around the chain will allow them to slip around and you want to maintain spacing. And without the sc row to work into,  placing them into the chains secures their spot. When working at the top of the VV I went down under the strands and stitched between the to pull it all up nice and tight.


Below you can see the difference in the full panel and the thinned out panel. It's clearly lighter, but it blends in as it tapers to the lace edging. Also keeping the essence of the main rows makes it look more planned. I had to frog this section numerous times as a reduced stitches to conserve yarn. Whatever I did below the V row i had to do above it to keep it balanced.

None of this effected cstitch count. The row is a bit shorter, but counts are all the same


The pattern is available on ravelry. It is for sale and the charts are great. The written pattern is a bit confusing as they way over explain it. 

My shawl took 2 Hanks of dark purple and would have taken a 2nd hank of the light to finish. But if you follow the pattern you should have enough. I ran out of purple about 1/2 way through the last purple band. Again, I was using an I hon instead of G because I like the fabric better.
https://www.ravelry.com/patterns/library/rimsky-korsakoffee-cake-shawl

This is a picture of it pinned out. I steam blocked it. I also used sock yarn


Sunday, May 19, 2013

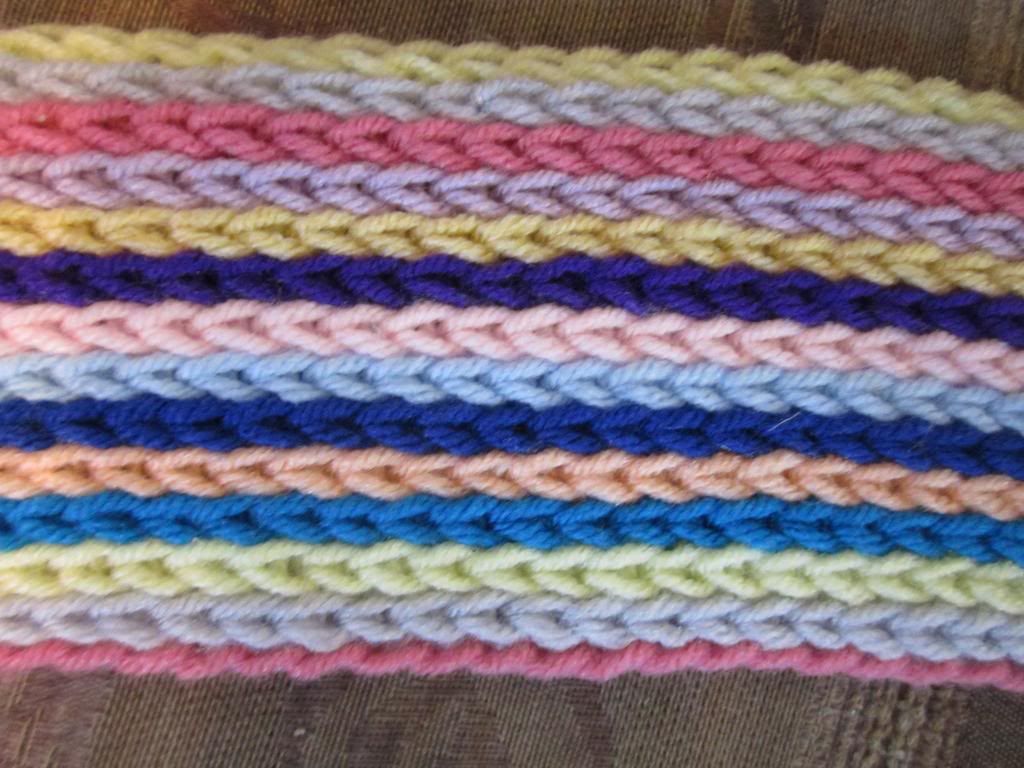
back bar single crochet

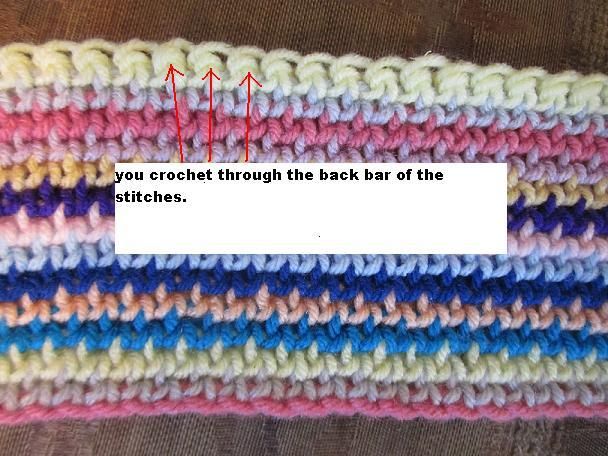
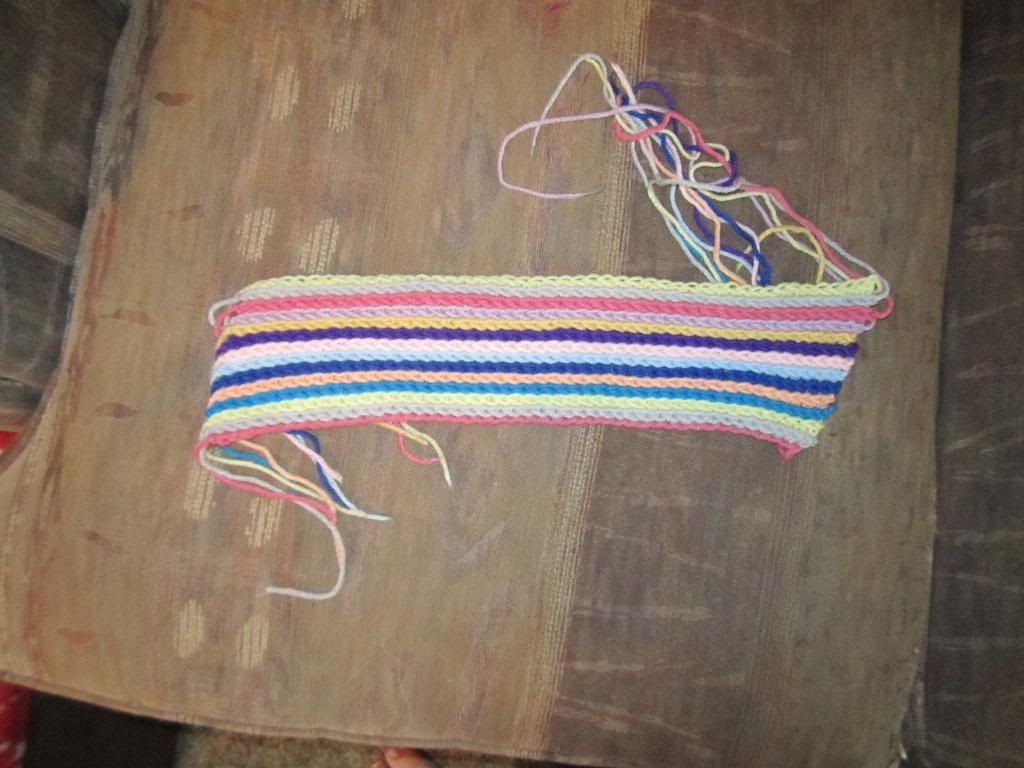
This is a technique that I cam up with when someone posted a "how is this done?" photo. This is crochet through the back bar of the stitch and it is always worked with the right side of the fabric facing you.

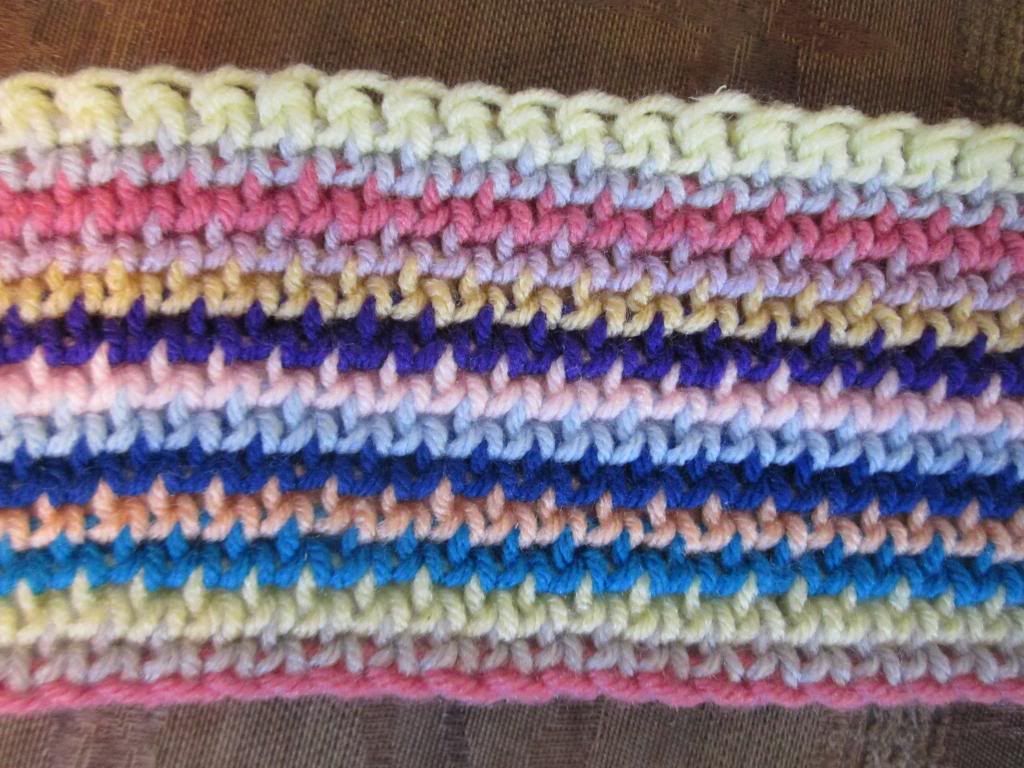
When working this flat, you work 1 row and break your yarn and return to the beginning to start the next row new. By working through the back bar of the stitch you are pushing forward the top edge which leaves the right side of the fabric showing the braided edge of each row. This also results in a denser fabric. 

I recommend using a larger hook and a non splitty yarn to be sure you can get your hook into the back bar of the stitch. For the initial chain I worked it with a hook 2 sizes larger than the one I did the work with to help eliminating a tight edge.

This also will bias hugely as it's worked all from the right side. There are ways to counter this effect and I will mention them later. Due to the tails on each side, this is also a great fabric to add fringe to, especially if you are working each row in a different color.

This makes a nice fabric for a place mat, or a unique texture for a scarf. You can work it in the round to create a unique striped edging for a blanket.

this is the fabric from the back. You can click on the images to enlarge them.


To start, chain a desired amount for the length you wish to make. Use a hook 2 sizes larger than your working hook to make sure your starting chain does not get to tight while working into the stitches.

* I always prefer to work my 1st row of any project through the back bumps of the chain. This creates a nice edge.

After you have made your chain, turn and switch to the smaller hook and now  work 1 row of SC. I like to end with a chain one than break my yarn. (this is the right side of the fabric)

After this point you will always have the right side facing and you will be crocheting into the back bars of the stitches.


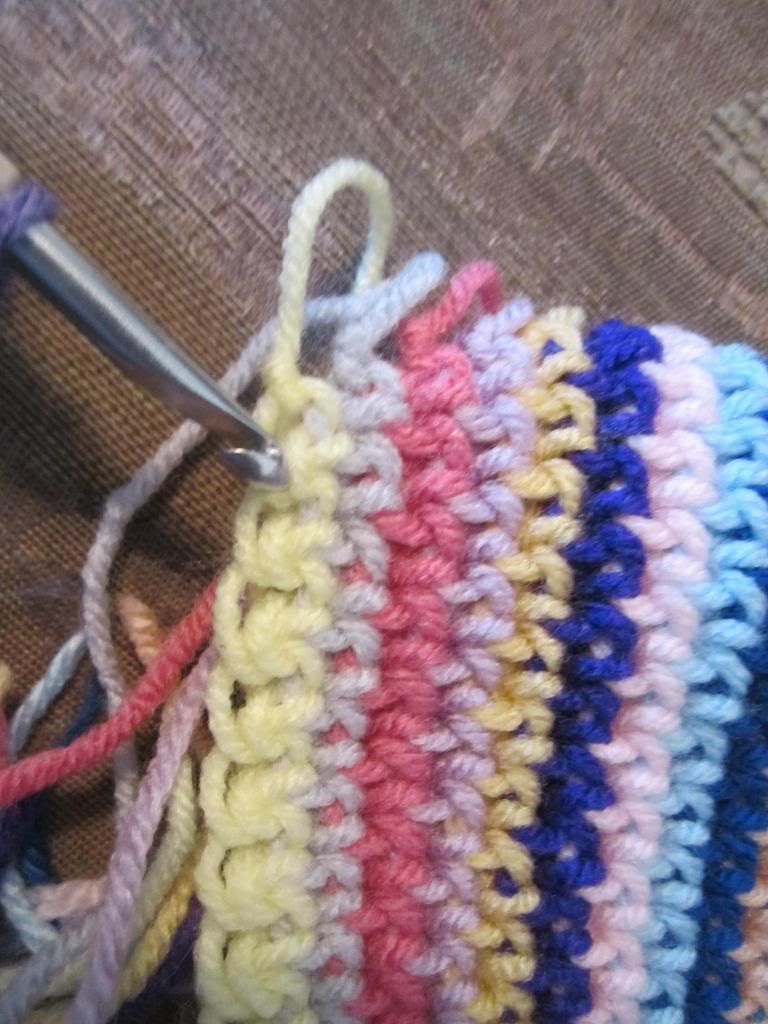
Return to the start and join with a single crochet into the back bar of your 1st stitch. 


To join with a single crochet place your slip knot on your hook and insert your hook into the bar, yo and draw up a loop, 


yo and draw through loop and slip knot on hook.


Continue working accross the row working 1 sc into the back bar of each stitch on the previous row. 


When you reach the end the last stitch can be hard to see. This one is a bit harder to see because i left my ends loose.


Here I have 1 stitch left to make


Continue to work 1 sc in each back bar to the last stitch and chain 1 and break yarn

Working every row as stated above will result in a fabric that slants on both sides. This is just the nature of this stitch.


If you wish to minimize this effect or shape the bottom differently, you can work 2 sc into the 1st bar of the row and on the last 2 stitches sc them together (insert hook into next stitch, yo draw up a loop, insert hook into last stitch yo and draw up a loop, yo and draw through 3 loops on hook). doing this on every row will result in the fabric slanting the opposite way. Alternating every 5 rows or so between regular and the shifted rows will result in a edge that has points.


To make the edges more straight. work one row regular, stitch for stitch to the end. and work the next row with the sc2 in 1st bar and sc2tog in last 2 bars. this will help keep the edges in a straighter line.

On the 1st 3 rows of the pruple here, I have worked them as the shifted rows starting with 2sc in 1st bar. you can see the slant is gong the oposite way as the edg in the fabric below the purple.

the rest of the purple is worked alternating rows which has caused a straighter edge.

this is how the solid section will look from the back


and form the front


Saturday, March 23, 2013

Adding a corchet edging

I am working on a collective blanket and I have received crochet and knit squares from around the world for this blanket. Lots of gauges are different and I am going to crochet the blanket together. So to prep for this I am putting a crochet edging on every square to make it easier to assemble. the thing is there are so many different gauges and I am a very relaxed crocheter (and knitter) so my gauge is looser than some PPL's. I'm also crocheting with a I hook

If I work stitch for stitch my edging would end up ruffled because my gauge is much looser than the original knitter/crocheters. So  I thought I would take the opportunity to make this little post.

This is how you can tell if you will end up with a ruffle or a pucker wend adding a crochet border to a project weather it is knit or crochet.

Sorry for the quality of these photos, I took them with my phone. But I think you can still see what I'm talking about. Here I have corchet along the edge of a square. but you can see the edge of my stitch is nearly at the edge of the next stitch  I have not crochet into. If I keep going at a stith for stitch rate, I will end up with a edging that ruffels. so when I see my stithc start to run ahead of the stitch I hven't worked into yet I know it's time to work 2 as 1 off my square edge.


 So to make up the difference here I have simply inserted my hook inot hte back loop of the next stitch and the one after that and worked them as 1. You can see now my stitch is no longer leaning over the next stitch and I have compensated for the difference in gauge. You want your edging stitch to be directly above the stitch you are working into. I really like to crochet into the back loop (if able) when this may be an issue because you cannot see the crochet 2 tog and it doesn't interfere with the edging lines.

Some squares I had to sc 3 and than sc 2tog to get the edging to be nice and smooth.


An if you are working your edging and it seems your stitches are starting to pull back  you need to crochet 2 into the 1 on the next stitch to make up for the difference. IF you don't than you will end up with a tight edge that may pucker and curled up.

And that is how you read your crochet and you will be able to keep your edging in match with your project if they happen to be at different gauges.

Now I did have one knitted square that was so tight on the edge I could not get my I hook into the stitches to make an edging. the way I adjusted for that was I did 1 round with a G hook because it fit more easily into the stitches and than the next round with an I hook and didn't increase stitches in the corner as the hook size increased it naturally.

Friday, March 15, 2013

Steam blocking

I made a video of me blocking my recent shawl to show how easy steam blocking is. This shawl is crochet from KP Gloss Lace yarn which is a 70/30 blend of wool/silk Steam blocking is my preferred method for blocking. It's really fast and you eliminate that pulled look that you can get from over stretching on pins. For items that have rounded curves, this is a great way to block and not loose those lovely lines.


Here is the center crock stitch spine before I blocked it.


And this shows the difference after blocking. In the video you can see it just lay down as i block it.


Saturday, March 9, 2013

Crochet intarsia

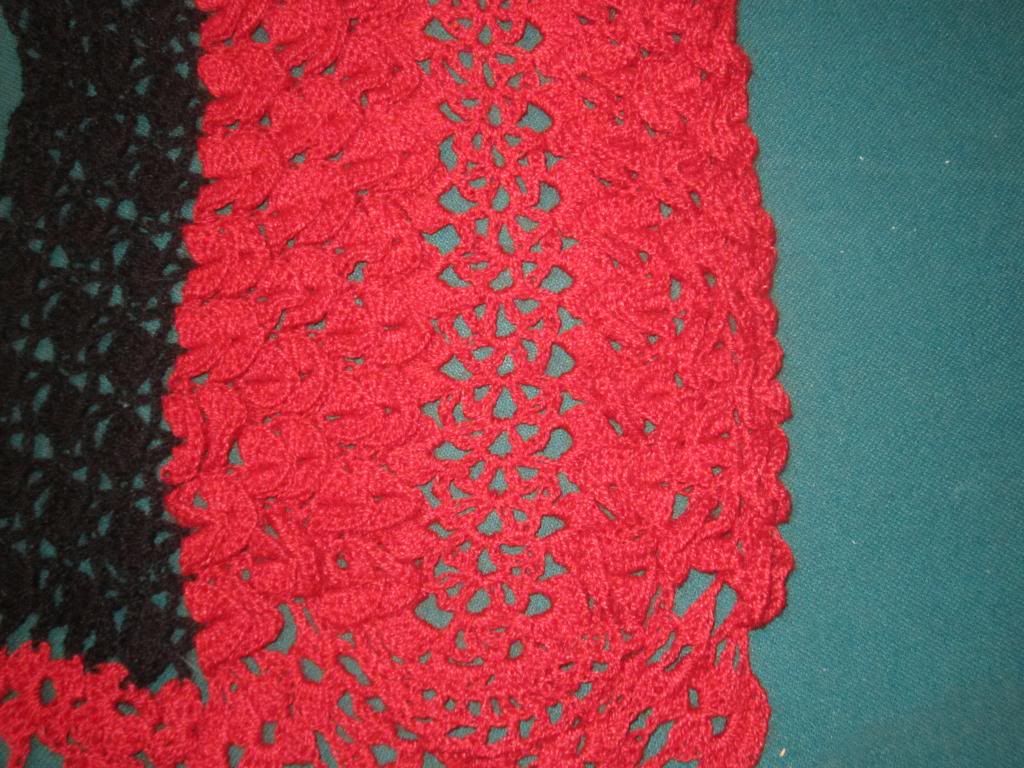
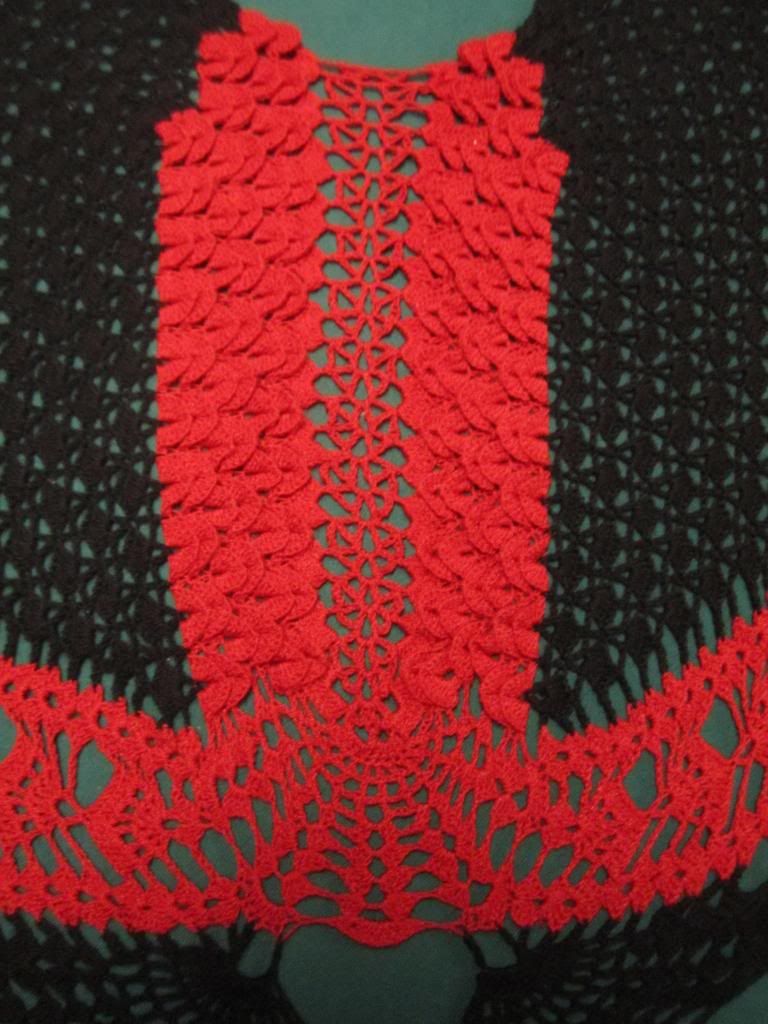
This is a technique I came up with in an effort to eliminate the ends I would have to weave in while making my most recent crochet shawl. I am calling this crochet intarsia. Like intarsia in knitting, this technique allows you to work separate blocks in of color in lace without having to cut your yarn or using other stranded techniques. I leave each ball connected to the project, ready to pick up and work when I get back to it.

Reminder: I'm left handed and crochet left to right holding my hook in my left hand

Being that this is lace work I didn't want to have to weave ends in everywhere but I wanted it in 2 colors split 3 ways. I have taken photos of how I did this. But you will have to forgive me as my photos are of me working this current project which happens to be crochet out of lace weight black and red yarn so the photos may not be the best (the yarn is a wool/silk blend so it does show up kinda well considering). They should be good enough to get the idea/technique across though.

This may seem quite tedious of a process, but when you consider the other option I had to make this shawl in this color scheme was to clip the yarn and weave in each end on every row several times for each color... this is a rather attractive alternative. With this method, the only ends I have to weave in are the 3 from the start and the 3 at the tip of each wing when I am done.

This shawl is the Icarus Shawl available form interweave and this is the Ravelry page for the pattern as well.

I have been taking detailed notes as to my changes for this project on my Ravelry project page

This is the shawl finished and blocked.

You can enlarge any picture for a full clear view.


Here I'm about to start the color switch. I have a chain 3 for my black (space between black and red shell)


I have my loop left on my hook from my chain 3 and now I'm going into the black in the row below where the red passes through the black chain space.

I am doing a yarn over and will draw a loop through the black to give me a working loop to crochet with. still leaving my black loop on the hook. I pretend it's not there. you can drop it if you like.

I have drawn up a loop and am ready to crochet with the red.

I have slip stitched back to the chain 2 in the shell.
 I have chained up 2 chains and slipped that loop of black around the loop of red on the hook.


Now I close the loop of red to fit the hook

 now I bring my hook around those chain 2 and snag my yarn and bring up a loop this traps that chain 2, this will become part of the 1st stitch.


Here I went into the chain 2 space in the shell below and drew up a loop. I yo and draw through 2 loops on the hook, yo and draw through the last 2 loops completing the 1st double crochet, trapping my black yarn form the other section and also wrapping my chain 2 up into the stitch. I than did 2 dc to complete the 3dc cluster of that side of the shell. The black yarn is left attached to the ball and forgotten till we need it again.

Now I'm at the other side of the red section and have completed my last shell.
 I am going to insert my hook into the stitch of the shell below that the black is going through.

Now I yo and draw up a loop of black (note the red loop i was working on is still on the hook, you can drop it or just forget it exists for a minute)
 Now I have slip stitched back over the chain 3 space and up the point where I would normally crochet into for my 1st stitch in after the shells section.

A note about slip stitching back over the chain, this is black lace weight yarn so instead of trying to find each stitch I simply slip stitch around the chain, chain 1 and slip stitch around the chain, easier and faster than trying to slip in each stitch. this is how I slip stitch around all the chains in this shawl.
 my 1st stitch coming off the red is a chain 3 space and a dc, so  I have chained 6 to make the equivilant space. I have slipped my red loop over my black loop on the hook. and now I will slip stitch back over 3 of the chains I have just made trapping the red loop of yarn.
 Here I am back to the point to work in pattern.Slipped back the 3 stitches and the other 3 chain stitchs represent my 1st dc. Now I can just work in pattern as written.
 I have worked to the end and turned my work and came back to where I just left off in photo above and am ready to change back to the red.
 I will insert my hook into the black strip form the row below where the red is trapped through it.
 this shows where I have put my hook through the black.
 I will now slip stitch back to the chain 2 space of the shell, just as I did earlier.

 doing a chain 2 and slipping my black loop from the previous color section around the red loop on the hook.
 Now i have brought my hook behind my chain 2.
 I have done a yo to bring the loop from behind the chain 2 around to the front and than inserted my hook into the chain 2 space of the shell and will complete the stitch as a normal dc trapping the black yarn and the chain 2 from my chain up.
 This shows the black yarn now taped in the 1st stitch of the shell.
 and I work across the red section to the last shell on the other side.
 I will put my hook into the section of the shell that the black yarn is trapped through and yo and draw up a loop with the black yarn.


 Now i have slip stitched across the chain 3 space of the black yarn up to where my 1st stitch is to start in my background shell (which is the 4th dc.
 For this pattern, I would normally start this section with a chain 3 space and a sc into the 4th dc in the cluster below (this is the stitch I slipped back to). So I have chained 3
 And slip the loop of red yarn around the loop on my hook.
  And will slip stitch back across this chain creating the chain 3 space required.

 Than I will do a sc into the same stitch I started from and am ready to work back in pattern as written.


Here is a closeup of the left wing tip. I like how this technique works. Yes, it does make those joining chains thicker, but so would weaving in ends.