Saturday, December 26, 2009

Some assembly required...

MY ASS!!!!

My parents got the boys a play kitchen for Christmas. Robert was so excited that as soon as he unwrapped it he suddenly wanted to go home and didn't want the rest of his presents. He even started to shove the box towards the door.

So I got it home and opened it up. There couldn't possibly be more assembly required. All the pieces were connected together with runners. So just to start putting it together I had to cut it all apart!

But needless to say at least 2 hours and 1 beer later It was done and is well loved! So all the effort was worth it. The boys really love their kitchen and playing with food (which they have a TON of!)

And lets not forget the best part.... THE BOX!

And all that turned into this.... And the final product!

Painting sugar cookies

So we painted sugar cookies on Christmas eve. This is a fun thing for the kids (and adults)! It takes more time than other methods of decorating cookies but it's quite fun. You start with your favoriate rolled sugar cookie recipe and make a bunch of cookies! And for the "paint" I don't really have a recipe exactly but I take a medium bowl and fill it with powdered sugar. Add about 1-2 tsp vanilla extract and I like it to be a bit buttery so I add 1-2 tsp Whilton imitation butter flavoring. Gradually add milk and whisk to the desired consistency (paint). divide into small bowls and color the icing. get some cheap plastic craft paint brushes and let everyone have fun!

Here is the sugar cookie recipe I used:

Rolled sugar cookies

Recipe By :
Serving Size : 0 Preparation Time :0:00
Categories : Cookies Deserts
Holiday recipes

Amount Measure Ingredient -- Preparation Method
-------- ------------ --------------------------------
1 1/2 cups butter -- softened
2 cups sugar
4 whole eggs
1 teaspoon vanilla extract
5 cups all-purpose flour
2 teaspoons baking powder
1 teaspoon salt

1. In large bowl, cream together butter and sugar until smooth. Beat in
eggs and vanilla. Stir in the flour, baking powder and salt. Cover and
chill dough for at least one hour (or over night).

2. Preheat oven to 400ºF (200ºC). Roll out dough on floured surface 1/4
to 1/2 inch thick. Cut into shapes with any cookie cutter.

3. Place cookies 1 inch apart on ungreased cookie sheets. Bake 6-8
minutes. Cool completely.

(click on any image to enlarge it)


Thursday, December 24, 2009

Finished my last Christmas project!

Talk about waiting till the last minute! I was getting a bit worried. All the hours I have been working (6 day weeks on 3rd shift) has really slowed down my holliday projects. But i made both my nephews hats. My older nephew asked me to make him one and I figured I might as well make one for my younger one as well. So. here are the hats. I used I Love This Yarn from Hobby Lobby. The one on the right was the 1st one I did and I just finished the one on the left. It's only by chance that they ended up with stripes in the same spots.

Maple nut sticky buns

A great recipe for breakfast. Make these the night before and let them rise in the refrigerator over night and take them out while the oven is preheating then just pop them in! This will be our yummy treat come Christmas morn.... and good any other time of year to!

Maple Nut Sticky Buns

Recipe By :
Serving Size : 12 Preparation Time :0:00
Categories : Breads Breakfast

Amount Measure Ingredient -- Preparation Method
-------- ------------ --------------------------------
1 cup nuts -- coarsely chopped
1/2 cup maple syrup
3 cups all-purpose flour
1/4 cup granulated sugar
1 package yeast
1 teaspoon salt
1 cup water -- warm
6 tablespoons butter -- softened
1 whole egg -- room temp
1/2 cup packed brown sugar
1 teaspoon cinnamon

1. Grease 13 x 9 inch baking pan and spread nuts and syrup evenly over the bottom.

2. Combine 2 cups flour, granulated sugar, yeast and salt in a large bowl. Stir in water, 2 tbs. butter and egg. Beat until smooth; gradually stir in remaining flour until soft dough forms. Cover with plastic wrap; let rise until doubled, about 30 minutes.

3. On lightly floured surface, roll dough to 15 x 12 inch rectangle. Spread with remaining butter. Mix brown sugar with Cinnamon; sprinkle over surface. Starting with a 12" end, roll up tightly.

4. Cut into 12 slices; place cut side down, evenly spaced in prepared pan (they will rise to fill the gaps). Cover with plastic wrap and let rise until buns double. 30-45 minutes. Preheat oven to 375º F. Uncover buns. Bake until golden brown, 25-30 minutes. Cool for 1 minute. Loosen edges;
invert onto serving plate. Serve warm.

- - - - - - - - - - - - - - - - - - -

Per Serving (excluding unknown items): 280 Calories; 7g Fat (23.5%
calories from fat); 6g Protein; 49g Carbohydrate; 2g Dietary Fiber; 18mg
Cholesterol; 191mg Sodium. Exchanges: 2 Grain(Starch); 1/2 Lean Meat; 1
Fat; 1 1/2 Other Carbohydrates.

NOTES : You can place yeast doughs in a slightly warm oven to provide a dry, warm place to rise. To easily cut dough, use string by wrapping it around the dough and pulling it through.

Mix 'n' Match
For cinnamon rolls, omit syrup and nuts; glaze with a mixture of 1 1/2 cups confectioners sugar, 2-3 tablespoons milk and 1 teaspoon vanilla.

It is best to judge rising by size and not be concerned by the time it takes.

Tuesday, December 22, 2009

Peanut Brittle

So, here's the steps and recipe for the best peanut brittle ever (seriously, this is what many PPL say about it)! I have found out that you can get the silicone baking liners and use them and this eliminates the need to line and grease the pans.

Another thing about candy. Hard candy is dry candy. it's hard because you have cooked out the water. So, if you make hard candy on a humid day it will adsorb the moisture from the air and get tacky Which is why it's really popular in winter (the air is dry). This is also why it is important to make sure you keep it covered. And do not store softer candies along with hard candies. I did this once and my brittle got soft and tacky due to the moisture in the other candies.

Peanut Brittle

Recipe By :
Serving Size : 0 Preparation Time :0:00
Categories : Candies Holiday recipes

Amount Measure Ingredient -- Preparation Method
-------- ------------ --------------------------------
1 1/2 teaspoons baking soda
1 teaspoon water
1 teaspoon vanilla

1 1/2 cups sugar
1 cup water
1 cup light corn syrup
3 tablespoons butter
1 pound peanuts -- raw

1. Heat oven to 200°F. Grease 2 cookie sheets, 15 ½ by 12 inches and keep in warm oven. This makes the brittle easier to spread. Grease long metal spatula, or the back of a metal spoon and set aside.

2. Mix baking soda, 1 tsp. water and the vanilla; set aside. Mix sugar, 1 cup. water and the corn syrup in 3-quart sauce pan. Cook over medium heat, stirring occasionally, to 240°F on candy thermometer (soft ball stage).

3. Stir in butter and peanuts. Cook, stirring constantly, to 300°F (hard crack stage). Watch carefully so mixture does not burn. Immediately remove from heat. Quickly stir in baking soda mixture until light and foamy.

4. Pour half the candy mixture onto each cookie sheet and quickly spread with buttered spatula about ¼" thick. Cool completely, at least 1 hour. Break into pieces with butter knife handle and store in covered container.

Source:
"Betty Crocker cook book"
Yield:
"2 pounds"
- - - - - - - - - - - - - - - - - - -

Per Serving (excluding unknown items): 4978 Calories; 258g Fat (43.9%
calories from fat); 117g Protein; 625g Carbohydrate; 39g Dietary Fiber;
93mg Cholesterol; 2728mg Sodium. Exchanges: 4 1/2 Grain(Starch); 15 Lean
Meat; 42 1/2 Fat; 37 Other Carbohydrates.

NOTES : It is easier to spread the hot brittle by pouring it out onto the sheets and then shaking and rocking to make it flow thin. You do not need a greased spatula or spoon this way. Click on any image if you like for an expanded view.
-----------------------------------------------

In this photo the sugar has just dissolved. Because brittle does not have the dairy in it like caramels, you do not need to tend to the pot as often because it will not boil up and over making a mess. Just keep an eye on the temperature.
Here it has reached 240ºF and is ready to have the peanuts and butter added. Make sure you have RAW peanuts because they will cook in the syrup for quite a while and roasted ones will simply burn. 1lb of raw peanuts equals just a bit over 2 cups. You can see the syrup has begun to yellow and the bubbles are a bit thicker. In the cup with the small spatula is my vanilla, water, baking soda mix for later.
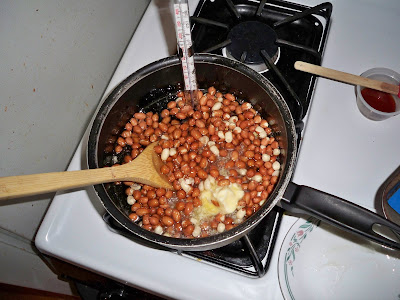
Here i have added the peanuts and butter. This will greatly cool down the syrup and it can be a bit stiff to stir as it gets back up to temp. Once the peanuts are in it you will want to keep it moving. More so after they start to cook and darken so they cook evenly. I only use real butter. When it comes to candy, there are so few ingredients I don't dare cut corners!
Here it has reached 300ºF. At this point you will want to work fast! You can see how brown/dark the brittle has gotten and the peanuts are also quite dark. This is good! And by this time your house will be filled with the wonderful smell of roasted peanuts.
Remove it form the heat and take out the thermometer (you will be siring very fast and dumping out the syrup). Pour in your vanilla (again, I only use real vanilla extract), water and baking soda mixture and mix fast and hard. It will froth up as you see in this image. It's quite a neat process. This is how the brittle gets light, bubbly and crunchy. Without the baking soda it would just be a hard lolly pop type substance w/peanuts in it.
As soon as it is all evenly mixed quickly pour it out onto your pans and spread. Make sure you are pouring it onto a flexible surface (don't use pyres or stoneware for example). Candy makers use marble slabs and the candy cools on contact. When it is cooled and done break up and store.

This brittle is light and crunchy with rich flavors. IT does not tack to your teeth or hurt to bite it.
Cleanup is easy! This is just hardened sugar. So, no matter how bad your mess is, just soak in water and give it a bit of time and it will be easy to wash your pans.

Saturday, December 19, 2009

The last of the tree trimmings!

I have received what i think are the last of the decorations to add to the tree this year. for our Holiday Craft Exchange on the HGTV knitting and crochet message boards I received this really cute Christmas doll and the large colorful ornament stars on the tree which are made of yarn. and this year my youngest sons class made ornaments. The teacher took photos of the kids at one of their field trips and some how had them printed on clear plastic. then she cut them and tucked them inside clear glass globes and the kids added glitter. It's so pretty! It's hard to see the picture inside due to it being in the globe and clear it self but I did get it to show up.


I have recieved what i think are the last of the decorations to add to the tree this year. for our Holiday Craft Exchange on hte HGTV message boards I recieved this really cute christmas doll and the large colorful ornament stars on the tree which are made of yarn. and this year my youngest sons class made ornaments. The teacher took photos of the kids at one of their field trips and some how had them printed on clear plastic. then she cut them and tucked them inside clear glass globes and the kids added glitter. It's so pretty! It's hard to see the picture inside due to it being in the globe and clear it self but I did get it to show up.

Sunday, December 13, 2009

Girl Scouts at the Griffins - hockey

Last night we took the Girl Scouts out to the arena fora Griffins game. We had 9 girls and our troop filled one row. Because some of the girls wore their badge vests & sashes the troup got large posters for Griffins Hockey. They also had a autograph session with one of the warewolfs from Twilight (Alex). That was a bit of a disappointment as they were allowing some to pose with him but kinda shoved our girls through. But the girls got their autographs. Rachel & Jessica cought T-shirts that were being thown into the crowd. We left at 5:45pm and got home just before 11pm. THAT was a long night! I had to work the night before as well so needless to say when I got home I passed out! Rachel spend the night here w/Anja after the game.

But here's our troop


Michael's hat

I made another one of these knit beanie hats. The pattern is Struan By: Ysolda you can find it further down the page in the link. It's a really fun hat to knit and easy to make any size you like. This one is an XS hat for my son. It a top down knit and starts with 5 cast on stitches. Each stitch you add to the cast on it creates one pattern repeat of cables & seed stitch. The brim is a cut piece of plastic canvas. The hat is very warm. You knit the pattern to the top of the ears then you knit 4 inches of the edging and fold it under, tuck in the brim and stitch it up so there is an extra thick band around the ears.


Friday, December 11, 2009

Winter recipes

Here are some fun winter recipes.

Snow Ice cream

Get about 1 gallon fresh fallen snow. You will want to wait till the snow is deep enough to be sure to get CLEAN snow! and the fluffy stuff works best, don't want wet snow.

Add about 1 cup white sugar
1 tbs vanilla extract
and about 2 cups (give or take) of milk

The richer the dairy product, the creamier the ice cream.

Mix the snow, vanilla & sugar and gradually add the dairy till you reach the consistency you prefer and enjoy! Kids love to make this!

Snow slushies
Get fresh fallen snow. Mix Kool-Aid into a really concentrated mixture. Works best if the mixture is chilled so it doesn't instantly melt the snow. Pour over a cup of snow and enjoy!

My large, family sized hot cocoa mix


This is another really easy recipe and great to have on hand. 

In a sealable container. Mine is 4.5 qt/4.3L large rubbermaid flex seal. I just bought a new one. This is the exact one I got on Amazon.
 I dump in an 8 oz container of regular cocoa powder (buy using this size container you do not need to measure the ingredients).
1 box (makes 8 quarts size) powdered (dry) milk
then fill the rest with sugar.

I don't like to mix it in my container as it's tall so i dump the ingredients in the container then put them in a big bowl for mixing and then back in the container when done. I use generous 1/3 cup scoops per mug. The kids love having it on hand during the winters. And it's good in coffee to!

Thursday, December 10, 2009

Oh, the weather out side is frightful...

So they have been talking about nothing but this HUGE storm we are supposed to be having. IT was supposed to hit yesterday. So yesterday morning we had a thunder storm which turned all our existing snow to slush, that was a MESS! But the blizzard never came. we got a flurry instead. only a couple inches. It still made the roads slick though because of all the rain & slush that was on them. So last night it started to snow again. All the schools are closed AGAIN so the kids are home. The snow is coming down fairly well but still not the blizzard they promised. Right now it's about 16ºF but the wind chill is a -3º so it's pretty chilly. I decided to snap some photos while I was out shoveling this AM for the heck of it... No, I wasn't shoveling for the heck of it, just taking photos for the heck of it ;) .

So here are photos of our 1st snow "storm" here in West Michigan.

I am glad though that we didn't get the storm they predicted as they were saying we were going to have a thunder storm followed by sleet and ice and then blizzard like conditions. That would have knocked down many a tree and probably cut power to a lot of homes (which happens every year). I do think though that the ice is so pretty on the trees, just seriously dangerous as you can hear cracking limbs all around when we have ice storms.


Tuesday, December 8, 2009

AND THE WINNER IS.....

with 6 people who entered I left it up to the roll of a dice. I rolled a 2 and Jennifer was the 2nd person to reply to my post. So the winner is...

Jennifer!

And seeming how it appears you are in Italy I will need your address the exact way you would write it on the envelope so I can copy and paste it onto my label.

you can e-mail me through my profile here or on ravelry.

Sunday, December 6, 2009

Creating an angle

I have been making another pineapple lace angle. The pattern can be purchased at Crochet Memories. The pattern is very well written (as all of her patterns are). My only suggestion is instead of trying to crochet into the chain stitch just crochet into the space, it's easier.

You can click on any image to get a large detailed view.

So here are the stages. 1st 2 photos of the pieces simply off the hook and having nothing done to them.


this is my drying station if you will. I cut a paperboard cone and taped it on top of my large Pyrex bowl. Then wrapped another cardboard box with a plastic bag (turned inside out) for the flat pieces. The 1st time I did this I didn't pay any attention to which side of the bag was out. The ink didn't bleed onto the project buy why take any chances.
I am short on pins so I soaked the wings in Elmer's glue all - all purpose glue (slightly diluted with water) and pinned the wings. I took my blow dryer and held it on the wings so it would dry faster and I could use the pins for the halo.

Here is the angle body drying. There is a white pipe cleaner thorugh the arms for shaping and to help hold the trimmings when she is done.


12-7

She is finished! I used the glue nearly full strength so she is very hard! But this is going to someone else so she has to be more durable. The rose is just slipped into the "hands" and tied with ribbon. The ribbon is tied and not glued. I figure this will allow the owner to change the look if they desire to. Or replace the rose/ribbons if they fade.

Saturday, December 5, 2009

Santa and kids

When I was growing up all the presents were from Santa. this is how my folks did it so when I had kids automatically this was also the way I did it. Tagged all the gifts from Santa. Well Anja is now 12 and we have a new way to do it. One gift per child is from Santa.

When Anja was little she loved the Christmas magic and we have never been over spenders but i tagged all the gifts as from Santa. The problem with this that I suddenly noticed is that it made her sad because she believed in Santa so she thought that I/we didn't get her anything cuz it was all from Santa. And not wanting to spoil the magic for her I couldn't say "but sweety we got you these gifts". She has never been a selfish child and we never spoiled her with a ton of gifts. But tagging it all from Santa made her feel like we didn't bother to get her anything.

So now there is a 6.5 year difference between her and my oldest boy. Our boys will be 4&6 Come January so we have the ability to switch it up with the boys to save them the feeling that "Mom & Dad didn't get us anything" one gift is tagged from Santa and the others (which will only be a few more each) will be from us.

We do focus on family and togetherness for the season and base most of our Christmas experience around building memories that will last a life time. But i want them to experience the "magic" also.

So, I'm just telling this story so that if anyone was also raised this way and has young children that "From Santa" is nice and the magic of the season is fun, but if over done it can leave the children we love most feeling sort of forgotten.

Just offering another perspective that I wish someone had told me before hand.

Friday, December 4, 2009

Trimming the tree

So the tree is up. The decorations are on, the popcorn is popped and strung. Here are some photos of the trimming. As you see our decorations are a mixture of collected ornaments throuhg the year. Some made by me others by the kids and other family members. And of course the angel was made by me.


Wednesday, December 2, 2009

My new tatted dragon

12-5
Finished the dragon. These are fun to tatt!


So I'm making another dragon. This one is for a friend to give as a Christmas gift. I only need to make the other wing and it will be done. I took the tips from tatting chick about climbing out of a round with 2 colors and applied it to my dragon. i think it looks really cool (but I may be a bitbias). I also have had a revelation. I figured a way to hide my begining tails but not my end till today. I figure if I end on a ring I can do it as a SSSR then just snip the tail close to the work when it's all done and no weaving needed the end is locked under the stitches!

Crafting for charity/good will

First thing you should check your local hospitals and shelters and see what you can donate locally. Many hospitals take donations which they give out for diffrent things. One time my older son was in for a nasty cut on his head and they gave him a mini granny square afghan to help him feel better. Cancer wards can greatly use chemo caps. Infant neo/natal can use hats and small wraps for the unfortunate circumstances that a baby is still born so they can present the baby in something better than a scratchy hospital blanket.

Here are some other charities to consider...


Head Huggers (USA)a site for making and donating chemo caps with patterns
Knit one Save one save the children campaign to provide hats to newborns in impoverished areas
Knitted helmet liner (USA) helmet liners for the troops in cold climates.
Project Linus (USA) provide blankets to ill, traumatized or otherwise needy children
Warming Families (USA & Canada)

In need of shawls that don't have points made form acrylic. Also throws
GRAND RAPIDS HOME FOR VETERANS
3000 MONROE AVENUE NW
GRAND RAPIDS, MI 49550

pattern sites
chemo caps

Great charity patterns
The convertible (C) a great hat for charity and shelters as it's so multi useful.

*If anyone has any charity you would like to add let me know and include what country (if any) it is in/for. I will be building this as a ongoing thing.

Tuesday, December 1, 2009

Crochet kitchen set give away

I was cleaning out my corner where my rocker and crochet/knitting stuff is and I found this set tucked away all tied w/a bow. I have already given away the sets I intended to and though this would be a nice one to give away to someone on my blog. It is 100% cotton and includes all that you see here. I have 2 of these dish mats for my self that I LOVE to use. Lay it on your counter and stack your wet dishes on them in place of a regular towel. It allows air to circulate and of course the cotton yarn is much more absorbent than a standard terry towel.

This is open to all countries and if you are interested just reply to this post and tell me what you like best about this time of year. Next Tuesday (12-8-09) I will pick someone at random and let you know who gets the set.

Happy Holidays!


*you can click on the images for a closer view

3 Tunisian crochet dish cloths
1 dish mat
1 pot holder
1 handle cover


Sunday, November 29, 2009

My little chefs

So for dinner we are having turkey noodle soup with home made noodles of course. My kids really like to help me cook and I got a few photos of them doing so. The turkey is in the pot boiling with the veggie scraps for flavor. I will strain it and return the broth to the pot along w/the meat I pick from the bone. I have a basic egg noodle recipe that I make. I do not have a past a maker so they are done by hand. Robert cut the noodles with sewing thread. Michael handed the noodles to Anja who hung them to dry. You can find the recipe in my very 1st blog post Drying home made noodles along with how I created my "drying station"

Friday, November 27, 2009

Invisible join - crochet

Often times I just slip stitch but there are times when I want the edge to look seamless and slip stitch join just doesn't get that. I have come up with this method. This is demonstrated on my craft exchange item (but it's to close to tell what I'm making so HA!). You can click on any image for a larger view.

1st a reminder that I am left handed.

When you finish your last stitch do not do a slip stitch join. Break/cut your yarn and pull the end through your last stitch leaving it unattached to the beginning.

Thread the yarn onto a darning needle. You can use a hook also. Now stitch through the same place where you would do a slip stitch join as shown.
Now bring the yarn down through where your yarn came from on the last stitch through as shown here.
When you pull this tight to match the tension in the project the stitch is now "lost" on the top edge. Looks exactly like the rest of the stitches.

Note: This does add 1 stitch to the edging. If you do not want the added stitch you can pull the yarn to close the gap.
Now I like to run my needle back under the side side of the beginning chain up. This creates the bottom hump that you get when you do a normal chain.
Weave your end n as you would normally do per your preferred method.