A place where I can share patterns and help others on their way to loving fiber crafts while being left handed.
Sunday, August 21, 2011
Michigan Fiber Festival 2011
So I went out to the MI fiber fest today and had an amazing time! We had really nice weather for it, not to hot and breezy.
I scored some mill end yarns. the bright pink one is a hand dyed and was only $8 and the cone was only $6 ( it's cotton).
And here are some photos I took from the barns and booths
I love this photo!
They had a costume parade which was really cute!
Saturday, August 13, 2011
How to make a hat... any hat... any craft
Hat's are easy to make and quite fast to work up. You don't need a pattern to make a nice hat. These tips will work to help you make a hat out of what ever craft you choose be it knitting, crochet, nalbinding or what ever... it all works the same.
Now this method does tend to a bit of frogging some times to get it right but if you start at the bottom and work your way up this is minimal. With knitted hats you may like to see what your gauge is via a swatch but it's not necessary. For my knitted hats worked in standard worsted yarn on about size 7 needles I cast on about 70 - 80 stitches.
To make a hat you just make a strip long enough to fit generously around the head. It is common for this strip to snug up as you work into it on the next round which is why you don't want to make it just snug enough to fit or it may become to tight.
Work in the round how ever you like (joining each round, working in a spiral) untill the hat is long enough for your taste. you can make it a roll brim or a beanie style, it's up to you. when the hat has cleared your ears and is to the point you think it should start to round off for the top you can reduce it.
For a long time i reduced all my hats on 4 evenly spaced corners (I did this for knitting and crochet) and just kept reducing until the opening was not much more than an inch and i would run my yarn through the stitches and cinch it closed.
You can also reduce every 10 stitches for a more rounded top. If knitting reduce every other row.
you can use any stitch pattern your want to make your hats. Plain, ribbing, cables, single crochet, double or any combination you desire... it's entirely up to you. Make it out of what ever makes you comfortable.
to reduce you generally either knit 2 together, you put your hook into 2 stitches at the same time or put your hook into one draw up a loop and into the next and draw up a loop than draw a loop through all the loops on your hook, or put your needle into 2 stitches at the same time. How ever you do it, you are turning 2 stitches into 1. If using this for nalbinding I would suggest making more drastic decreases as the rows are so tall yet the stitches are close together so it will take more reducing, I'll work 4 stitches together by putting my needle into the next 4 stitches before completing the stitch.
Tuesday, August 9, 2011
Nalbinding hat
So I've learned me a new craft... nalbinding! I don't really have time right now to post in detail about what it is exactly but it's a very old craft which predates knitting and crochet. I believe it was used in the Viking era and probably even before. It uses wool yarn and a needle to create interlocked loops of yarn. You break the yarn into workable lengths (I'm using 2 fathoms) and than spit splice them together as you run low.
the craft is so old that there is not a clear translation of how to spell it. Nalbinding is one way of a few to spell it. I am using a big fat yarn needle.
This will be a hat.
The videos I used to learn this are right handed videos and he worked with his needle in his right hand. I am working with my needle in my left hand.
Sunday, August 7, 2011
A great easy scarf pattern!
So I was rummaging through my stash last night and found this skein of green/purple camo yarn I forgot I had. Wanted to make something out of it but I knew it had to be able to be made with 1 skein as i know I would not be able to match this after so long. So I made this drop stitch scarf.
this is a easy, fast and fun knit. A great pattern if you have that 1 skein of variegated yarn you just don't know what to do with. I knit mine on size 10 needles.
I crochet up a swatch in this yarn using my brick stitch scarf pattern and it really was pretty but I just couldn't crochet this in just one skein so I used this pattern instead.
the drop stitch scarf pattern is not mine but it's a really nice pattern!
Ravelry pattern page
PDF pattern file
Saturday, August 6, 2011
Different types of color work in knitting
So I thought it would be nice to do a post about the different types of color work used in knitting.
Most common I think is stranded color work. Fair Isle is a form of stranded color work but not all stranded color work is Fair Isle.
Stranded color work is the simple process of working multiple colors in 1 row and carrying the one not used along the back. If the strand is to be carried for more than a few stitches it should be tacked up as you knit along the back to reduce the chance of long floats being snagged. I used stranded color work when I worked my Dead fish hat.
The eyes on the hat are worked in a duplicate stitch. This is a way to add color to a finished project. Instead of knitting the color as you work it you thread a yarn needle and trace the stitches with the new color to add a layer of color on top.
Fair Isle is a more intricate form of color work which has a rich history in origins and design. Only 2 colors are used in any given row but one color is switched out after only a couple rows. Fair isle is traditionally worked in the round and than the knitting is cut to create openings for sweaters and front openings. It must be steeked as a prep to cutting the yarn to prevent it from unraveling.
This is an example of traditional Fair Isle
Intarsia is a form of color worked used to add large blocks of color to a solid background. This technique does not require carrying your yarn on the back of the project. The different colors are held on bobbins and hang from the project when not being used. To transition between the 2 you must wrap your colors around each other to make the knitting flawless.
Here is a good example of intarsia
the technique used to create intarsia is not limited to adding blocks of color to a project but can be used to add borders of diffrent colors while you knit.
Slip stitch is another technique which you do not carry any colors and only work one color per row. For slip stitch designs you slip the opposing color which pulls it over the background color. This is an afghan I am making that uses slip stitch. It is worked in 6 rows of color worked in stockinette separated by 4 rows of garter (which is the gray). I slip 2 stitches while I knit the color portions and than I connect it with the gray when I knit my next band of gray which pulls the gray over the colored background.
Also I have added an edging on this in gray which is 4 stitches wide on either side. to do this I use the intarsia technique and use a bobbin to hold my gray yarn for the opposite side so this blanket has 3 strands of yarn coming off of it but only one is worked at any given time (I carry the unused strands up the edges between the color and the gray). the back just has colored bands and you cannot see the front pattern on the back.
When this photo was taken I was about 1/2 way through a band of color and you can see how the 2 gray stitches are slipped and starts to pull up. This is a stitch pattern found in the book A Treasury of Knitting Patterns
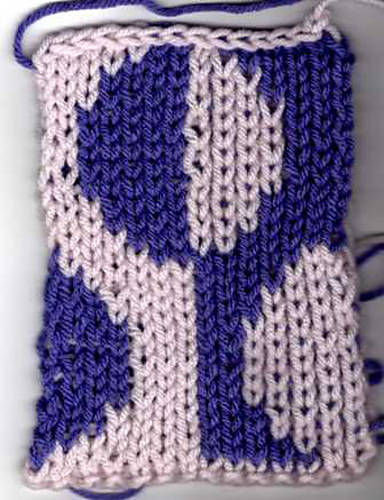
Double knitting is a technique that has you knitting 2 sides at 1 time. both sides are the right side. Often double knit designs provide a negative image on either side of the opposing side. Double knitting also can be used to create 2 completely different designs on either side of the fabric. Here is a sample I did of a double knit swatch. this was my 1st double knit so the stitches are a bit wonky. This is a pattern I pulled out of the reversible knitting book
If this was done in the more standard version of double knitting the reverse side of the spots would be a negative image of what you see here.
This more advanced form of double knitting requires you to use circular needles and you have to slide your work back and make 2 passes for each side before turning your work.
this is side A
and this is side B
Most common I think is stranded color work. Fair Isle is a form of stranded color work but not all stranded color work is Fair Isle.
Stranded color work is the simple process of working multiple colors in 1 row and carrying the one not used along the back. If the strand is to be carried for more than a few stitches it should be tacked up as you knit along the back to reduce the chance of long floats being snagged. I used stranded color work when I worked my Dead fish hat.
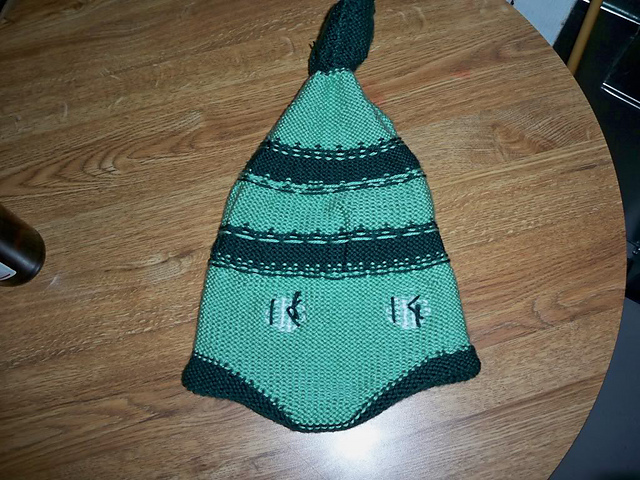
The eyes on the hat are worked in a duplicate stitch. This is a way to add color to a finished project. Instead of knitting the color as you work it you thread a yarn needle and trace the stitches with the new color to add a layer of color on top.
Fair Isle is a more intricate form of color work which has a rich history in origins and design. Only 2 colors are used in any given row but one color is switched out after only a couple rows. Fair isle is traditionally worked in the round and than the knitting is cut to create openings for sweaters and front openings. It must be steeked as a prep to cutting the yarn to prevent it from unraveling.
This is an example of traditional Fair Isle
Intarsia is a form of color worked used to add large blocks of color to a solid background. This technique does not require carrying your yarn on the back of the project. The different colors are held on bobbins and hang from the project when not being used. To transition between the 2 you must wrap your colors around each other to make the knitting flawless.
Here is a good example of intarsia
the technique used to create intarsia is not limited to adding blocks of color to a project but can be used to add borders of diffrent colors while you knit.
Slip stitch is another technique which you do not carry any colors and only work one color per row. For slip stitch designs you slip the opposing color which pulls it over the background color. This is an afghan I am making that uses slip stitch. It is worked in 6 rows of color worked in stockinette separated by 4 rows of garter (which is the gray). I slip 2 stitches while I knit the color portions and than I connect it with the gray when I knit my next band of gray which pulls the gray over the colored background.
Also I have added an edging on this in gray which is 4 stitches wide on either side. to do this I use the intarsia technique and use a bobbin to hold my gray yarn for the opposite side so this blanket has 3 strands of yarn coming off of it but only one is worked at any given time (I carry the unused strands up the edges between the color and the gray). the back just has colored bands and you cannot see the front pattern on the back.
When this photo was taken I was about 1/2 way through a band of color and you can see how the 2 gray stitches are slipped and starts to pull up. This is a stitch pattern found in the book A Treasury of Knitting Patterns
Double knitting is a technique that has you knitting 2 sides at 1 time. both sides are the right side. Often double knit designs provide a negative image on either side of the opposing side. Double knitting also can be used to create 2 completely different designs on either side of the fabric. Here is a sample I did of a double knit swatch. this was my 1st double knit so the stitches are a bit wonky. This is a pattern I pulled out of the reversible knitting book
If this was done in the more standard version of double knitting the reverse side of the spots would be a negative image of what you see here.
This more advanced form of double knitting requires you to use circular needles and you have to slide your work back and make 2 passes for each side before turning your work.
this is side A
and this is side B
Subscribe to:
Posts (Atom)