Making this tonight and it's pretty good!
5 lb. Stew beef cut into 1 1/2" chunks
1/2 c. All purpous flour
Salt & pepper
5 T. Vegtabl oil or suet
3-4 large yellow onions coarsely chopped
1 lb. White mushroom halfed or quartered
2 12 oz. Bottles Guinness Extra Stout
2 c. Beef stock
1 TSP. Brown sugar
1 TSP. Dried thyme leaves
Generous pinch of nutmeg
4 bay leaves
Toss meat, flour, salt & pepper till coated
Heat oil in large Dutch oven or stew pot. Add meat an brown thourly. Remove from pot and set aside when done.
Add the onions to the pot and cook over medium heat until they just become translucent.
Return beef to the pot and add all other ingredients with salt and pepper to taste.
Bring to a boil and cover. Continue to simmer gently for about 2 hours stirring occasionally.
If you want, you can make some Beer bread with another bottle of Guinness to go with the stew.
Saturday, March 12, 2016


Tuesday, February 9, 2016

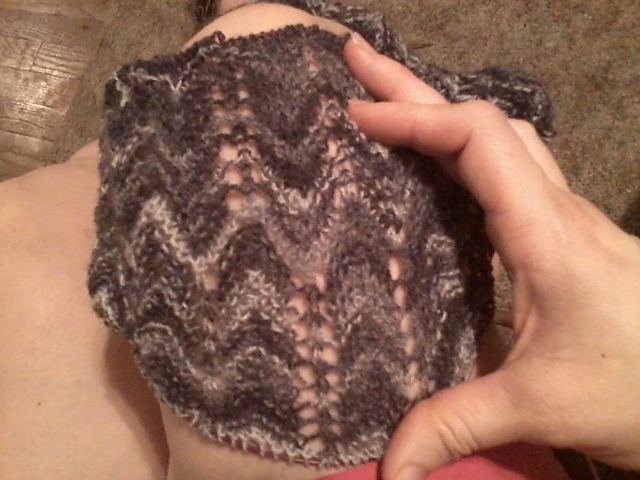
One row lace scarf
The base of this is co in multiples of:
Knit flat - 6+1
In the round - 6
Use a larger needle than called for. This yarn is some hand spun worsted and I'm using a size 9 needle.
For one I co 6+5 to create a 3 stitch garter edge.
Every row = k1, yo, k1, s1 k2tog psso, k1 yo. Repeat to end k1
This creates a richly textured fabric that is deeply rippled. Works great with self striping yarn. I will be turning minecinto s moebius cowl by grafting th ends
Tuesday, December 8, 2015
Drop stitch moebius cowl
Drop stitch moebius cowl
"The 80's will never die!"
"The 80's will never die!"

This pattern is available on Ravelry!

Fingerling weight/sock yarn. I used:
Wild Hare Fiber Studio Hand Dyed Pinnacle Sock Yarn
colorway: Neon Lights
My cowl only took about 2/3 the hank. so this does not use much yarn at all! This particular yarn is UV reactive and will glow under black light
Co 155 (multiples of 10+5. Total stitch count will be multiples of 20+10) stitches using cats moebius co. To make the stitch pattern line up properly on both sides of the co edge you need to co in multiples of 10 + 5 giving you a total stitch count of multiples of 20 + 10.
For more information about the moebius cast on and other things about the moebius (including how to deal with wrong stitch counts), see my post: Demystifying the moebius!
Setup round: Place marker at the start of the round and purl one complete round. The 1st half will be really difficult to work as you don't have stitches, but just loops and the loops will be tight on the cabel. To help with this I have interchangeable needles and put the smallest tip I have (a size 2 in my set) on the end I knit my stitches off from. The 2nd half will be easier to knit. This also helps when knitting into the row with all the yo's as they tend to choke up on the cable as its being worked.
Round 1: (k6, yo, k1, yo 2, k1, yo3, k1, yo2, k1, yo) repeat to end, m1
Round 2: purl all stitches. On multiple yo's, purl the 1st wrap while dropping the rest as you work
Round 3: knit
Round 4: purl
Round 5: k1, (yo, k1, yo2, k1, yo3, k1, yo2, k1, yo, k6) repeat to end
Rounds 6, 7, and 8 are the same as 2, 3, and 4
*Only work the M1 on round 1. On all other repeats, just work this as a single knit stitch at the end of the row!
Repeat rounds 1 - 8 until the cowl is the desired width. Bind off loosely.
I did not block mine as I like the texture and ripply look of the fabric.


Saturday, December 5, 2015
Moebius bubble cowl/scarf
Moebius Bubble Cowl


This pattern is available on Ravlery!

Yarn: premier yarns "wool-free lace"
Needles: size 2
This yarn, though labeled "lace" is more like a sock (fingerling) yarn. This pattern is easily modified for any yarn. The thicker the yarn you use, I recommend doing your sections with less stitches. Use the needle size recommended for your yarn. The finished cowl is quite warm and the stitch pattern allows plenty of stretch if you desire to use it as a hood.
I also like to use stitch markers at each knit/purl transition point.
Here is a sample of this same stitch in a thicker, hand spun yarn worked on size 6 needles and it is a 6x6 rib. this yarn is pretty much worsted.

If you intend to make this a cowl, you can either cast on provisionally and graft or do a 3 needle bind off, or cast on regularly and seam. Of course grafting will result in a seamless cowl and have a post here that deals with working the Kitchener Stitch (grafting) in pattern. It's a useful skill to have and not nearly as complicated as it may seem once you understand it.
I have this pattern charted. it's a simple pattern to adapt and also makes a great scarf if you don't want to make a moebius. As written, it's basically a 10 stitch by 10 row checker of tight and dropped stitches with twisted stitches to help keep it all tidy on the edges of the transition points. A 10x10 rib that creates a reversible bubble effect.
A close up of the stitch pattern at the point where I grafted the ends together.
You can read more about creating moebius knits here: Demystifying the moebius!
I did not block this. If you block it, you will loose the texture of the bubbles.


Demystifying the moebius!
I have a couple new moebiuses to post but thought I would post a little trouble shooting and tips post first.
For starters, when I cast on for a center out moebius I use my longest cables. I believe the are 60". I use this for all my center out moebius knits. It's the most comfortable length for me. I also like to put a small tip on the end that i will be knitting off. this makes it easier to get the stitches off the cable.
When it comes to cowls, the moebius is my preferred shape as it lies flat and you don't have any bunching at the twist.
This is regarding the center out moebius knit in the round. You can adapt any stitch pattern that looks good on both sides to a moebius knit! It doesn't even have to be the same on both sides, just has to look good.
I always use Cat's moebius co. YouTube link It's a brilliant and super fast co. But its also incredibly sloppy and somewhat difficult to count as you don't have any actual stitches on the needles until you knit 1/2 way around on round 1. Before that it's just yarn wrapped around the needles and cord.
When casting on you count the stitches being wrapped around the needle only. Each set of wraps creates a wrap on top and on the bottom cord, but only count the top!
If you are converting a regular circular cowl to a moebius, co the same amount the pattern recommends (counting top only).
When converting a nesting pattern like chevrons or drop stitch (as in the cowl I'll be posting) or a staggered pattern. You want to cast on in what ever your pattern stitch repeat is + 1/2 that. If your stitch repeat is 8, for example, you want to cast on in multiples of 8+4. The 1/2 count will let the pattern nest above and below the co line. Your grand total, on a 8 stitch repeat will be a multiple of 16+8 counting all stitches (top and bottom). Here is the cast on of the Moebius waves of Color cowl with 1/2 the stitch repeat added so that it nests (I did a few modifications to the original as well which I detailed on my Ravelry project page).

Now I have yet to cast on a center out moebius and have an accurate stitch count. It could be because its such a fast co that my hands work faster than my brain.
So after I cast on and when I'm working the 1st round, I place markers for counting. Of course ALWAYS use something to mark the start of the round! I place small markers every 20 or so stitches. If you need to adjust your stitch count, make sure to balance it on both sides of the co line! This is extremely important on nesting designs!
If you find you need to add stitches, do it in sets. If you need to add 2 stitches do a M1 and in that same spot on the other side use a locking marker and place it between the stitches on the other side so you know you need to m1 in that spot when you get there. A strand of scrap yarn tied around the spot works to.
If you have to many stitches, decrease in sets as well. K2tog and place a locking marker through 2 stitches on the other side so you know to knit them together when you get there.
You need to increase/decrease in this way for fixing stitch counts to maintain the same amount of stitches above as below to keep things lined up properly when you start your pattern.
Working a moebius flat and seaming into shape
Another cowl I made uses a 20 stitch repeat of 10x10 ribbing. When doing something like this you want a reversible pattern and offset design. When working the cowl, I work it flat like a scarf and seam it on the short ends into a moebius. In ribbing you want your rows to end opposite of how they start. Start with knits, end with purls. When you add the 1/2 twist the sides will line up.
You will also want to make sure any row repeats line up properly. The bubble cowl I made started with a bubble on the 1st column repeat. So I needed to end with a bubble being in the 1st column again so that when the twist was made it lined up properly on the other side. If you have a ribbing pattern and knits are on the left, you want to end with purls on the right so it lines up when grafted.
Also, this type of cowl requires grafting in pattern which isn't nearly as complicated as it sounds. I have a post describing how to Kitchener in pattern which will enable you to Kitchener any combinations of knits and purls. It will also help you to understand what you are doing and to tell where you are at if you have to set it down.
This is the seam of my recent pattern Bubble Moebius cowl.
The seam is the last grey row to the right of the skinny grey strip on the left. On the right you see it flat as a WIP. If you look you will notice that the bubble on the left is knit and the bubble on the right is purl. this needs to be offset like this to be able to make the 1/2 twist required to complete the moebius shape.


For starters, when I cast on for a center out moebius I use my longest cables. I believe the are 60". I use this for all my center out moebius knits. It's the most comfortable length for me. I also like to put a small tip on the end that i will be knitting off. this makes it easier to get the stitches off the cable.
When it comes to cowls, the moebius is my preferred shape as it lies flat and you don't have any bunching at the twist.
This is regarding the center out moebius knit in the round. You can adapt any stitch pattern that looks good on both sides to a moebius knit! It doesn't even have to be the same on both sides, just has to look good.
I always use Cat's moebius co. YouTube link It's a brilliant and super fast co. But its also incredibly sloppy and somewhat difficult to count as you don't have any actual stitches on the needles until you knit 1/2 way around on round 1. Before that it's just yarn wrapped around the needles and cord.
When casting on you count the stitches being wrapped around the needle only. Each set of wraps creates a wrap on top and on the bottom cord, but only count the top!
If you are converting a regular circular cowl to a moebius, co the same amount the pattern recommends (counting top only).
When converting a nesting pattern like chevrons or drop stitch (as in the cowl I'll be posting) or a staggered pattern. You want to cast on in what ever your pattern stitch repeat is + 1/2 that. If your stitch repeat is 8, for example, you want to cast on in multiples of 8+4. The 1/2 count will let the pattern nest above and below the co line. Your grand total, on a 8 stitch repeat will be a multiple of 16+8 counting all stitches (top and bottom). Here is the cast on of the Moebius waves of Color cowl with 1/2 the stitch repeat added so that it nests (I did a few modifications to the original as well which I detailed on my Ravelry project page).
Now I have yet to cast on a center out moebius and have an accurate stitch count. It could be because its such a fast co that my hands work faster than my brain.
So after I cast on and when I'm working the 1st round, I place markers for counting. Of course ALWAYS use something to mark the start of the round! I place small markers every 20 or so stitches. If you need to adjust your stitch count, make sure to balance it on both sides of the co line! This is extremely important on nesting designs!
If you find you need to add stitches, do it in sets. If you need to add 2 stitches do a M1 and in that same spot on the other side use a locking marker and place it between the stitches on the other side so you know you need to m1 in that spot when you get there. A strand of scrap yarn tied around the spot works to.
If you have to many stitches, decrease in sets as well. K2tog and place a locking marker through 2 stitches on the other side so you know to knit them together when you get there.
You need to increase/decrease in this way for fixing stitch counts to maintain the same amount of stitches above as below to keep things lined up properly when you start your pattern.
Working a moebius flat and seaming into shape
Another cowl I made uses a 20 stitch repeat of 10x10 ribbing. When doing something like this you want a reversible pattern and offset design. When working the cowl, I work it flat like a scarf and seam it on the short ends into a moebius. In ribbing you want your rows to end opposite of how they start. Start with knits, end with purls. When you add the 1/2 twist the sides will line up.
You will also want to make sure any row repeats line up properly. The bubble cowl I made started with a bubble on the 1st column repeat. So I needed to end with a bubble being in the 1st column again so that when the twist was made it lined up properly on the other side. If you have a ribbing pattern and knits are on the left, you want to end with purls on the right so it lines up when grafted.
Also, this type of cowl requires grafting in pattern which isn't nearly as complicated as it sounds. I have a post describing how to Kitchener in pattern which will enable you to Kitchener any combinations of knits and purls. It will also help you to understand what you are doing and to tell where you are at if you have to set it down.
This is the seam of my recent pattern Bubble Moebius cowl.
The seam is the last grey row to the right of the skinny grey strip on the left. On the right you see it flat as a WIP. If you look you will notice that the bubble on the left is knit and the bubble on the right is purl. this needs to be offset like this to be able to make the 1/2 twist required to complete the moebius shape.
Saturday, August 29, 2015
Row counters

These are nice counters that you can leave on your needle. You can't accidentally put them on the wrong row and they count to 100. You can also use them to track repeats of 10 rows or less.
What you need
Chain (closed loops are best. I got mine at Michael's)
Beading wire (I like the nylon coated wire)
Crimp beads
Cutters (to cut the wire)
Pliers (to crimp the crimp beads)
Lobster claw clasps
Whatever beads you like
Break the chain into 10 ring segments
Make a dangle on the lobster claw clasp and add crimp bead to secure
Add a bead to the end chain ring. This marks the bottom of the counter.
GET CREATIVE! Make them however you want. Make matching stitch markers if you want.
How it works:
As a 1-100 as row counter:
The clip represents the 10's place. The clip in the bottom ring is 0, so this is where you start.
You hang it from the needle in the corasponding ring.
Clip on the 1st ring and the 4th ring on the needle =row 4
Clip on the 5th ring and the 2nd ring on the needle=42
Move up to the next ring on the needle at the start of each row. When you've got the top ring on the needle in the next row move back to the 1st ring and move the clip up one ring.
To use as a 1-10 pattern repeat counter:
Place the clip on the ring for the last row of your repeat. Move up one ring per row. When you reach the marker you know you're on your last row of the repeat and return to the 1st ring on the next row.
Saturday, July 18, 2015
Easy cheap yarn sacks.
I do love my knitted yarn sacks. But let's face it, if I spend all my time knitting cozies for my yarn I won't have as much time to knit/crochet with all the yarn in knitted cozies!
So I went to the lingerie section of the store where they sell stockings and bought one of those big packs of knee high stockings. You get a bunch in a box and they're cheap.
Bonus is if you wear them, this is a great use for the ones that are either mismatched or have runs in them. You can also cut the feet off the full stockings you can't wear anymore.
You can then place your center pull cakes and skiens inside the stocking and it will help hold it together as you work and it gets floppy as the nylon will compress the yarn. It's also great to protect those super soft and delicate yarns that can get nappy from being taken out and stufed back into your project bag. It also keeps it clean oif it falls on the floor.
Reduce, reuse recycle!

Friday, July 3, 2015
Sagataria shawl

This is a free pattern that is available on Ravelry. You can find it here
First I would like to stress this is not my pattern. I in no way wrote it. The charts I offer here reflect my mods. They do not give instruction to make the pattern. I suggest downloading the actual pattern than using these mods if you want to.
I am making this post because I did quite a few modifications to the pattern and also charted my bead placement. I thought it would be good to explain what I did.
1st. the body of the shawl.
Cast on:
This shawl starts with a 2 stitch garter tab. I have a post the shows how to do a garter tab so that you don't have to pick up any stitches when done. You can find it here (it's actually the post just below this one)
This was a traditional Shetland lace. the original has all the decreases leaning the same way so I mirrored them. this is the same stitch pattern used in Rock Island. The charts are mirrored on both sides so I eliminated the 2nd half of the chart so it would print larger. This is what I have for the body of the shawl. If you want to use lifelines in this portion of the pattern I would suggest inserting them on any double decrease row. these rows have the most stitches which makes it easier to pick up off the lifeline if needed.
Instead of the k3tog. I did a s1, k2tog, psso. this centers the decreases
this is the chart I made for chart 1
The edging:
Here I didn't really change the chart. I did change the decreases and used both s1, k2tog, psso and s2knitwise, k1, psso
for the most part I used the later so this created straight lines of stitches with a lined up stitch on top. I did use the 1st version at the tips of the arrows to allow them to come to a clear point. I also moved the decreases from the center of the arrow to the edge to better accent the lines of the arrow heads. Again, this chart is mirrored so you don't need the other side, this allows for larger printing.
I also changed the order of the charts on the page so better see how the pattern repeats lined up with each other. The highlighted stitches are where I placed the beads I worked the stitch and than removed the loop and slipped a bead onto it before placing it back on the needle.
This bead placement does take a LOT of beads! But I think it's worth it as it really brings out the arrow pattern in the edging.
Here is my charts for the edging
The bind off:
I placed a bead at the tip of each point. I also worked the bind off in pattern. It calls for a stretchy bind off so I worked the one where you make 2 stitches and than knit them together. But I worked the 1st stitch in pattern.
So the bo on mine goes...
k2, slip back, k2tog (place bead on loop), yo, pass last stitch over the yo, *k1, slip back and k2tog* [repeat 4 times). ssk, slip back and k2tog, *k1, slip back and k2tog* [repeat 4 times]. yo pass last stitch over yo, k1, slip back and k2tog (place bead), yo, pass stitch over yo. Basically I worked the 1st stitch of the bo edge as though it were another pattern repeat than I bound it off with the last stitch I had on the needle.
I continued on in this same fashion. It's not necessary to do this, but I liked carrying the decreases to the edge.
Beads... beads... this has a LOT of beads!
when working off your edging every other cluster will turn into a arrow. Of these arrows they will stagger and every other will be shorter. the short arrows take 15 beads each and the long arrow takes 17
for the body of my shawl I worked 7 repeats. this gave me 36 full arrows along the edge 576 beads than another 70 for the increase arrows that resulted from increasing on the points. The edging took 25 beads for a grand total of 671 beads.
My beads are small and I used a size 13 crochet hook to place them on. Another method is to string them onto a beading wire than fold the end of the wire. hook the loop of the stitch with the bend of the wire and put the tip of the wire back into the bead and push the bead down onto the stitch.

Friday, May 22, 2015
No pickup garter tab
I have combined a couple techniques that has resulted in a garter tab that you don't have to pick up a single stitch to make!
1st cast on using the provisional co for toe up socks. For this sample I'll be making a 3 stitch garter tab. So I have 3 stitches on each needle.

Just pull the needle through the 3 you won't be knitting right now so they are further down the cable and out of the way.

With the 3 stitches that are on the needle
kfb, k2 turn
k3 turn
kfb, k2 turn

repeat these steps. the 1st stitch of the kfb will be the one that you would have to pick up later. Were just doing it right now. End on a kfb row. Do these steps untill you have enough stitches to equal what you would be picking up later.

You can see the 3 loops on the cabel thsn 5 stitches created by the kfb and the last 3 are the live stitches
Now pull your cable tight causing the 3 stitches from the co to pop back up to the tab. My tail is kinda in the way here, but I've moved the cable through so all the stitches atr together.

turn your work and knit across all stitches. this is the 3 live stitches, however many you have on the side (i have 5 in my sample) and the 3 from the co end.

you have just made a garter tab and didn't have to pick up a single stitch!
Here is the co to my current shawl that I used this technique for. This called for a 2 stitch garter tab and 5 stitches to pickup along the edge as well as another 2 stitches from the start.

Tuesday, February 24, 2015
New stitch pattern - Knitting
Clearly this isn't "new" if I reversed engineered it from an existing fabric. But I just worked this one out for someone on Rav who linked to a sweater and wanted to know how recreate the stitch pattern (I also happen to enjoy challenges as this). I thought I would share here as it's a rather pretty and simple stitch. Also it looks attractive on both sides.
This is a 3 color, 3 stitch, 9 row repeat
Use 3 color and work a different color each row. Trail the yarn instead of cutting if working in the round
 the stitch repeat is 3 stitches and 3 rows. but each set of 3 rows shifts 1 stitch so it takes 9 rows to complete.
this is the pattern written for working in the round
Cast on in multiples of 3
CO in multiples of 3
1. s1wyif, p, k
2. k, k, p
3. p, k, k
4. k, s1wyif, p
5. p, k, k
6. k, p, k ,
7. p, k, s1wyif
8. k, p, k
9. k. k. p
If you are working flat this is the written pattern
1. s1wyif, p, k
2. p, k, k
3. p, k, k
4. k, s1wyib, p
5. p, k, k
6. p, k, p
7. p, k, s1wyif
8. p, k, p
9. k. k. p
Here is a chart. I didn't number the rows and you can use it for flat or in the round. Bold is the pattern repeat. I wrote the slip stitch as keeping the yarn on the right side of the fabric in case anyone uses this for flat work. Keeps it from getting over complicated.

This is a 3 color, 3 stitch, 9 row repeat
Use 3 color and work a different color each row. Trail the yarn instead of cutting if working in the round
this is the pattern written for working in the round
Cast on in multiples of 3
CO in multiples of 3
1. s1wyif, p, k
2. k, k, p
3. p, k, k
4. k, s1wyif, p
5. p, k, k
6. k, p, k ,
7. p, k, s1wyif
8. k, p, k
9. k. k. p
If you are working flat this is the written pattern
1. s1wyif, p, k
2. p, k, k
3. p, k, k
4. k, s1wyib, p
5. p, k, k
6. p, k, p
7. p, k, s1wyif
8. p, k, p
9. k. k. p
Here is a chart. I didn't number the rows and you can use it for flat or in the round. Bold is the pattern repeat. I wrote the slip stitch as keeping the yarn on the right side of the fabric in case anyone uses this for flat work. Keeps it from getting over complicated.
Sunday, December 21, 2014
Designing tip
I mostly chart my stuff in Excel. I like it, it's easy and you can do some neat things with it. I'm making a shrug based on a stitch pattern in an old book. The pattern was written so I had to chart it. It's a busy pattern so charting it wasn't the easiest to transfer from flat written to charted in the round.
This is a section of the chart i printed for decreasing. Te center is the pattern repeat and the sides are the repeat sections I will be decreasing. I have shaded lines across the chart on the decrease rows and I changed the font for the sections I will decrease to a really light font. I printed this out and it allows me to see what the pattern repeats are supposed to do and I can adjust and over wright with a pen the changes I made as I decrease. I use a pencil and shade in "no stitch" areas as I get rid of sections and can easily decided when it's to narrow to continue in pattern. When I am done I will go back in and make the changes to the chart to reflect what it really needs to be.
The dark row at the bottom is an unaltered pattern repeat for reference to build off of.
 Here is what it looks like in progress with notes over written. I take this back to the computer and update the chart.

And this is what I'm working on

This is a section of the chart i printed for decreasing. Te center is the pattern repeat and the sides are the repeat sections I will be decreasing. I have shaded lines across the chart on the decrease rows and I changed the font for the sections I will decrease to a really light font. I printed this out and it allows me to see what the pattern repeats are supposed to do and I can adjust and over wright with a pen the changes I made as I decrease. I use a pencil and shade in "no stitch" areas as I get rid of sections and can easily decided when it's to narrow to continue in pattern. When I am done I will go back in and make the changes to the chart to reflect what it really needs to be.
The dark row at the bottom is an unaltered pattern repeat for reference to build off of.
And this is what I'm working on
Saturday, November 1, 2014
Carving Starry Night

So this Halloween i decided to tackle Van Gogh's Starry Night. To do this I have some wood carving tools I picked up at Michael's craft store. Clay tools really aren't sharp enough. i also have a couple small loops for carving out.
I printed off the picture. To conserve ink I just printed it under the "draft" setting. Didn't need a really nice print, just to get the idea. I used a regular ball tip pen to transfer it to the pumpkin. I did this freehand. You can make a couple pricks through the print to get a few points for size reference.

To start carving i clipped my print to a board so I could have it to look at as I went. After gutting the pumpkin and thinning the walls I got one of the tap lights that are battery powered and put it inside. I put the light in a sandwich bag 1st so it didn't get pumpkin on it. I liked the light so much that we ended up using it instead of candles when we were done.
To get the walls a uniform thickness i have a needle probe in my set and poked it through teh wall in several spots to cofirm that it was all the same thickness. I scraped it to about 1/2 - 3/4 inch thickness.

I used a small curved blade for most of the pumpkin. To get the crisp outlines I partially cut into the skin following the lines I made than used a flat chisel blade and cut towards the outline cuts and chipped out small bits to create the outlines.
Slowly carve in layers! You can't un-carve. I worked away at he moon with large and small curved blades. I used a hole punch for the stars (you can see the tools in the background... and the pumpkin all over me!)

Pumpkins like this are in revese. The deeper you go the brighter the spots get. I used the edge of the angled chisel to scrape the deepest lines by the mountain and moon. the Moon is nearly cut through on the outer edge and I did cut through around the points and circle

For the buildings I poked in straight with a flat chisel than cut towards my 1st cut to chip out the flesh.
This angle shows the moon well.

When I'm done I wash the pumpkin inside and out to get any hanging bits. this really does make a huge difference in how clean the lines of a pumpkin look! i than went and checked for any areas that needed touch ups.
This was only the 2nd time I have done a shadow pumpkin. I really am happy with this. I think I could have had more depth around the stars, but this is pretty good!

My daughter Anja's pumpkin

You can see the tap light in this one. They really do work great!


Friday, April 11, 2014
Weaving in ends - knitting
I just came across this amazing post with excellent photos detailing many ways to weave in ends in your knitting and thought I would pass it on.
http://www.purlbee.com/knitting-tutorials-finishing/2011/7/14/weaving-in-your-ends.html
http://www.purlbee.com/knitting-tutorials-finishing/2011/7/14/weaving-in-your-ends.html
Tuesday, January 21, 2014
Lasagna
Posting my lasagna recipe.
1. because it's good
2. I thought i lost it when I lost my cooking program files but found a paper copy and don't want to loose it for real.
I actually double this when I make it
1 lb ground beef (I use Bob Evans Italian roll sausage)
1 can tomato sauce
2 jars spaghetti sauce
I used my own sauce so don't add these ingredients, will post sauce recipe
chopped onion to taste
chopped bell pepper to taste
2 tbsp chopped parsley (to taste)
1 tbsp chopped oregano (to taste)
minced garlic (to taste
1 cup small curd cottage cheese
1 container ricotta cheese
1 egg
mozzarella cheese - shredded to taste
1/2 cup grated Parmesan
combine parsley, ricotta, cottage cheese, oregano and egg
preheat oven to 350ºF
I do not fully cook the pasta, I just boil it till it's a little bit soft but still
In pan coat bottom with sauce
layer with pasta, ricotta mix than mozzarella (save some mozzarella for end)
repeat layers ending with sauce.
cover and bake about 35 minutes
uncover and top with remainder of the mozzarella and Parmesan and return to oven uncovered for another 10 minutes.
For my spaghetti sauce I brown 1 lb roll Bob Evans Italian sausage I add the onions and bell pepper with the sausage. I combine that all into a pot with 1 28oz can tomato sauce and 1 14.5 oz can Italian style diced tomatoes. Add in what ever you like to sauce (mushrooms and such). I also add about 1 tbs honey (or brown sugar).
simmer down to desired consistency.
Tuesday, January 7, 2014
Tunisian lattice throw

This throw is tunisian crochet on the bias and has a simple but elegant texture. For mine I used Caron Simply Soft in Heather Grey and it took about 5.25 skeins. This pattern is written and will allow you to make this as wide or long as you like. If you want to switch up the edging or add open spaces to it, it is easy to modify.
The pattern is written
Tools:
Tools 6mm / J extended tunisian/afghan hook (or long straight hook). 6 skeins 1500 yards / 852 grams Caron Simply Soft Heather Grey
I have 3 downloads for this pattern.
Tunisian Lattice Throw- mirror. This pattern includes photo instructions on how to create the tunisian stitches and they are left handed.
Tunisian Lattice Throw - standard - This is the same print but I have went and flipped all the images so they appear right handed.
Tunisian Lattice Throw - Chart (left hand) - This is a chart for this pattern. It is a left hand chart ( read left to right) if you are right handed and read patterns right to left you will want to either go into your advanced printers settings and print this as a mirror image so that you will be able to read it right to left. Or just read the printed chart left to right. This chart does not have detailed stitch directions so use it along with the instructions on the written patterns.
The 1st pages are just bare bones with 2 images. I than follow with photos on separate pages to show how to do the various tunisian stitches required for this pattern. This will allow you to just print the pattern or print the photos and tutorials.
I think this blanket works best with a medium shade yarn. Nothing to bright or dark or the texture will be harder to see. Also I chose a solid grey but Tunisian tends to play well with variegated yarn.
This would make a lovely large blanket, just be cautious to make sure you purchase enough yarn as this does consume a LOT of yarn!
This is also on Ravelry

I don't know why these pictures are showing up sideways,


Saturday, December 21, 2013
2013 Cookie party!

This is my post for my 2013 cookie party! I have started a tradition for family and friends that every year I throw a cookie party. This year will be 3D Christmas scene involving sleigh, reindeer, trees and snowman. I will add to this post as the event evolves. I am making the sleigh and reindeer out of gingerbread cookies and the trees and snowman out of sugar cookie dough. I will pre-color the tree dough green.
This is the gingerbread recipe that I am using. It is included in the cookie set.
Gingerbread cookies
(This recipe states it's lighter than those used for houses so suitable for small cookies. See my cookie party 2012 post for a gingerbread house recipe.
Have ingredients at room temperature before starting
Combine and sift together than
set aside
5 c. flour
½ t. Baking soda
1T. Ground ginger
4t. Ground cinnamon
¾ t. ground cloves
1t. Nutmeg
1t. Allspice
1 ½ t. salt
½ t. Baking soda
1T. Ground ginger
4t. Ground cinnamon
¾ t. ground cloves
1t. Nutmeg
1t. Allspice
1 ½ t. salt
In the bowl of an electric mixer,
using flat beater, beat on medium-high speed until fluffy and pale yellow (4-6
minutes)
2 sticks (1 cup) butter
Add and beat for 1 minute
½ c. firmly packed brown sugar
½ c. granulated sugar
½ c. granulated sugar
Reduce speed to low and beat in, until
well combined (about 1 minute)
1 c. molasses
Add and beat until well combined
1 egg
Add the flour mixture in 4
portions, beating in each addition before adding more. Stop and scrape down
sides of bowl occasionally.
Turn dough out onto floured
surface and with floured hands divide into 4 sections. Shape each section into
a disc and wrap in plastic wrap, parchment paper or other material and
refrigerate at least 2 hours or up to 2 days.
Preheat oven t o400ºF (200ºC)
Remove dough 1 disc at a time and
let stand 10 minutes. Roll out to ¼ “- 3/8” thickness and cut.
Bake cookies until lightly
browned on the bottom (4-5 minutes for smaller cookies 6-7 minutes for larger
cookies).
Let cookies cool on the sheet for
5 minutes before removing and placing on cooling rack. Trim cookies while warm
as needed
12-22-13
Cookie party was a success (as it usually is). I found some silicone molds for $1.99 at our grocery store (Meijer's) so I melted Jolly rancher candies into them. the gingerbread men and snowflakes took 1 candy. and I used 3 for the presents to fill the bow space.


 For the candy decorations we had...
12-22-13
Cookie party was a success (as it usually is). I found some silicone molds for $1.99 at our grocery store (Meijer's) so I melted Jolly rancher candies into them. the gingerbread men and snowflakes took 1 candy. and I used 3 for the presents to fill the bow space.


And as for the cookies.... it was FUN! We had lots of candy to decorate with and a room full of creative people who have unique senses of humor is always a good thing.

This one belonged to a friend of mine. Her and her husband love to do cookie stuff.


This is my niece with her decked out tree


Another friend has their sleigh running over some poor gummy bears!

And my daughter made a full on cookie crime scene!


- colored sugar
- candy corn
- mints
- gummy bears
- gummy worms
- sour gummy worms
- chocolate covered raises
- spice drops
- pull and peel twizlers
- peppermint candies
- mini M&M's
- mini reses cups
- smarties
- candy pearls (in assorted colors and sizes)
- jelly beans
- icing
- buttercream frosting
- royal frosting
Subscribe to:
Posts (Atom)